Thursday, July 31, 2025

Korean Veggie Pancakes

 Discover the secret to quick & easy Korean veggie pancakes! Perfectly crispy, healthy, and ready in just 15 minutes. Try this delicious recipe today! 

Ingredients

For the Pancakes:

1 cup all-purpose flour 

2 tbsp cornstarch 

3/4 cup cold water 

1/2 cup julienned carrots 

1/2 cup julienned zucchini

1/4 cup chopped green onions 

1/4 tsp salt 

Vegetable oil for frying 

For the Dipping Sauce:

2 tbsp soy sauce 

1 tbsp vinegar 

1 tsp sesame oil 

1/4 tsp red chili flakes 


Preparations

Start by washing and julienning the carrots and zucchini into thin, uniform strips. Chop the green onions into small pieces. For best results, pat the vegetables dry with a paper towel to remove excess moisture. This step ensures the pancakes fry up crispy. 

 In a large mixing bowl, combine the all-purpose flour, cornstarch, and salt. Gradually add the cold water while whisking until you achieve a smooth, lump-free batter. Cold water is essential for creating a light and crispy texture.

Fold the prepared vegetables into the batter, ensuring they’re evenly coated. Heat a non-stick pan over medium-high heat and add a tablespoon of vegetable oil. Once the oil is hot, pour a ladleful of the batter into the pan, spreading it out thinly with the back of a spoon. Cook for 2-3 minutes on each side, or until the pancake is golden brown and crispy. Continue cooking the remaining batter, ensuring to add a little more oil between batches to maintain crispiness. 

Prepare the Dipping Sauce

While the pancakes are cooking, whisk together the soy sauce, vinegar, sesame oil, and red pepper flakes in a small bowl. Adjust the seasoning to taste.

Tips for Perfect Pancakes

Use Cold Water: This trick helps the batter stay light and airy, resulting in crispier pancakes.

Don’t Overload the Pan: Cook one pancake at a time to ensure even frying and a perfect golden crust.


https://gscrochetdesigns.blogspot.com. one can see my crochet creations  

https://kneereplacement-stickclub.blogspot.com. for info on knee replacement

https://cancersupportindia.blogspot.com  for info on cancer and health related topics

https://GSiyers home remedies.blogspot.com   is the latest addition to my blogs

Crispy Vegetable Pancakes with Dipping Sauce

Ingredients

For the pancakes

1 cup shredded carrots

1 cup shredded zucchini (squeezed to remove excess moisture)

1/2 cup shredded potato (optional, for extra crispiness)

1/2 cup finely chopped cabbage
 
2 green onions, finely chopped
 
2 large eggs
 
1/4 cup all-purpose flour
 
2 tbsp cornstarch
 
1 tbsp soy sauce
 
1/2 tsp sesame oil
 
Salt and pepper, to taste
 
Vegetable oil, for frying
 This may contain: a plate with some food on it and a dipping sauce in the bowl next to it
 
For the dipping sauce
 
2 tbsp soy sauce
 
1 tbsp rice vinegar
 
1 tsp sesame oil
 
1 tsp honey or sugar
 
1/2 tsp grated ginger
 
1/4 tsp chili flakes (optional, for heat)
 
1 tbsp water (to thin sauce, if needed
 
 
Preparations for the pancakes
 
In a large bowl, combine the shredded carrots, zucchini, potato (if using), cabbage, and green onions.
 
In a separate small bowl, whisk together the eggs, flour, cornstarch, soy sauce, sesame oil, salt, and pepper.
 
Add the egg mixture to the vegetables and stir until everything is evenly coated.
 
Fry the pancakes
 
 Heat 2 tablespoons of vegetable oil in a large skillet over medium heat.
 
Once the oil is hot, drop spoonfuls of the vegetable mixture into the skillet, flattening them into small pancakes with the back of the spoon.
 
Fry the pancakes for 3-4 minutes on each side, or until they are golden brown and crispy. You may need to add more oil as you cook the pancakes in batches.


Prepare the dipping sauce:

 In a small bowl, whisk together the soy sauce, rice vinegar, sesame oil, honey, grated ginger, and chili flakes (if using).

Add a bit of water to thin the sauce, if needed.

To serve-

Once the pancakes are cooked, drain them on a paper towel-lined plate to remove excess oil.

Serve the crispy vegetable pancakes with the Asian dipping sauce on the side.

 Note- you may add veges of your choice while making the pancakes


https://gscrochetdesigns.blogspot.com. one can see my crochet creations  

https://kneereplacement-stickclub.blogspot.com. for info on knee replacement

https://cancersupportindia.blogspot.com  for info on cancer and health related topics

https://GSiyers home remedies.blogspot.com   is the latest addition to my blogs

Ricotta Lime Squares with Almond Crunch

 This may contain: a close up of a cake with almonds on it 

Ingredients

2 cups whole milk ricotta, well-drained OR fresh / soft paneer

¾ cup granulated sugar 

3 large eggs, separated

2 tbsp lemon zest

¼ cup Limoncello OR lime juice as per taste

¾ cup all-purpose flour (for a softer crumb)

1 tsp baking powder

¼ tsp salt

¼ cup melted butter, plus more for greasing

½ cup sliced almonds

Powdered sugar, for finishing


Preparations

 Set oven to 325°F (165°C). Grease your 9×9-inch pan and line with parchment (leave an overhang for easy lift-out).

In a large bowl, combine ricotta, sugar, egg yolks only, lemon zest, limoncello/ lime juice, and melted butter. Whisk until smooth and creamy. 

In a second bowl, whisk together the flour, baking powder, and salt.

Gently fold the dry mix into the ricotta mixture—don’t overmix! You want the batter light and airy.

In a clean third bowl, beat the egg whites until soft peaks form. Add 1 tablespoon sugar gradually while whipping to stabilize them.

Gently fold the whipped whites into the batter in two additions, using a spatula. Fold just until combined. This is what makes the texture cloud-like!

Pour batter into your prepared pan. It’ll be thick but smooth. Scatter the sliced almonds on top, pressing just lightly so they stick.

Bake for 35–40 minutes, or until the edges are golden and a toothpick inserted in the center comes out with moist crumbs (not wet batter). The center will still jiggle slightly—this is perfect.


https://gscrochetdesigns.blogspot.com. one can see my crochet creations  

https://kneereplacement-stickclub.blogspot.com. for info on knee replacement

https://cancersupportindia.blogspot.com  for info on cancer and health related topics

https://GSiyers home remedies.blogspot.com   is the latest addition to my blogs


Date and Walnut cake

 Date and Walnut Cake 

Ingredients

1 cup pitted dates (chopped)

1 cup walnuts (chopped)

1 tsp baking soda

1/2 tsp salt

1 cup all-purpose flour

1/2 cup unsalted butter (softened)

1 cup brown sugar (packed)

2 large eggs

1 tsp vanilla extract

1/2 cup water (boiling)


Preparations

Start by preheating your oven to 350°F (175°C). Grease and flour an 8-inch round cake pan or line it with parchment paper for easy removal.

In a small bowl, combine the chopped dates and boiling water. Allow them to sit for about 10 minutes to soften and plump up. Afterward, stir in the baking soda and set aside.

In a large mixing bowl, cream together the softened butter and brown sugar using a hand mixer until the mixture is light and fluffy. This should take about 3-4 minutes.

In a large mixing bowl, cream together the softened butter and brown sugar using a hand mixer until the mixture is light and fluffy. This should take about 3-4 minutes.

In another bowl, whisk together the all-purpose flour and salt. Gradually add the dry mixture to the wet mixture, alternating with the date mixture, and mix until just combined. Do not over-mix. 

Fold in the chopped walnuts gently into the batter. 

Pour the batter into the prepared cake pan and spread it evenly. Bake in the preheated oven for 30-35 minutes, or until a toothpick inserted into the center comes out clean.

Once baked, allow the cake to cool in the pan for about 10 minutes before transferring it to a wire rack to cool completely. Slice and serve, either plain or with a dusting of powdered sugar.

Substitutes

 Whole Grain Flour: Substitute all-purpose flour with whole wheat flour for added fiber.

Nut Butter: Swap butter for almond or coconut oil for a dairy-free option.

Natural Sweeteners: Use coconut sugar or maple syrup as a sugar alternative.


https://gscrochetdesigns.blogspot.com. one can see my crochet creations  

https://kneereplacement-stickclub.blogspot.com. for info on knee replacement

https://cancersupportindia.blogspot.com  for info on cancer and health related topics

https://GSiyers home remedies.blogspot.com   is the latest addition to my blogs

Coconut Almond Ckikki

 Recipe image thumbnail 

Ingredients

2 cups sugar

1/3 cup corn syrup / honey/ maple syrup

2/3 cup water

1/2 tsp salt

2 tbsp butter

1 cup coconut flakes

1/2 cup whole almonds

1 tsp vanilla


Preparations

Prepare a half baking sheet with a silicone baking mat and set asides.

Combine sugar, corn syrup/ honey and water in a large saucepan. Stir until sugar is dissolved.

Once dissolved, cook without touching or stirring until temperature reaches 265 degrees. Add salt and butter and cook further to 300 degrees.

Pour sugar mixture onto prepared baking sheet and sprinkle the coconut flakes and almonds evenly across the pan.

Allow to cool completely for up to one hour. Break up into desired pieces and serve.

OR

make syrup of 2 string consistency, add coconut, almonds, vanilla, give a quick mix, spread on a greased plate, mark pieces, as once it hardens it will be difficult to cut.


https://gscrochetdesigns.blogspot.com. one can see my crochet creations  

https://kneereplacement-stickclub.blogspot.com. for info on knee replacement

https://cancersupportindia.blogspot.com  for info on cancer and health related topics

https://GSiyers home remedies.blogspot.com   is the latest addition to my blogs


Quinoa Almond Chikki

 Ingredients

1/2 cup uncooked white quinoa

3/4 cup almonds, chopped

1/3 cup rolled oats

2 tbsp black chia seeds

2 tbsp coconut sugar

1/2 tsp vanilla extract

1/8 tsp sea salt

2 tbsp coconut oil

2/3 cup pure maple syrup / honey

 This may contain: someone picking up some food from a white plate

Preparations

Preheat oven to 325°F and line a baking sheet with parchment paper, then set aside.

In a medium mixing bowl, combine the quinoa, almonds, oats, coconut sugar, chia seeds, coconut sugar, and sea salt and stir to combine.

Add the melted coconut oil, vanilla extract, and pure maple syrup. Stir until fully mixed.

Spread the mixture into an even layer on the parchment paper and bake for 12–15 minutes, watching carefully to avoid burning. The brittle is ready when the color is evenly golden brown and the edges begin to darken, get bubbly, and spread farther out.

Let cool completely before breaking into bite-size pieces with your hands.


https://gscrochetdesigns.blogspot.com. one can see my crochet creations  

https://kneereplacement-stickclub.blogspot.com. for info on knee replacement

https://cancersupportindia.blogspot.com  for info on cancer and health related topics

https://GSiyers home remedies.blogspot.com   is the latest addition to my blogs


Leftover roti Tacos !

At times we've left-over roti, some dry veges, all that can be used to make a quick snack. Whatever veges you've mash it well, add some finely chopped onion, finely grated carrot, add salt, chili pdr and other preferred masalas to taste, along with chopped coriander leaves.

Heat a pan/ tawa, spread some oil./ ghee,  flatten the veges to the size of the roti, OR make with the veges like a thick cutlet, put a roti on top press it well, the veges will spread all over the roti. Now cook the vege- side down, press it on top well, after 2-3 minutes on medium flame, it will get cooked well, flip it, cook the roti side for a minute, then fold into half, you may spread some mayo, sauce of your choice, some cheese and salad and serve hot to the family. It will be a hit. Your family will now ask you to make extra rotis to make tacos !


Important tip- How to have boiled potatoes always handy !

Whenever, I use pressure cooker to cook, rice, lentils, I wash and cook few potatoes along with it. Once the pressure is released, keep the potatoes out, let the water drain, then keep it in a bowl, without peeling the potatoes, it will come in handy, like to make cutlet for tacos, or use to make quick poha. It will last more than a week in the fridge.  


https://gscrochetdesigns.blogspot.com. one can see my crochet creations  

https://kneereplacement-stickclub.blogspot.com. for info on knee replacement

https://cancersupportindia.blogspot.com  for info on cancer and health related topics

https://GSiyers home remedies.blogspot.com   is the latest addition to my blogs


Wednesday, July 30, 2025

Oats Almond Apple Date Smoothie

Ingredients

1 Apple, peeled and diced
3 Dates, pitted
10 Whole Almonds , soaked in water for 30 minutes
1 cup cold Milk
 
 2 tbsp Instant Oats 
 
 
Preparations
 

Blend Apple, oats, dates, almonds with just half the milk, until smooth in a blender.

Add the remaining milk and blend again to combine well. Open the jar and pour the smoothie in a glass and serve.


https://gscrochetdesigns.blogspot.com. one can see my crochet creations  

https://kneereplacement-stickclub.blogspot.com. for info on knee replacement

https://cancersupportindia.blogspot.com  for info on cancer and health related topics

https://GSiyers home remedies.blogspot.com   is the latest addition to my blogs


Cheesy Garlic Spinach Corn Paneer Sandwich

paneer corn sandwich from www.indianhealthyrecipes.com  

Ingredients

2 cloves Garlic, finely chopped
2 cups Spinach, finely chopped
1 cup Sweet corn, frozen and thawed
1 tbsp Whole Black Pepper Corns, coarsely pounded
1 cup Paneer (Homemade Cottage Cheese), cut into small cubes
1/4 cup processed Cheese grated
2 tbsp Mayonnaise
8 Whole Wheat Brown Bread, slices
2 tbsp Butter (Salted)


Preparations

To begin making the Cheesy Garlic Spinach Corn Paneer Sandwich Recipe, heat herb butter in a wide pan and allow it to melt. Once it is heated, add garlic and saute till the aromas from the garlic is released.

Once done add in the spinach and saute the spinach for about 3 to 4 minutes until the spinach wilts. After the spinach has wilted add the steamed corn, paneer and grated cheese. 

Keep stirring until the moisture from the spinach goes away.  Once all the moisture has evaporated add the coarsely pounded black pepper, Egg-less Mayonnaise and stir well to combine. Taste the mixture and add salt and pepper if required.

The next step is to assemble the Spinach Corn Paneer Sandwich.

Take 4 slice of bread and place them on a counter. Spread some paneer and corn filling on two slices of bread and cover the filling with another slice to make a sandwich. 

Spread Herbed butter on both the sides of the sandwich and Grill the Cheesy Garlic Spinach Corn Paneer Sandwich on a preheated pan till it turns brown and crisp on both the sides.

Once done transfer the Cheesy Garlic Spinach Corn Paneer Sandwich onto a serving plate. Cut it in half and serve immediately.


https://gscrochetdesigns.blogspot.com. one can see my crochet creations  

https://kneereplacement-stickclub.blogspot.com. for info on knee replacement

https://cancersupportindia.blogspot.com  for info on cancer and health related topics

https://GSiyers home remedies.blogspot.com   is the latest addition to my blogs


Nuchinunde- steamed lentil dumplings- NO FAT, FULL OF PROTEIN AND FIBER !

Nuchinunde recipe from hebbarskitchen.com  

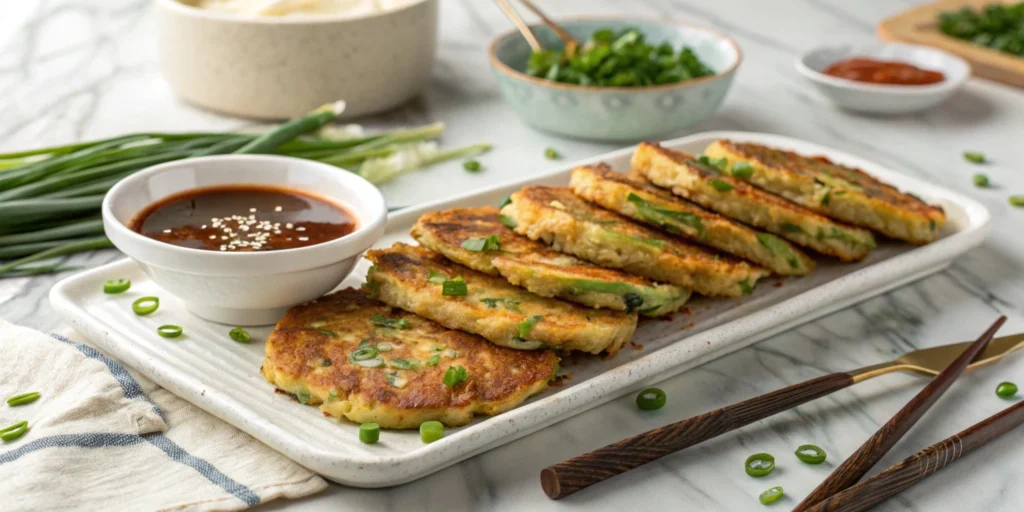
Nuchinunde is a protein-rich, delicious breakfast option suitable for the whole family.  t tastes great when served hot with ghee most importantly. Coconut chutney or any other side dish of your choice. 

Nuchinunde has to be soft and moist but well cooked

Nuchinunde can simply be called steamed lentil dumplings.

The lentils, toor dal, moong dal, and chana dal are soaked for a couple of hours, drained, and ground coarsely with basic spices like ginger, pepper, cumin.

Generous amounts of chopped coriander, curry leaves, grated coconut are also added to the ground mixture.

This is then shaped into cylindrical dumplings and steam cooked.

Zero oil, completely lentil based, and absolutely delicious. 

Lentils are rich in fiber fiber, complex carbohydrates, varied minerals like iron, folate, potassium, manganese, and have a low glycemic index (GI).

Being an excellent vegan/vegetarian protein-source that is also gluten-free, lentils are also known to promote gut health.

Lentils contain anti-nutrients like trypsin and phytic acid that inhibit the absorption of nutrients.

Therefore, it is important to soak the lentils for a couple of hours and discard the water before cooking them.

Spices like ginger, cumin, pepper, and herbs like coriander and curry leaves are also used in this.

Not only do they add lot of flavor, but they all aid in good digestion of the lentils and avoid bloating.

The addition of coconut contributes to the good fat content in nuchinunde. Good fat is extremely essential  to the body for multiple reasons, one of them being that it helps protein do its job.

You can also add finely chopped onions, but ensure that you immediately shape the mixture into balls and steam them as onions leave moisture to the mixture.

Tip: If the mixture has turned a little soggy after adding onion, add in more grated coconut and shape them immediately. Do not squeeze the mixture or mix it too much after adding coconut.


Ingredients

Measurement: 1 cup = 250 ml

To grind

1/2 cup tuvar dal

1/2 cup moong dal

2 tbsp chana dal

3 green chilies or to taste

1/2 tsp fresh ginger - finely chopped

1/2 tsp black pepper pdr

1/2 tsp cumin seeds

1 tsp salt or to taste

 To add to the ground mixture

a handful coriander leaves finely chopped

2 sprigs fresh curry leaves - finely chopped

4 tbsp fresh grated coconut

1/4 tsp turmeric powder

a pinch of asafoetida


Preparations

Wash the three lentils well until water runs clear and soak them in about 3 cups of water for 2 hours. The lentils would have then soaked well, turned soft, and easily breakable.  Next, drain the lentils well in a colander or spread on a kitchen towel so that the water content is removed as much as possible.  Transfer the well-drained lentils to a mixer jar along with green chilies, ginger, black pepper, and cumin seeds. Since I used rock salt, I added it too to grind.  Without adding any water grind the mixture slightly coarsely. Ensure that you don't grind it too smooth.  Transfer the ground mixture into a bowl and add chopped coriander leaves, curry leaves, grated coconut, turmeric powder, and asafoetida.

If you did not add salt while grinding, add it now.  Mix everything well and immediately shape the mixture into oval-shaped dumplings and place them on a steamer plate or idli plates.  In case the ground mixture is too smooth and you are not able to shape them, add lot more grated coconut.  
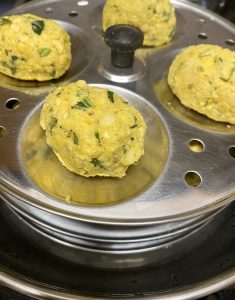
Meanwhile pour water into your steamer or idli cooker and bring it to a boil. Once it starts to boil, place the idli stand or the steamer plate inside. Close the lid and steam it for 10 minutes.  After 10 minutes take out the idli stand or steamer rack and let the nuchinunde cool a bit. They might look under-cooked at this stage, but they harden up a bit and get the right texture on cooling.  Remove the nuchinunde from the idli plates/steamer and serve hot with ghee and coconut chutney, or any chutney/ brinjal / tomato gotsu.  Notes
  1. Do not steam the nuchinunde for more than 12 minutes, as they will turn hard. 
  2. If you want to store the mixture or make the nuchinunde in batches, do not add salt at once. Add it just before steaming the nuchinunde. If not, the mixture will turn slightly runny and you will not be able to shape them. 
  

https://gscrochetdesigns.blogspot.com. one can see my crochet creations  

https://kneereplacement-stickclub.blogspot.com. for info on knee replacement

https://cancersupportindia.blogspot.com  for info on cancer and health related topics

https://GSiyers home remedies.blogspot.com   is the latest addition to my blogs