Showing posts with label furniture. Show all posts

Sunday, June 2, 2024

20 Surprising Uses for Lemons

Lemons are citrus fruits with a great aroma that blends wonderfully with food and drinks. Lemons also have many other uses thanks to their antibacterial properties, as well as being rich in vitamin C. They are strong antioxidants and contain 5% acid, meaning they are very useful for a whole range of things.

To maximize the usefulness of lemons, we have collected 20 of the best things to do with them besides cooking! 
 
1. Ant repellent

lemon uses
Pour some lemon juice around any infested areas to keep them at bay!
 
 
 2. Air freshener
An equal amount of water and lemon juice placed in an air freshener will supply your house with a nice, fresh scent. 
 
 
3. A clean tub
An equal amount of water and lemon juice can also be very effective at cleaning the mildew and fungus that accumulates on the sides of your shower or tub.
 
 
 4. Disinfectant
A small amount of lemon juice can be a great addition to vinegar as a cleaning agent. Not only will it neutralize vinegar's strong smell - it will also fortify vinegar's disinfecting properties. 
 
 
5. Microwave
Heat up a bowl of water and lemon wedges in the microwave for 30-60 seconds. Once you've done so, try cleaning the inside of your microwave. Those previously hard-to-remove stains will now be easily removed and the 'food smell' will be neutralized. 
 
 
6. Refrigerator
Storing half a lemon in the fridge will help prevent unpleasant odors.  
 
 
7. Cleaning chrome/brass/copper
Mix lemon juice with drinking soda and dip a clean hand towel into the mixture. Wipe down chrome, brass or copper surfaces thoroughly, then rinse well and wipe down with dry paper to make them look like new! 


8. Bathroom
Mix half a cup of borax powder with a glass of lemon to clean the toilet perfectly, leaving it smelling fresh and clean.  
 
 
9. Faucets and sinks
Use half a lemon to remove limescale buildup on your sinks and faucets. Rinse well and reapply as required. 
 
 
10. To make your laundry whiter
Add half a cup of lemon juice to a white wash, then hang up your clothes when the cycle is done. A teaspoon of lemon juice in the machine during the wash cycle will also give your fabric a fresher smell. 
 
 
11. Dishes
 To remove fatty substances on utensils, try adding a teaspoon of lemon juice to the dish soap.


12. Drainage
A mixture of hot lemon juice and drinking soda can help to improve your drainage by unclogging it. 
 
 
13. Trash can
If you throw lemon peel in the trash, it will help to neutralize the bad odors coming from the rest of the foodstuffs in there. 
 
 
14. Cutting Board
Rub half a lemon on a wooden cutting board, leave it like that overnight, then wash it the following day. The lemon juice will help to kill any bacteria that has accumulated on the board, and neutralize any bad odors. 


15. Glass and Mirrors
Mixing four tablespoons of lemon juice with two liters of water creates an effective mixture for cleaning windows, mirrors and glass surfaces.


16. Furniture
Add one part lemon juice to two parts of olive or cooking oil to create a wonderful agent for polishing furniture.


17. Hair brightening
Pour some lemon juice onto your hair and sit for an hour in the sun in order to brighten it a shade or two.
 
 
18. Hair softening
Lemon juice mixed with a glass of warm water can be used as a great hair mask. Soak your hair in the liquid for a few minutes and then rinse thoroughly. If you have a sensitive scalp, this may not be the solution for you. 
 
 
19. Cuts, stings, and skin irritation
Pour a small amount of lemon juice on small cuts. Although it will probably sting, it should help to stop any bleeding and disinfect the wound. In addition, applying lemon juice to stings should alleviate the feeling of discomfort and itchiness.
 
 
20. Removing bad smell from hands
If you were handling something odorous like fish or onions, washing your hands in lemon juice is a great way to get rid of those odors without drying or damaging your skin.


https://GSiyers home remedies.blogspot.com     is the latest addition to my blogs.

https://gscrochetdesigns.blogspot.com. one can see my crochet creations  

 
 https://cancersupportindia.blogspot.com. feel free to view for easy, simple and health tips 
 
 https://kneereplacement-stickclub.blogspot.com. for info on knee replacement

Tuesday, November 28, 2023

How to remove turmeric stains from skin, furniture, nails, clothes,

One simply cannot ignore turmeric, for its multitude of health benefits are, certainly, impressive. But we won’t focus on those in this article - you can learn all about them in our post titled Turmeric is As Effective as 14 Other Drugs Combined. Let’s talk about the annoying part of this powerful spice - the staining.
It’s no secret that cooking with turmeric is a risky business. One wrong move, and you’ll have a bright yellow stain on your T-shirt, the kitchen counter, or even cooking utensils. Turmeric stains can be quite stubborn, so much so that turmeric is frequently used as a dye. But don’t let these pesky stains stop you from using this delicious and nutritious spice. 
 
After all, for every problem, there is a solution. And in this article, we’ll show you how to get rid of those distinctive turmeric stains from various surfaces - fabrics, furniture, ceramic, and even the skin. Coincidentally, all these tips help remove stains of condiments and sauces that contain turmeric (like mustard and curries) from these surfaces too.
 
 
1. How to remove turmeric stains from cookware
How to Remove Turmeric Stains turmericTurmeric can stain bowls, dishes, containers, cutting boards, and even silicone spatulas, so be careful when cooking with this spice at home. It does NOT, however, stain stainless steel and ceramic, or at least not permanently, so using metal and ceramic cookware, containers, and utensils is your best bet.

When it comes to plastic, wood, silicone, glazed ceramic, or even glass kitchenware, it’s a different story altogether, and getting rid of them will require more effort. Follow these steps to get rid of persistent turmeric stains from cookware: 
 
1. Rinse the dish, utensil, or container with warm water. 
 
2. If the item is small, fill the sink with a solution of 1 part bleach (or vinegar) and 2 parts water. Soak the stained items in the solution for 12 hours or overnight. 
 
3. If the item is big, saturate a cloth with the same solution, and place it over the stain overnight. 
 
4. Rinse the item thoroughly and proceed to clean it in the dishwasher or by hand as usual. 
 
If the stain remains, here’s another method you can try. This trick works especially well for removing turmeric stains from wooden chopping boards. 
 
1. Mix baking soda and water into a thick paste. 
 
2. Massage the paste into the stain and leave it for 15-20 minutes. 
 
3. Rinse thoroughly and proceed to clean the item in the dishwasher or by hand as usual. 
 
 
2. How to get rid of turmeric stains from clothes and carpets
Even if you don’t cook with turmeric and need not worry about your cookware gaining a yellow tinge, you may still end up with a curry stain on your clothing, couch, or carpet when ordering takeout. But before you proclaim your shirt, kitchen towel, or carpet ruined, let us assure you that getting turmeric out of fabrics is possible, especially if you act quickly. 
 
Here’s where these step by step tips come into play: 
 
1. Remove any excess curry or turmeric from the fabric with a paper towel or spoon. 
 
2. Rinse the fabric under a stream of cold water. Do NOT use hot or warm water because this will set the stain. 
 
3. Depending on the size of the item, fill either a sink or a bathtub with cold water and add the appropriate amount of a stain remover (e.g. Vanish or Oxi Action). 
 
4. Soak the fabric in the solution for 20-30 minutes, then rinse with cold water. 
 
Fresh stains will usually be gone after you follow these steps, but if this doesn’t happen and you can still see a stain, apply more stain remover directly onto the stain and launder it in the washing machine with laundry detergent on a cold cycle. You can try to repeat these steps a few times and add some color-safe bleach in the next cycle if the stain persists. 


Another way you can try to remove turmeric from fabrics is with the help of glycerin. Flatten the dry fabric and work a generous amount of glycerin over the stain. Wait for 1 hour, and launder the items as usual.
 
 Note: Always be mindful of the fabric of the garment or other item and take it to the dry cleaner instead if it’s not advised to wash the item on the label. Once you’re satisfied with the results, let the item air-dry and DO NOT put it in the dryer, since the heat will set the stain completely.


3. Getting rid of turmeric stains from furniture and counters
In most cases, fresh turmeric stains will be easy to clean from the kitchen table or counter with a damp cloth or sponge. So, if you notice a fresh stain, it’s best to act fast. Older turmerics stains are trickier to remove.Try to use the baking soda paste trick we showed you earlier, provided that it’s safe to use on your specific counter or furniture. 
 
You can patch test it in an inconspicuous place first to make sure that the baking soda doesn’t scratch or otherwise damage the surface. If the stain remains, you can repeat this method a few times, or use white vinegar or a multipurpose cleaner to get rid of any traces of the stain. Small stains can also be cleaned away with a weak bleach solution or even whitening toothpaste: simply apply it on the stain, wait for a few minutes, and then wipe away with a damp cloth.


4. How to get rid of turmeric stains on the skin and nails
How to Remove Turmeric Stains turmeric face mask
Rule number one of cooking with turmeric is to always use a spoon to measure out turmeric for a recipe. It’s also a wise decision to use disposable gloves when you’re grating fresh turmeric or massaging a dry rub spice mix when preparing meat. If you’re not careful, your fingers, nails, and even nail polish will be stained with turmeric.
 
Likewise, putting on a DIY mask that contains turmeric, while very effective at keeping the skin moisturized, may stain your face or even eyebrows if you have light hair. Luckily, there’s a way around that catastrophe, too. Here are a few things you can try: 
 
Overall, try to wash the affected area of the skin or the nails as often as you can - do the dishes, take a bath to let the stain wash away more quickly. 
 
Use a scrub, loofah, or exfoliating liquid to exfoliate the top layer of the skin. Needless to say, loofahs will only work for the hands and body, and not the face. 
 
Apply body oil or just plain old olive oil to get rid of stains on the body or the hands. Oils absorb the yellow pigment and may help draw it out of your skin. Make sure to use a non-comedogenic facial oil, like the anti-aging oils we mentioned in the article 6 Beauty Oils That Reverse the Signs of Skin Aging, to remove turmeric stains from your face. Otherwise, you can end up with blocked pores and acne on the face.


Milk or yogurt is another effective remedy for turmeric stains. Dairy contains lactic acid that naturally exfoliates the skin. Apply plain white yogurt and leave it on for 10-15 minutes, then wash away. Alternatively, apply milk onto the skin with a cotton pad and then rinse with water. For stained fingernails and hands, you can even soak the hands in some milk for 15 minutes and then rinse your hands. 
 
Lastly, you can use hydrogen peroxide to naturally bleach your nails. To prevent any damage to the skin or nails, use 3% hydrogen peroxide diluted in 2 teaspoons of water. Soak a cotton pad in this solution, then apply it to the stained nails and fingers. Let this solution stay on the nails for 10 minutes - do not wash your hands at this time. You can repeat this method once a day. ​
 
We hope you found this article useful. If so, please share it with others as well


https://gscrochetdesigns.blogspot.com. one can see my crochet creations  

https://cancersupportindia.blogspot.com. feel free to view for easy, simple and health tips  

https://kneereplacement-stickclub.blogspot.com. for info on knee replacement

https://GSiyers home remedies.blogspot.com     is the latest addition to my blogs.


Wednesday, June 16, 2021

Turn Old Looking Things Into New Once Again

You most probably have a couple of things around the house that are old, or things you most likely love that you wish would look as good as new again. Thankfully, with these secrets, your old-looking items will look brand new once again!

1. Chopping boards
make old things look new

Use a sponge soaked in a mixture of lemon juice and salt to make an old chopping board look as good as new. 
 
2. Copper pots
make old things look new

For copper pots to look as good as new again, sprinkle the surface with salt, then pour a little bit of vinegar over it, rubbing it with a hard sponge.

3. Plates
make old things look new
Got scratches on your plates? Use a polish designed specifically for use on porcelain. 
 
4. Baking trays
make old things look new
Remove burnt stains from baking trays easily by applying a paste made of hydrogen peroxide and ordinary soda. Spread the paste on the baking tray and leave it for 30 minutes before rinsing. 
 
 5. Carpets
make old things look new
Prepare a solution made of one part vinegar and two parts water. Mix the water and vinegar together in a spray bottle and spray on the stain, covering with a damp cloth. Then, set your iron onto steam mode and place it over the cloth for 30 seconds.  
 
6. Cast-iron pans
make old things look new
For cast-iron pans you will need a disinfectant, some gloves, garbage bags and white vinegar and follow these instructions: 
 
• Spread a thick layer of the disinfectant on the old cast-iron pan. 
 
• Put the pan in a garbage bag and tie it up tightly. 
 
• Leave the pan in the bag for 1-2 days then rinse off the disinfectant. 
 
• Apply a new layer of the same liquid and put it in a tightly knotted bag for one day. 
 
• Wash off the dirt with hot water. 
 
• Soak the pan in a mixture of warm water and vinegar (1:1) for an hour and scrub the surface with a scouring pad. 
 
• Let the pan dry. 
 
• Preheat the oven to 250C, putting the pan in it for an hour. 
 
• Carefully remove the hot frying pan and apply a layer of olive oil all over it. 
 
• The hot metal will absorb the required amount of oil - wipe off the residue with a clean, dry cloth and once again, put the pan in the oven, this time upside down. 
 
• Take it out after 15 minutes, wipe with a cloth and place it in the oven again for an extra 15 minutes. Repeat for another two times. 
 
7. Tiles make old things look new
Use bleach to clean the areas between the tiles. Mix with water in a ratio of 1:1. While doing so, be sure to ventilate the room. 
 
8. White sneakers 
make old things look new
It is possible to make your sneakers bright white once again using a solution of one teaspoon of dishwasher cleaning liquid, three tablespoons of hydrogen peroxide, and two tablespoons of baking soda. 
 
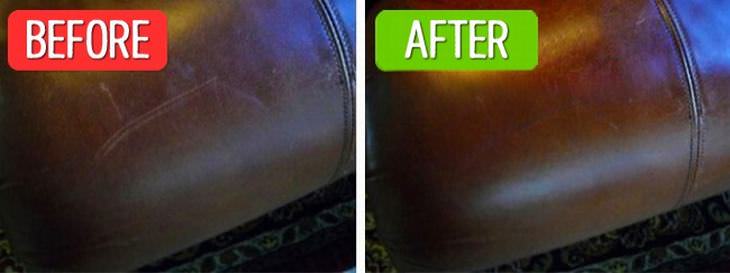
9. Leather furniture  
make old things look new
Wipe scratches from your sofa using olive oil or baby oil, using a cotton swab. Let the oil dry for an hour. If the scratch is visible, repeat the procedure. 
 
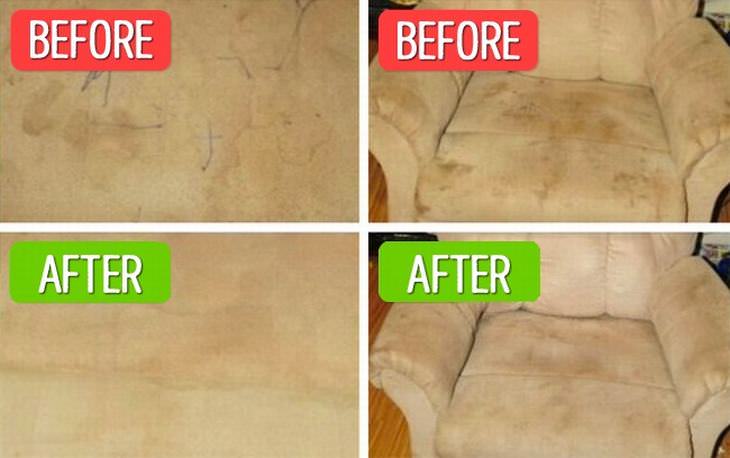
10. Furniture, with microfibre upholstery   make old things look new
This kind of furniture requires special care. Use a white sponge and alcohol to get rid of any stains that may appear on the furniture over time. Dampen the stain with a sponge soaked in alcohol, let it dry, then clean the area thoroughly with a brush. 
 
11. Leather bags
make old things look new

Clean the stains on a leather bag easily by simply using wet wipes.


https://gscrochetdesigns.blogspot.com. one can see my crochet creations  

https://cancersupportindia.blogspot.com. feel free to view for easy, simple and health tips  
https://kneereplacement-stickclub.blogspot.com. for info on knee replacement


Saturday, March 27, 2021

Turn Old Looking Things Into New Once Again

You most probably have a couple of things around the house that are old, or things you most likely love that you wish would look as good as new again. Thankfully, with these secrets, your old-looking items will look brand new once again!

1. Chopping boards  
make old things look new
Use a sponge soaked in a mixture of lemon juice and salt to make an old chopping board look as good as new. 
 
2. Copper pots
make old things look new
For copper pots to look as good as new again, sprinkle the surface with salt, then pour a little bit of vinegar over it, rubbing it with a hard sponge.

3. Plates
make old things look new
Got scratches on your plates? Use a polish designed specifically for use on porcelain. 
 
4. Baking trays
make old things look new
Remove burnt stains from baking trays easily by applying a paste made of hydrogen peroxide and ordinary soda. Spread the paste on the baking tray and leave it for 30 minutes before rinsing.

5. Carpets
make old things look new
Prepare a solution made of one part vinegar and two parts water. Mix the water and vinegar together in a spray bottle and spray on the stain, covering with a damp cloth. Then, set your iron onto steam mode and place it over the cloth for 30 seconds. 

6. Cast-iron pans
make old things look new
For cast-iron pans you will need a disinfectant, some gloves, garbage bags and white vinegar and follow these instructions: 
 
• Spread a thick layer of the disinfectant on the old cast-iron pan. 
 
• Put the pan in a garbage bag and tie it up tightly. 
 
• Leave the pan in the bag for 1-2 days then rinse off the disinfectant. 
 
• Apply a new layer of the same liquid and put it in a tightly knotted bag for one day. 
 
• Wash off the dirt with hot water. 
 
• Soak the pan in a mixture of warm water and vinegar (1:1) for an hour and scrub the surface with a scouring pad. 
 
 • Let the pan dry. 
 
• Preheat the oven to 250C, putting the pan in it for an hour. 
 
• Carefully remove the hot frying pan and apply a layer of olive oil all over it. 
 
• The hot metal will absorb the required amount of oil - wipe off the residue with a clean, dry cloth and once again, put the pan in the oven, this time upside down. 
 
• Take it out after 15 minutes, wipe with a cloth and place it in the oven again for an extra 15 minutes. Repeat for another two times. 
 
7. Tiles
make old things look new
Use bleach to clean the areas between the tiles. Mix with water in a ratio of 1:1. While doing so, be sure to ventilate the room. 
 
8. White sneakers
make old things look new
It is possible to make your sneakers bright white once again using a solution of one teaspoon of dishwasher cleaning liquid, three tablespoons of hydrogen peroxide, and two tablespoons of baking soda. 
 
9. Leather furniture
make old things look new
Wipe scratches from your sofa using olive oil or baby oil, using a cotton swab. Let the oil dry for an hour. If the scratch is visible, repeat the procedure. 
 
10. Furniture, with microfibre upholstery
make old things look new
This kind of furniture requires special care. Use a white sponge and alcohol to get rid of any stains that may appear on the furniture over time. Dampen the stain with a sponge soaked in alcohol, let it dry, then clean the area thoroughly with a brush. 
 
11. Leather bags
make old things look new
Clean the stains on a leather bag easily by simply using wet wipes.

https://gscrochetdesigns.blogspot.com. one can see my crochet creations  

https://cancersupportindia.blogspot.com. feel free to view for easy, simple and health tips  
https://kneereplacement-stickclub.blogspot.com. for info on knee replacement

Saturday, November 30, 2019

10 Different Coffee Stain Removal Tricks You Need to Know

Coffee is an extremely important and vital part of most people’s day. Over 10 million tons of coffee are consumed every year across the world. With all of its deliciousness and energy-boosting properties, there’s no getting rid of coffee from our lives. But that doesn’t mean we don’t want to get rid of those nasty coffee stains that find their way into every part of our lives. A sudden brake while driving and your latte forms a pattern on the car seats. What you thought was a push door turned out to be a pull, and suddenly your white sweater is brown. Don’t worry, we have solutions for all of your coffee stain related problems. From coffee stains on your teeth to spilled coffee on your couch, these tips can make coffee stains a thing of the past.     
 
1. Removing coffee stains from furniture
Coffee stains on your furniture can be an undeniably irksome and persistent problem. Between guests, children and sheer bad luck, more coffee ends up on the sofa than in your stomach. Flipping the couch cushions can be a solution, but it only works once!

We have a quick fix method that will work every time on fresh spills! Start by soaking up as much of the spilled coffee as possible with paper towels. Then put a few drops of ordinary laundry detergent onto a sponge and rub the stain in a careful circular motion so the stain doesn’t spread any further. If it is an especially persistent stain, just clean the sponge and get to work with the detergent again until it’s faded. Then wipe the area down with a fresh wet sponge.  


2. Removing coffee stains from a carpet
Any kind of a stain on the carpet is a house owner's worst nightmare. Coffee stains are like the Freddie Krueger of all carpet stains. But much like Mr. Krueger, there is a way of defeating them, and it is as simple as white vinegar! White vinegar contains acetic acid, which is an excellent remover of stubborn stains.

1 tablespoon of white vinegar combined with an equal portion of liquid dish soap mixed in two cups of warm water will be your miracle solution. First, blot the spilled coffee with paper towels. If the stain has already dried out, add a little warm water and then blot with a dry cloth. Then, using a fresh cloth and the above-mentioned soap solution, rub the stain from the outside to prevent the spreading of the stain, until it is gone completely. 


3. Cleaning coffee spills from your car
Cup holders seem very convenient until that one day you push the brake pedal suddenly and you realize how loose a grip the holder actually has. Also, you get to know how sticky leather seats can get when doused with hot coffee. Nevertheless, with a quarter cup of white vinegar, a little dish-washing soap and just 1 cup of water, you can get those seats looking and feeling smooth again.

In case of dry stains, make sure to add a little warm water first, and then proceed to blot the stain with paper towels. Then you can use a dry clean cloth, dipped into the vinegar-soap solution to clean any and all affected areas of the car, from the cup-holder to the seats. In places where stains have occurred on any form of fabric, make sure to rub in a circular motion so the stain doesn’t spread outward. 


4. Removing coffee stains from mugs
The sad truth is, our coffee mugs might be the most affected items in our lives, at least when it comes to coffee. Even if you manage to avoid stains appearing on the outside, often caused by congealed coffee, it is almost impossible to stop the inside of your mug from steadily gaining a browner color over days, weeks, and months. Until one day you find yourself with a mug that is now an entirely different color than the one you purchased, and your partner, parent or friend informs you that it may be time for a new mug. You can stop the cycle from repeating itself with one simple product: table salt.

Just fill the mug with a good layer of salt and use cleaning gloves to scrub the inside of the mug. This should remove the stain completely, and if salt doesn’t work or, perhaps, you’re facing a shortage, baking soda is also known to be effective. After you’re done scrubbing the mug, make sure to put it in with the next load of dishes to avoid your next cup of coffee being a salty one! 


5. Removing coffee stains from a kitchen counter
If you’ve managed to avoid staining the outside of your mug, chances are it’s because any and all spilled coffee has ended up on your kitchen counter, where it has remained unnoticed until your return from work in the night. By then, this warm delicious liquid has become a cold, brown, and almost-solid mess, and the color has seeped into the marble, wood, glass, or any other material in question. Well, believe it or not, there’s a very simple way to restore the original color of your counter, and it’s sitting in your fridge waiting for you.

Crack an ordinary egg, very carefully into a dish, and separate the white of the egg from the yolk. Feel free to keep aside the white of the egg to use in your next healthy meal, and then beat the yolk thoroughly. Using a cloth, apply the yolk generously to the stained area and let it sit for a minute or two until it is semi-dry. Then rinse the area thoroughly, and your kitchen counter shall be stain-free!  

 6. Cleaning your teeth of coffee stains
Despite its wonderful effects on your energy levels, coffee isn’t great for your teeth. Sure, the sugar can do some serious damage, so you might think that coffee would be harmless if you remove the sugar quotient. But coffee can also severely stain your teeth, leaving them yellowish or light brown, particularly if you are a frequent and regular coffee drinker. To prevent this, you may need to up your dental hygiene routine.

For starters, use toothbrushes with slightly harsher bristles, and only toothpaste that contains hydrogen peroxide and baking soda, as the former acts as a natural whitener while the latter is an effective stain remover. Also, make a habit of brushing your teeth after consuming coffee, or at the very least, rinsing your mouth with warm water.  


7. Getting rid of fresh coffee stains from clothing
Spilling coffee on your clothes is a part of life, but that doesn’t mean you have to live with the stains forever. If you want to get rid of that stain as soon as it hits the cloth, we may be able to help. First things first, though, check the label of the clothing in question to ensure there are no special cleaning instructions or restrictions.

The main three ingredients we’ll be using are white vinegar, table salt, and laundry detergent. First, sprinkle the affected area with table salt so the stain cannot spread. After a minute or two, brush off the coffee-absorbed salt with a paper towel. Run the back of the stain under cold water for about 15 minutes, then treat with small amounts of laundry detergent. Finally, apply a little white vinegar onto the stain and scrub with a toothbrush. After that, let the garment sit for fifteen minutes and then put it in the washing machine. 

8. Getting rid of old coffee stains from clothing
Now, for older coffee stains, you will need a different solution because the coffee is likely to have seeped deep into the cloth fibers. Have no fear though, we have a quick fix for that as well. To start with, you will need either rubbing alcohol or lemon juice. Dab the part of the garment with the dried stain with an extremely small amount of rubbing alcohol or lemon juice.
Make sure the cloth does not become too saturated with the liquid, only a very small amount is required to soften the stain. After the alcohol or lemon juice has dried, rub some laundry detergent onto the affected area until the stain is removed. Then, you can rinse the garment with warm water and after it dries, it will be suitable for a normal wash in the washing machine.  

9. Removing coffee stains in a coffee maker
Nobody can afford to buy an expensive latte every morning, and if you have a particularly stressful job, having a coffee maker on hand, in an office, a study or at home, can be the best way to cut down on costs. But coffee makers are as susceptible to stains as our clothes, teeth, and furniture are. In fact, even more so, as coffee makers can be stained inside and out by spilled coffee grains and leftover coffee brew residue. To initiate the cleaning process, check the manual of your machine to see if it has any specified cleaning instructions. Keep in mind, on average, coffee makers need to be cleaned at least once every six months, if not more.
First, to clean the inside, use equal parts white vinegar and cold water poured into the pot of the machine, and hit the switch to make it brew. You can switch it off halfway through the cycle and then rinse out the container with soapy water. Then use clean cold water in a similar manner, allowing it to brew. Use clean water in the brewing cycle at least 3 times to clear out any residual soap or vinegar.
Once the inside is cleaned, you can use soap and water on a sponge, or straight vinegar on a cloth to wipe down the outside surface of the coffee maker. Clean any individual parts of the machine in a similar manner and then rinse thoroughly with cold water before leaving to dry. This will have your coffee maker looking as good as new! 


10. Removing burnt coffee from a coffee maker hot plate
Even if you’re using a hot plate designed for making coffee, it’s still likely to leave a big mess. Not including spilled coffee, which you now know the easy fixes for cleaning, with a hot plate there is the additional struggle of the stains left by burnt coffee. This, too, can be easily cleaned, though.
Start by ensuring the machine is switched off and unplugged. Then dip a cloth into a mix of dish-washing detergent and warm water, and scrub the cloth against the affected area until a majority of the burnt coffee stains are removed. You can scrub off the remaining residual stains with a sponge soaked in small amounts of white vinegar. Clean off the last of the residue as well as the white vinegar and soap with paper towels soaked in cold water. Finally, a dry paper towel will have your hot plate sparkling.

for crochet designs, my blog, those who like a particular design are free to mail me

https://gscrochet designs.blogspot.com

those interested in cancer & health related topics are free to see my blog- 

https://cancersupportindia.blogspot.com/ 

For info. about knee replacement, be free to view my blog- 

https://knee replacement-stick club.blogspot.com