Showing posts with label Brown Sugar. Show all posts

Saturday, October 24, 2026

Healthy Carrot and Nut Muffin

 Muffins are definitely a guilty pleasure, but what if we told you that we have a muffin recipe that isn’t only on the healthier side, but is also ridiculously easy to prepare and needs very little cleanup. This recipe is dairy free and it also replaces part of the flour with almond flour, which results in a denser (and healthier) muffin.

They also contain healthy plant oils and nuts, full of the essential omega 3 fats and fiber, dried cranberries, carrots and ginger rich in vitamins, antioxidants, and healthy plant compounds. True, we do use eggs, minimal quantities of whole wheat flour and added sugar in this recipe, which means that you won’t be able to survive on these muffins exclusively (I know I want to), but we stand by the belief that it’s still a good idea to stick to healthier alternatives, especially when you’re craving sweets so badly your hand is reaching for cookies as you read this. 

As is the case with all of our recipes, this recipe can be prepared in 1 bowl and it’s ready in a blink of an eye (sadly also gone in a blink because they’re so delicious). Finally, here is the recipe:

Ingredients

 Dry Ingredients 

½ cup (50 g) almond flour* 

2 cups (250 g) whole wheat flour 

1 tsp baking soda 

1 tsp cinnamon pdr

¼ tsp nutmeg pdr,

½ tsp salt


*Whizz some almonds in my blender until they form a powder. If any bigger almond bits remain, don’t worry, they will give your muffins some extra crunch, yum! 

Wet Ingredients 

1 cup (240 ml) soy milk 

1 tsp vinegar 

¾ cup (150 g) brown sugar 

2 eggs 

½ cup (125 g) applesauce 

¼ cup (60 ml) coconut oil 

1 tsp vanilla extract 

2 tsp grated fresh ginger (optional) 

“Filling” 

1 cup (50 g) shredded carrots (about 2 small carrots) 

¾ cup (90g) unsweetened dried cranberries 

1 cup (150 g) chopped walnuts (reserve half for the topping) 

Equipment: a lined 12 muffin tin.

Preparation: 

Step 1. Preheat your oven to 375°F (190°C). 

Step 2. Prepare the soy buttermilk by whisking the soy milk with vinegar and letting it thicken for about 10 minutes until it resembles buttermilk. 

Step 3. In a large bowl, combine and mix all the wet ingredients together until smooth, adding in the buttermilk last. 

Step 4. Sift in all the dry ingredients, whisking the batter until smooth and glossy, but it’s crucial not to overmix the batter because it won’t rise as it’s supposed to. 

Step 5. Add in all the ingredients from the “filling” section and work them in gently with a spatula. 

Step 6. Divide your batter evenly into the lined muffin tray, topping each muffin with some of the walnuts you reserved. Bake the muffins in the midsection of the oven for 18-20 minutes. The top of a perfectly-cooked muffin should be domed and golden brown, and the edges of the muffin should pull away slightly from the edges of the muffin tin. 

Step 7. Take the muffins out of the oven and let them cool down for at least 10 minutes before taking them out. Enjoy warm or cold, I love to combine these with morning coffee, so delicious!

https://gscrochetdesigns.blogspot.com. one can see my crochet creations  

https://kneereplacement-stickclub.blogspot.com. for info on knee replacement

https://cancersupportindia.blogspot.com  for info on cancer and health related topics

https://GSiyers home remedies.blogspot.com   is the latest addition to my blogs


Wednesday, August 26, 2026

Gluten-Free Chocolate-Pecan Quickbread

 Ingredients

4 tbsp melted butter

2 cups all-purpose gluten-free flour

1/4 cup sugar

1/4 cup brown sugar

3/4 tsp  baking soda

1/2 tsp salt

1 cup semi-sweet chocolate chips

1/2 cup chopped pecans

2 eggs, beaten ( you can use egg substitutes)

1 cup unsweetened applesauce

1/2 cup vanilla-honey Greek yogurt

1/4 tsp pure vanilla extract


Preparations

Preheat oven to 350 degrees Fahrenheit.

Butter a 5"x9" loaf pan.

In a large bowl, combine the flour, sugars, baking soda and salt.

Stir in the chocolate chips and pecans.

In a separate bowl, combine the eggs, applesauce, yogurt, vanilla and melted butter.

Pour the wet mixture into the bowl of dry ingredients and stir until just combined, making certain not to over-mix.

Pour the batter into the loaf pan.

Bake for 1 hour or until a toothpick inserted into the center comes out clean.

Allow to cool for 10 minutes before removing from pan and transferring to a wire rack.


https://gscrochetdesigns.blogspot.com. one can see my crochet creations  

https://kneereplacement-stickclub.blogspot.com. for info on knee replacement

https://cancersupportindia.blogspot.com  for info on cancer and health related topics

https://GSiyers home remedies.blogspot.com   is the latest addition to my blogs

Tuesday, July 28, 2026

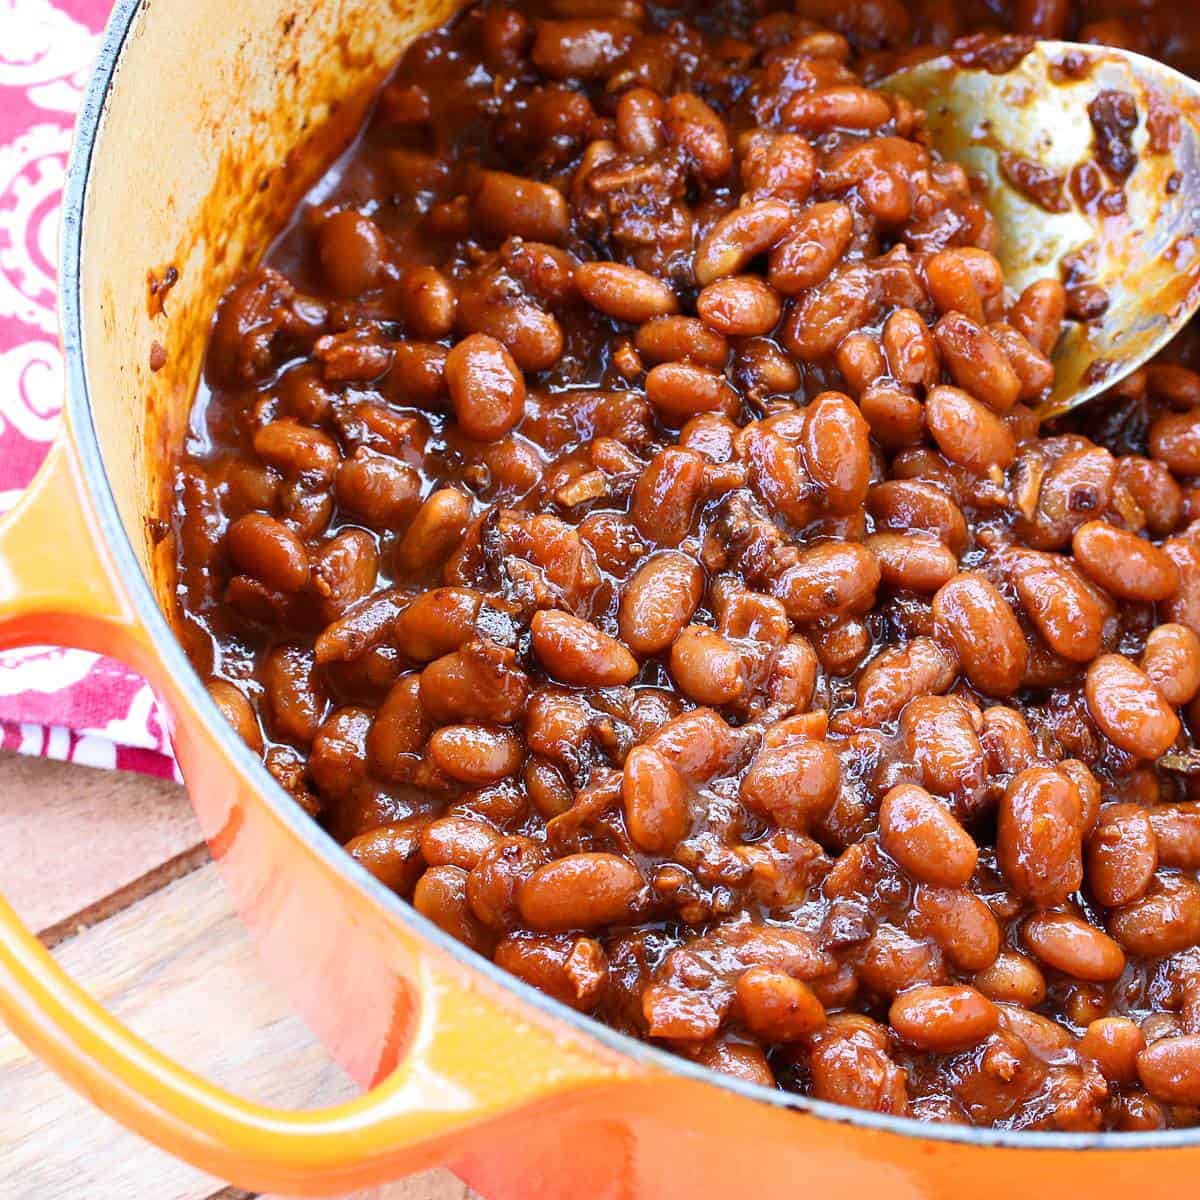
Old Fashioned Baked Beans

 homemade baked beans recipe best old fashioned traditional brown sugar maple sweet smoky from scratch 

Ingredients

 1pound  dried navy beans

8 ounces thick cut bacon, diced ( veg. sub. smoked tofu. tempeh/ smoked paprika/ mushrooms)

1medium yellow onion, finely chopped

2 cloves garlic, minced

1/2 cup plain tomato sauce or ketchup

1/4 cup molasses

1/2 cup brown sugar

2 tbsp apple cider vinegar

1tbsp prepared yellow mustard

2 tsp  Worcestershire sauce

1 tsp smoked paprika

2 tsp salt

1/2 tsp  freshly ground black pepper

1 bay leaf


Preparations Place the dried beans in a pot of water covered by a few inches of water and let soak overnight. Drain the beans, place them back in the pot with fresh water and bring to a boil. Simmer for one hour, then drain, reserving the liquid. See NOTE. In a Dutch oven or other oven-proof pot  fry the bacon until crispy then add the onions and cook until soft and translucent, 5-7 minutes.  Add the garlic and cook for another minute. Stir in the tomato sauce, molasses, brown sugar, apple cider vinegar, mustard, Worcestershire sauce, smoked paprika, salt, pepper and bay leaf. Add 1 1/2 cups of the reserved bean water and the beans. Bring everything to a simmer for a minute or two to heat it up.  In the meantime preheat the oven to 325 degrees F. Transfer the Dutch oven with the lid on to the middle rack of the oven. Bake for 2 to 3 hours or until the beans are tender and the sauce has thickened, removing the lid during the last 20-30 minutes to help the sauce thicken.  NOTE: If at any point during the cooking process too much liquid evaporates and the beans get dry, add a little more of the reserved bean water. The beans themselves can vary from batch to batch and you may end up either needing to add more liquid if the beans are too dry or you may need to bake the beans longer with the lid off if there is too much liquid. Adjust as needed. Add more salt the pepper to taste. Serve immediately or let cool completely and refrigerate until ready to serve.  Can be reheated on the stovetop or in the microwave. SLOW COOKER METHOD: Follow steps 1 and 2 and then pour everything into the slow cooker. Cook on LOW for 6-7 hours or on HIGH for 3-4 hours or until the beans are tender. Open the lid for the last 30 minutes or longer until the sauce has thickened. If the beans are too thick at any point and too much liquid has evaporated, stir in a little extra water.

Notes

Depending on the age and storage condition of the beans some can remain hard even after hours of cooking.  A classic trick is to add 1/4 teaspoon of baking soda to the beans while you’re boiling them (1/4 teaspoon for every pound of beans).  Be careful though:  If too much is added or if it’s added to beans that aren’t too hard, you could end up with mushy beans.


https://gscrochetdesigns.blogspot.com. one can see my crochet creations  

https://kneereplacement-stickclub.blogspot.com. for info on knee replacement

https://cancersupportindia.blogspot.com  for info on cancer and health related topics

https://GSiyers home remedies.blogspot.com   is the latest addition to my blogs


Sweet and Sour Sauce

 sweet and sour sauce recipe best easy homemade chinese takeout 

Ingredients 

1 cup canned pineapple juice, see note

3/4 cup packed light brown sugar

OR Brown sugar alternative (for low sugar option)

1/3 cup rice vinegar, found in the Asian or general vinegar section of any grocery store, or you can substitute apple cider vinegar

3 tbsp ketchup

2 tbsp soy sauce or tamiri

For the Cornstarch Slurry:  

1 1/2 tbsp cornstarch dissolved in 2 tbsp water

Instructions Place all of the ingredients, except for the cornstarch slurry, in a small saucepan and bring to a boil. Stir in the cornstarch slurry and simmer for another minute until thickened, stirring constantly. If using red food coloring, stir it in. Let the sauce cool completely and store in an airtight container in the refrigerator where it will keep for 2-3 weeks. 

Notes

* Freshly squeezed pineapple juice contains enzymes that will break down the cornstarch and prevent the sauce from remaining thick, so either use canned or bottled


https://gscrochetdesigns.blogspot.com. one can see my crochet creations  

https://kneereplacement-stickclub.blogspot.com. for info on knee replacement

https://cancersupportindia.blogspot.com  for info on cancer and health related topics

https://GSiyers home remedies.blogspot.com   is the latest addition to my blogs


Thursday, June 11, 2026

Peanut Butter Cake

 Ingredients

 For the Cake:

 1 1/2cups all-purpose flour

 2 tsp baking powder

 1/2 tsp baking soda

 1/2 tsp salt

 1/3 cup coconut oil, at room temperature or oil of choice (I use coconut oil). Note: Oil yields a moister cake than butter

 1/3 cup natural unsweetened peanut butter

 1 cup brown sugar

 2 large eggs

1 cup buttermilk(can substitute 1 cup milk with 1 tablespoon white vinegar or lemon juice stirred into it. Let it sit for 5-10 minutes then use as recipe directs)

 1 tsp vanilla extract

 For the Frosting:

 1 cup natural unsweetened peanut butter (if using regular peanut butter which has lots of sugar in it, cut back a little on the brown sugar)

1/ 2cup unsalted butter, softened

3 cups powdered (confectioner's) sugar(can use less if preferred)

up to 1/2 cup heavy cream, at room temperature


Preparations

Preheat the oven to 350 degrees F.

In a medium bowl, sift the flour, baking powder, baking soda and salt. Set aside.

In a large mixing bowl, add the peanut butter, oil, and brown sugar. Beat until combined and creamy. Add the eggs and vanilla extract and beat just until combined.

Alternately add the flour and buttermilk to the wet mixture, beating just until combined. Be careful not to over-beat or the cake will be dense and dry. A few small lumps of flour is fine.

Grease a 9X2 inch round baking pan. Pour the batter into the pan.

Bake for about 30 minutes or until a toothpick inserted into the middle of the cake comes out moist (not wet with batter but moist. If the toothpick is dry, the cake is over-baked and will be dry). Let the cake sit in the pan for 5 minutes, then invert the cake onto a wire rack to cool completely.

To Make the Frosting: In the meantime place the peanut butter and butter in a large mixing bowl. Beat until smooth and creamy. Add the powdered sugar one cup at a time, continuing to beat. Add the heavy cream until you reach a spreadable consistency. (Note: This is a fairly stiff frosting.)

Cut the cooled cake in half horizontally. Frost the bottom half of the cake and down the sides. Place the top layer of the cake, upside down, on top of the bottom layer. Frost the top layer and down the sides.

Notes

To cut back on calories (and save yourself some work), bake the cake in a 9X13 cake pan as a sheet cake and make half the amount of frosting to go on top. Also, for a more moist and goopy version, prepare the sheet cake. In a small saucepan bring 1/4 cup honey, 1/4 cup brown sugar and 2 tablespoons of butter to a boil. Remove from heat. Poke some holes throughout the sheet cake and drizzle the honey glaze evenly over it. Allow to cool completely and then frost (remember, half the recipe amount for the frosting). Note, I haven’t actually tried this version, merely conceptualized it in my mind, but I think it would work ;) Note: For chocolate frosting, add a couple of tablespoons of good quality cocoa powder.*Variation: Add Nutella to the frosting*Another variation: Pour some chocolate ganache over it for ultra decadence!


https://gscrochetdesigns.blogspot.com. one can see my crochet creations  

https://kneereplacement-stickclub.blogspot.com. for info on knee replacement

https://cancersupportindia.blogspot.com  for info on cancer and health related topics

https://GSiyers home remedies.blogspot.com   is the latest addition to my blogs

Monday, June 8, 2026

3 Easy Ways to Soften Hard Brown Sugar

Personality quizzes Cookbook subscription box With the fall and winter holidays coming up, you may be reaching for your baking supplies for the first time in a while. If you haven't opened your jar of brown sugar in a while, it most likely looks like a rock-hard block. So what should you do? While hard brown sugar is safe to use in baking, it isn’t exactly the easiest thing to use. Luckily, you can soften the sugar in no time with these tricks - no fancy ingredients or kitchen supplies are needed.

Why Does Brown Sugar Harden?
How to Soften Hard Brown Sugar a bowl of hard Brown Sugar
In order to understand how to soften brown sugar, we must first figure out why it goes hard, to begin with. Brown sugar is made up of two ingredients: granulated sugar and molasses. As the natural moisture of the molasses evaporates, brown sugar hardens into a solid block. Improper storage speeds up the hardening process even more, which is why you should always store brown sugar in an airtight container in a dry place like the pantry.

How to Soften Brown Sugar  

In order to soften up your brick of brown sugar, you’ll need to rehydrate the sugar. Here are 3 tried and true methods that will accomplish that goal. 

1. Soften brown sugar with a slice of apple or bread. 

This may not be the fastest way to soften up brown sugar, but it’s certainly an effortless one. All you have to do is to put a slice of either a fresh apple or bread in a closed container with brown sugar. Wait for about a day, and the sugar will absorb just enough moisture to become soft again. Needless to say, discard the bread or apple slice once the sugar reaches your desired consistency.

2. Bake the sugar in the oven 

The oven method is much faster, but it takes a bit more work. You can use high temperatures to rehydrate the sugar. Preheat the oven to 250°F (120°C). Spread the hardened sugar on a baking sheet or oven-safe container and let the sugar warm up in the oven. Check every 2-3 minutes by carefully piercing the sugar clumps with a fork. When it’s soft and crumbly again, carefully take it out of the oven and let it cool completely. 

3. Try the microwave method 

This last trick may be the fastest way to soften brown sugar yet! All you need is a microwave, a damp paper towel, and a microwave-safe container. This method combines heat and high moisture, so it’s extra effective too. Just place the clumpy sugar into the container, cover it with the paper towel, and heat it up for 20 seconds. 

Then carefully remove the towel (it will be hot) and see if you can squish the sugar with a fork. If not, repeat for another 20 seconds until the sugar becomes completely soft. Don’t keep it in the microwave for too long, or else the sugar can melt. Once you’ve reached the desired consistency, let the sugar cool down and use it in your recipe.


https://gscrochetdesigns.blogspot.com. one can see my crochet creations  

https://kneereplacement-stickclub.blogspot.com. for info on knee replacement

https://cancersupportindia.blogspot.com  for info on cancer and health related topics

https://GSiyers home remedies.blogspot.com   is the latest addition to my blogs


Sunday, June 7, 2026

18 Pantry Supplies That Expire Faster Than You Think!

When we plan on clearing out expired foods, we usually go straight to the fridge. Rarely do we think to look into the pantry - a common mistake. In reality, many pantry items are just as likely to go bad after a few months as the stuff you keep in the fridge. From fresh produce to packaged goods, several pantry supplies lose their taste or become unusable over time. Therefore, buying such items in bulk is just a waste of your money. Read on for a list of 18 such items.

1. Brown Rice
 Pantry Supplies That Expire Faster Than You Think Brown rice

If you recently made the switch to brown rice, you may not know that it expires much faster than white rice. I learned this the hard way. Having bought several packages on a deal, I noticed a faint musty smell once I opened package number two. Little did I know that brown rice expires just 6 months after the packaging date.

The same goes for other whole-grain rice varieties (such as wild rice, red rice, or black rice), all because the natural oils in the rice bran go rancid pretty soon. If you want to extend the shelf life of an unopened package of whole-grain rice, put it in the freezer. It should hold up for around a year. 

What about white rice? Since rice bran is removed during the milling process, white rice can be kept in your pantry pretty much indefinitely according to the USA Rice Federation. Just make sure to keep it sealed away from moisture and pests. \

2. Cereal
Not in the mood for cereal every morning? Then we’d say that it’s best not to purchase it in bulk, as an opened box of cereal is guaranteed to go stale in 3 months maximum, even if you decant it into an airtight container. That said, an unopened batch of cereal will retain its taste and crunch for up to 1 year. This is for simple cereals like corn flakes; the shelf life of cereal varieties that contain nuts and other add-ins will be less than that. 

Note that eating old cereal won’t make you sick, so it’s technically still safe to eat. But who would want to begin their day with a bowl of stale cereal? 

3. Nuts and seeds
Nuts and seeds won’t spoil in your backpack, that’s why they are everyone’s favorite travel snack. But make no mistake, the fact that a bag of almonds or pumpkin seeds can last in your bag for a few days doesn’t mean that they will last in the pantry for years. As a rule of thumb, shelled nuts and seeds retain quality for 4-6 months. Unshelled nuts usually stay fresh for 2-3 extra months. 

After that, the natural oils that are present in abundance in all nuts and seeds will go bad, and you will notice a rancid smell, oily stains, or discoloration on the surface of the nuts. If you’d like to store nuts for a bit longer, pop them in a resealable bag and freeze them for up to a year. 

4. Potatoes
Potatoes don’t have a set expiration date. A fresh bag of potatoes can be safely consumed anywhere from several weeks to 2-3 months, depending on the storage conditions. Ideally, potatoes should be stored in a dark, dry place at 45-55°F (8-13°C). But if your pantry is warmer, you’ll likely need to use up your potatoes in a few weeks. 

You know potatoes have gone bad when they develop soft brown spots or smell terrible. Dry or wrinkled-looking potatoes that feel soft to the touch, green spots, or sprouting are also an indication that a potato is past its prime.

5. Nut butters
Pantry Supplies That Expire Faster Than You Think peanut butter

Where do you store peanut butter: in the fridge or in the pantry? Like nuts, opened jars of nut butters like peanut butter or almond butter will expire in around 3 months at room temperature. Due to their high oil content, nut butters are prone to rancidity and oil separation. 

Refrigerating opened jars of peanut butter will extend their life and prevent oil separation for another 3-6 months. But even an unopened jar of nut butter will not last for more than a year in your pantry, so buying several jars is probably not a great idea. 

6. Baking powder
Ever wonder why the cake you made didn’t rise, even though it usually turns out fluffy and soft? Expired baking powder could be the culprit. Unlike baking soda, baking powder has a set expiration date. Depending on the humidity in your kitchen, it will lose its leavening powers in just 6-12 months. Here’s a quick test that will help you tell if a packet of baking powder is still fresh. Add 1 teaspoon of baking powder to hot water. If it starts to fizz, it’s still fresh. 

Turns out the baking powder is expired? No worries, here's an article that will show you how to swap out the baking powder in different recipes - Ran Out of Baking Powder? 8 Easy Substitutes.  see my next post

7. Oatmeal
If you usually buy oatmeal in bulk, try not to buy more than you will be able to use up in 4-6 months. Like whole-grain rice, oatmeal can go rancid over time. This is less common in quick oats since those are more highly processed, but steel-cut oats tend to go bad in a matter of months. 

Freezing unopened bags of oatmeal can help you double its shelf life. Just don’t forget to label the date on the package. This way, you’ll know when it’s time to use it up.

8. Brown Sugar

Like some of the other food items on this list, brown sugar won’t necessarily expire over time. An opened bag of brown sugar usually dries up and hardens after around 4 months of storage or less. Luckily, keeping the brown sugar in a resealable bag or container will help you keep it soft for a few more months. If you do have a packet of brown sugar that turned into a rock-hard block, worry not. 

 3 Easy Ways to Soften Hard Brown Sugar. see my next posts

9. Garlic
Under prime storage conditions, an intact head of garlic will stay good for half a year, but an unpeeled garlic clove separated from the bulb will not last beyond 2-3 weeks. Not sure if your garlic is still good to use? Fresh and flavorful garlic clove has a light cream color and a glossy exterior. It is also firm and plump-looking. 

If the garlic clove is soft, matte, and closer to yellow than white, it’s well past its prime. Any discoloration, such as brown or gray spots, is a sign of decay. Such garlic should be discarded immediately. Sprouted garlic, on the other hand, is usually fine to use. All you need to do is cut the clove in half and remove the green sprouted core. Make sure to use up sprouted garlic as quickly as you can because sprouting reduces flavor. 

10. Certain cooking oils
Cooking oils are more delicate than they seem, especially unrefined varieties like virgin olive oil, avocado oil, grapeseed oil, or even sesame oil. After opening, these oils should be stored for no more than a year, and you ought to keep them in a dark, dry, and cool environment. 

Olive oil, in particular, can start tasting and smelling just 6 months after opening. If you don’t use it often, it’s best to buy a small bottle - just enough to use up in 1-2 months. That being said, it’s a myth that refrigerating oil will make it last longer, so don’t crowd the fridge door with extra bottles. 

11. Beer
Beer is best stored in the fridge, period. Otherwise, it will start oxidizing quicker and may develop unpleasant flavors in 3-4 months. “Non-refrigerated storage accelerates aging and development of off-flavors. Refrigerated storage is best for all beers at all times,” states Craftbeer.com. If you don’t have space for beer in your fridge and prefer to keep it in the pantry, buy enough to use up within a month or two. 

12. Graham crackers
Pantry Supplies That Expire Faster Than You Think Graham crackers

Graham crackers are always great to have on hand. You can use them for a cheesecake crust or make s’mores with the grandkids. However, we’d advise against buying them in bulk unless you use them in baking quite often. Even a sealed batch of graham crackers will only last you 9 months. 

After that, they become stale. An opened package should be used up as quickly as possible. If you have leftover crackers from a recipe, store them in an airtight container. Otherwise, they will get stale in a matter of days. 

13. Tea and coffee
Both coffee and tea will lose flavor after a few weeks, provided that you don’t store them in an airtight container. So it’s best to seal them well and use them up as quickly as you can. In addition, “tea bags can lose valuable antioxidants as they sit on the shelf over time,” stated Desiree Nielsen, a registered dietitian in Vancouver. 

After around a year of storage, tea and coffee will also start tasting stale, so make sure to only buy enough for around a year. 

14. Quinoa
Quinoa is considered to be a healthy whole grain, so many people buy it these days. Like brown rice, quinoa has a higher moisture content than processed grains or pasta, so it tends to expire much faster. If you keep quinoa in a sealed package in a dry and cold environment, it is said to last for 2-3 years from the packing date. 

However, once you open the package, its longevity will go down dramatically, especially if you keep it in a warm or moist environment. How do you know that quinoa has gone bad? It will have a slightly oily or musty scent, which means that the natural oils present in the grain have gone rancid. 

15. Canned goods
Canned foods may last a lifetime, but certain varieties will no longer taste good after just 1-2 years. That’s because acidic foods may start to break down the tin a little, which will give its contents a metallic taste. This taste doesn’t make the canned food unsafe to consume, it just tastes a bit off.

Pickles and canned tomatoes are more likely to do this, so keep a close eye on which tins you bought first and use them up within half a year or so. Low-acid foods, on the other hand, like canned corn or green beans will stay fresh and tasty for as long as 5 years. 

16. Turmeric and some other spices
Much like garlic or baking powder, certain spices will start losing their flavor after the 1-year mark. Turmeric, paprika, cinnamon, and nutmeg are all examples of such spices, so make sure to buy them in small batches. If you notice that turmeric has lost its smell, you’ll need to use more of it in a recipe or buy a new bottle of the spice altogether.

Eating old turmeric and other spices, in general, isn’t bad for your health. If you want to purchase spices in bulk, we recommend buying whole spices, such as whole black pepper and cinnamon, as these last for a longer time than ground spices. 

17. Flour
Exactly like rice, white flour lasts almost three times as long as whole-grain flour. Whole-grain flour retains its freshness for no more than 3 months, whereas white flour will keep fresh for 6-9 months. If you bought flour in bulk and don’t intend to use it up in the next half a year or so, seal it in a freezer bag and put it in the fridge or freezer. Refrigeration will prevent whole-grain flour from becoming rancid for up to 8 months, almost tripling its shelf life. 

18. Breadcrumbs
The last mention on this list is one you likely never thought of as a perishable good. But breadcrumbs too expire in around 6 months. How do you know that the breadcrumbs in your pantry are no longer good to use? Stale or rancid smells are, of course, one red flag. But be careful because old breadcrumbs, especially those stored in humid or overly warm conditions, may even develop mold or show insect activity.


https://gscrochetdesigns.blogspot.com. one can see my crochet creations  

https://kneereplacement-stickclub.blogspot.com. for info on knee replacement

https://cancersupportindia.blogspot.com  for info on cancer and health related topics

https://GSiyers home remedies.blogspot.com   is the latest addition to my blogs


Wednesday, May 27, 2026

Strawberry Rhubarb Cobbler

 Plate of strawberry rhubarb cobbler topped with vanilla ice cream  

Ingredients

8 cups chopped rhubarb

1 cup sliced fresh strawberries

2 cups white sugar

2 tbsp all-purpose flour

¾ cup brown sugar

¾ cup quick-cooking oats

¾ cup all-purpose flour

1 tsp cinnamon pdr

½ cup butter


Directions

Gather the ingredients. Preheat the oven to 375 degrees F (190 degrees C). Grease a 9x13-inch baking dish.

Combine rhubarb, strawberries, white sugar, and 2 tablespoons flour in a bowl; spread into the prepared baking dish.

Mix brown sugar, oats, 3/4 cup flour, and cinnamon together in a bowl; cut in butter with 2 knives or a pastry blender until mixture resembles coarse crumbs. Sprinkle over rhubarb mixture.

Bake in the preheated oven until cobbler is bubbling and lightly browned, about 45 minutes. Serve hot or cold.


https://gscrochetdesigns.blogspot.com. one can see my crochet creations  

https://kneereplacement-stickclub.blogspot.com. for info on knee replacement

https://cancersupportindia.blogspot.com  for info on cancer and health related topics

https://GSiyers home remedies.blogspot.com   is the latest addition to my blogs