Showing posts with label cornstarch. Show all posts

Tuesday, August 25, 2026

One-Bowl Homemade Ladyfingers

 Ingredients

3 large eggs (about 5 1/2 ounces; 155 g)

4 3/4 ounces sugar (about 2/3 cup; 135 g)

1/4 tsp (1 g) Diamond Crystal kosher salt; for table salt, use about half as much by volume or the same weight

1/4 ounce freshly grated lemon zest (about 1 tablespoon; 7 g) from 1 large lemon, optional

4 1/2 ounces all-purpose flour (about 1 cup, spooned; 125 g

1/2 ounce cornstarch (about 2 tbsp; 15 g

Powdered sugar, for dusting


Preparations

Getting Ready: Adjust oven rack to middle position and preheat to 350°F (175°C). Line two half sheet pans with parchment and fit a large piping bag with a 1/2-inch round tip. Roll bag open and stand upright in a tall drinking glass so it can be filled hands-free. Have ready a small, fine-mesh sieve of powdered sugar for dusting. Fill a 2- or 3-quart saucier with a few inches of water; bring to a boil, then lower heat and adjust to maintain a steady supply of steam. 

For the Ladyfingers: Combine eggs, sugar, and salt in the bowl of a stand mixer, using a flexible spatula to stir. Place over the steaming pot (if it touches the bottom, crumple a strip of foil into a ring to act as a booster seat) and cook, stirring and scraping constantly, until warmed to 160°F (70°C). This should not take significantly longer than 5 minutes; major delays simply indicate insufficient heat/lack of steam. 

Transfer to a stand mixer fitted with a whisk attachment. Whip on high speed until the eggs are foamy, more than quadrupled in size, and thick enough to briefly mound up like soft serve when dropped from the whisk, from 5 to 10 minutes depending on the horsepower of your mixer. This is a crucial stage; if the foam is unable to hold soft peaks, the lady fingers will spread flat in the oven. 

 When eggs are foamy and thick enough to briefly hold their shape when dropped from the whisk, add lemon zest, if using, then sift the flour and cornstarch on top. Fold gently with a flexible spatula to combine in a thick batter. Transfer to prepared piping bag, twist to close, and pipe approximately thirty 3- by 1-inch fingers, leaving an inch between each one. When piping, hold the bag at a 45° angle and apply steady pressure as you pipe, then stop squeezing before you reach the end of each one, and lift the bag straight up to break the "tail" of batter. 

A 4-image collage of transferring the ladyfinger batter to a piping bag, cinching it, piping ladyfingers, and dusting them with powdered sugar. 

Generously dust one tray with powdered sugar, and bake until puffed and firm to the touch, about 12 minutes. Set aside, then dust and bake the second tray as before. Cool ladyfingers to room temperature directly on the sheet pan, then transfer to an airtight container as soon as possible. If allowed to sit out after they have cooled, they will begin softening in the air. Use immediately, or store up to 3 weeks at room temperature.  

Notes

Most ovens don't have perfectly even heat, so it's best to bake the ladyfingers one tray at a time. It may seem faster to try and bake both trays at once, but the benefits aren't worth the risk when it comes to these delicate sponge cakes.


https://gscrochetdesigns.blogspot.com. one can see my crochet creations  

https://kneereplacement-stickclub.blogspot.com. for info on knee replacement

https://cancersupportindia.blogspot.com  for info on cancer and health related topics

https://GSiyers home remedies.blogspot.com   is the latest addition to my blogs


Tuesday, July 28, 2026

Sweet and Sour Sauce

 sweet and sour sauce recipe best easy homemade chinese takeout 

Ingredients 

1 cup canned pineapple juice, see note

3/4 cup packed light brown sugar

OR Brown sugar alternative (for low sugar option)

1/3 cup rice vinegar, found in the Asian or general vinegar section of any grocery store, or you can substitute apple cider vinegar

3 tbsp ketchup

2 tbsp soy sauce or tamiri

For the Cornstarch Slurry:  

1 1/2 tbsp cornstarch dissolved in 2 tbsp water

Instructions Place all of the ingredients, except for the cornstarch slurry, in a small saucepan and bring to a boil. Stir in the cornstarch slurry and simmer for another minute until thickened, stirring constantly. If using red food coloring, stir it in. Let the sauce cool completely and store in an airtight container in the refrigerator where it will keep for 2-3 weeks. 

Notes

* Freshly squeezed pineapple juice contains enzymes that will break down the cornstarch and prevent the sauce from remaining thick, so either use canned or bottled


https://gscrochetdesigns.blogspot.com. one can see my crochet creations  

https://kneereplacement-stickclub.blogspot.com. for info on knee replacement

https://cancersupportindia.blogspot.com  for info on cancer and health related topics

https://GSiyers home remedies.blogspot.com   is the latest addition to my blogs
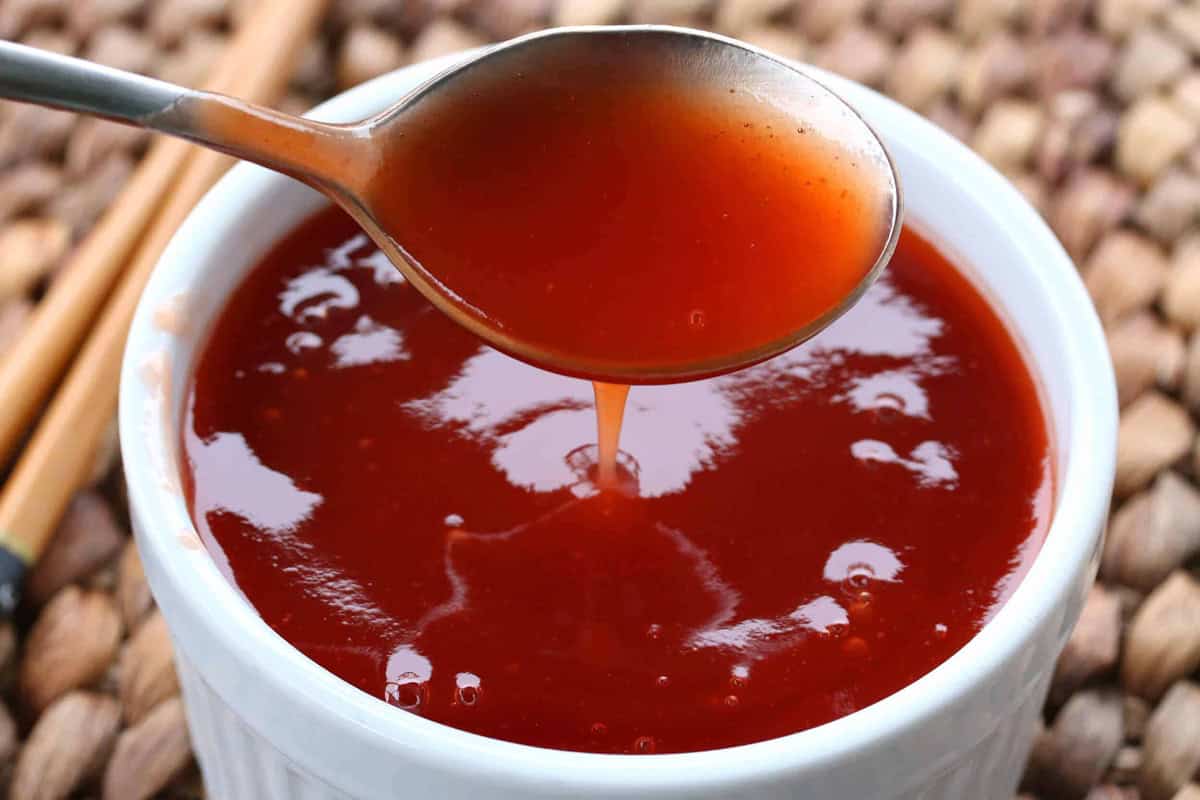
 

Thursday, June 11, 2026

Sweet and Sour Sauce

 Ingredients

1 cup canned pineapple juice, see note

 3/4 cup packed light brown sugar

Or brown sugar alternative (for low sugar option)

1/3 cup  rice vinegar /apple cider vinegar

3 tbsp ketchup

2 tbsp soy sauce or tamari

For the Cornstarch Slurry: 1 1/2 tbsp cornstarch dissolved in 2 tbsp water


Preparations Place all of the ingredients, except for the cornstarch slurry, in a small saucepan and bring to a boil. Stir in the cornstarch slurry and simmer for another minute until thickened, stirring constantly. If using red food coloring, stir it in.Let the sauce cool completely and store in an airtight container in the refrigerator where it will keep for 2-3 weeks.


Notes
* Freshly squeezed pineapple juice contains enzymes that will break down the cornstarch and prevent the sauce from remaining thick, so either use canned or bottled


https://gscrochetdesigns.blogspot.com. one can see my crochet creations  

https://kneereplacement-stickclub.blogspot.com. for info on knee replacement

https://cancersupportindia.blogspot.com  for info on cancer and health related topics

https://GSiyers home remedies.blogspot.com   is the latest addition to my blogs

Saturday, April 25, 2026

Steamed Vegetable Buns ( Baozi)

 Baozi veg recipe from thewoksoflife.com 


Ingredients

For the filling:
1 pound baby bok choy(450g, washed thoroughly)
 8 fresh shiitake mushrooms
3 tbsp vegetable oil(divided)
4 ounces dried bean curd(115g)
1 tsp light soy sauce
½ tsp sugar
½ tbsp sesame oil
⅛ tsp ground white pepper
Salt(to taste, in this case, it’s ok to taste the filling as you’re mixing it, because everything is cooked)
For the dough:
¾ cup warm water
1 tsp instant yeast(3 grams)
1 tbsp sugar(granulated, 15 grams) 
1 tbsp vegetable oil(plus 1 teaspoon, divided)
2 cups all-purpose flour(300 grams)
2 tbsp cornstarch(20 grams)
¼ tsp salt
⅛ tsp baking soda

Instructions

Making the filling
Prepare a pot of boiling water and an ice bath. Once the pot of water is boiling, blanch the bok choy for a quick 10 seconds in two separate batches. With each batch, the water should be at a rolling boil before you add the bok choy. With a large slotted spoon, scoop out the blanched bok choy and immediately transfer to the ice bath to stop the cooking process.
Strain the bok choy once it’s cooled completely in the ice bath. Do your best to squeeze out as much water as you can. This step is very important for preventing soggy buns!
Next, finely chop the bok choy; a food processor is a great time-saver. Transfer to a mixing bowl. Chop the mushrooms finely. Cook them in a wok over medium heat with 2 tablespoons of oil for about 3 to 4 minutes, until they become fragrant. Cool completely.
Next, finely chop the dried bean curd and set aside.
To finish the filling, first pour off any visible liquid in the bowl of chopped bok choy before adding in the cooked mushrooms and dried bean curd. Next, add 1 tablespoon of oil, the light soy sauce, sugar, sesame oil, and white pepper. Mix well. Salt to taste, and put the filling in the refrigerator to marinate. Chilling also helps to keep the bok choy green.
Making the dough
In a bowl, whisk together the water, yeast, and sugar until the yeast dissolves. Let the mixture sit until the yeast “blooms” and foams (about 15 minutes). Stir in 1 tablespoon of oil, and set aside.
In the meantime, whisk together the flour, cornstarch, salt, and baking soda in a medium bowl. Stir in the yeast mixture using a spatula. After the dry and wet ingredients are incorporated, knead the dough with your hands (or using a mixer) until the dough becomes smooth and soft. If the dough looks sticky, add a bit more flour 1 tablespoon at a time. If the dough feels dry, add a few drops of water at a time, and continue kneading until the dough is smooth and soft. The dough should be soft, but not sticky.
Brush the dough with 1 teaspoon of oil and cover with plastic wrap. Let the dough rest until it doubles in size (about 1 hour). Once the dough has risen, punch it down, and knead it for a few minutes to get rid of all air bubbles. Portion the dough into 14 equal dough balls. Cover with a clean kitchen towel to prevent them from drying out.

Assembling and cooking the buns
Cut 14 pieces of parchment paper into 3”x3” squares, and set aside. On a clean and lightly floured flat surface, take a dough ball, roll it out from edge to center, rotate, and repeat until it forms a 4-inch circle. The center should be slightly thicker than the edges. Your buns need solid footing, after all.
Add about 2½ tablespoons of filling to the center, then pleat and twist the bun repeatedly until the top is closed. Sit the bun on a piece of the prepared parchment paper and place it on the rack of your steaming vessel of choice, with at least 1 cm of clearance on all sides. Repeat until all the buns are assembled.
Check our Chinese cooking tools page for steamer setup options. You could use a steamer rack in a wok, a multi-level metal steamer or a bamboo steamer. Just make sure the steaming rack is at least 1½ inches above the water so the boiling water doesn’t touch the buns during the cooking process. Carefully put the buns inside the steamer, cover the lid, and let the buns rest for about 20 minutes (do not turn on the stove yet!)
When the buns are ready to be cooked, turn the heat on high to start the steaming process. Once the water starts to boil and steam is visible, turn the heat down to medium, and steam the buns for another 10 minutes. After 10 minutes, shut off the heat, and let the buns rest inside the steamer for 5 minutes. DO NOT REMOVE THE COVER. This is an important step, because if you remove the cover too early, the buns will collapse and lose their fluffiness! And if you are steaming buns in multiple batches, be sure to start each batch with cold water!
These buns can be enjoyed immediately. You can also store any leftovers in an airtight container in the refrigerator or freezer. Reheat in the microwave for about 1 minute or re-steam for about 6-8 minutes.

https://gscrochetdesigns.blogspot.com. one can see my crochet creations  

https://kneereplacement-stickclub.blogspot.com. for info on knee replacement

https://cancersupportindia.blogspot.com  for info on cancer and health related topics

https://GSiyers home remedies.blogspot.com   is the latest addition to my blogs


Wednesday, April 22, 2026

White Chocolate Raspberry Cheesecake Bars

 White Chocolate Raspberry Cheesecake Bars white chocolate raspberry cheesecake bars

Ingredients:

Raspberry Sauce

2 tsp room-temperature water, divided

1 tsp cornstarch

1 and 1/2 cups (205g) fresh or frozen raspberries (do not thaw)

2 tbsp (25g) granulated sugar

Crust

22 regular Oreo cookies 

5 Tbsp  (72g) unsalted butter, melted


Filling

6 ounces (170g) white chocolate, finely chopped

2 8-ounce blocks (16 oz; 450g) full-fat cream cheese, softened to room temperature

1/3 cup (65g) granulated sugar

1 Tbsp (8g) all-purpose flour

1 tsp lemon juice

1 tsp pure vanilla extract

1/8 tsp salt

2 large eggs, at room temperature


Preparations

Make & cool the raspberry sauce: The raspberry sauce must cool down completely before using, so I recommend making it first. Mix 1 teaspoon water with 1 teaspoon cornstarch in a very small bowl. Set aside. Combine raspberries, granulated sugar, and remaining 1 teaspoon of water together in a small saucepan over medium heat. Stir the mixture as it begins to cook, breaking up some of the raspberries as you stir. Once simmering, add the cornstarch mixture. Continue to stir and allow to simmer for 3 minutes. Remove the pan from heat and press through a fine mesh strainer to remove the seeds. Allow the thin raspberry sauce to cool completely before using. Cover and store for up to 1 week in the refrigerator.

Preheat oven to 350°F (177°C). Line the bottom and sides of a 9" square baking pan (8-inch is too small) with parchment paper, leaving an overhang on the sides to lift the finished bars out (makes cutting easier!). Set aside. 

Make the crust: In a food processor or blender, pulse 22 Oreos (including the cream filling) into a fine crumb. You should have about 2 cups (packed) crumbs, or 250g. Pour crumbs into a large bowl. Add the melted butter and stir to combine. The mixture will be thick and quite wet. Try to smash/break up any large chunks. Pour the mixture into prepared pan. With medium pressure using your hand, pat the crumbs down into the bottom to make a compact, thick crust. Bake for 8 minutes. Remove from the oven and set aside. Leave oven on.

For the filling: Melt the chopped white chocolate in a double boiler or the microwave. If using the microwave: place the white chocolate in a medium heat-proof bowl. Melt in 20 second increments in the microwave, stirring after each increment until completely melted and smooth. Let the warm chocolate cool as you work on the other cheesecake filling ingredients. You can place it in the refrigerator, but just don’t let it solidify!

Using a handheld or stand mixer fitted with a paddle attachment, beat the cream cheese and granulated sugar together on medium-high speed in a large bowl until the mixture is smooth and creamy, about 2 minutes. Add the flour, lemon juice, vanilla extract, and salt, then beat until fully combined. On medium speed, add the eggs one at a time, beating after each addition until just blended. After the 2nd egg is incorporated into the batter, stop mixing. A few small lumps can remain. Pour in the cooled (but still liquid) white chocolate. Beat on low speed just until combined.

Pour half of the cheesecake filling onto the crust. It’s ok if the crust is still slightly warm. Drizzle half of the raspberry sauce all over the top. Spread remaining cheesecake filling on top. (It’s ok if the raspberry sauce has spread to the sides or slightly incorporates into the top layer of cheesecake.) Drizzle remaining raspberry sauce on top, then use a toothpick or knife to gently swirl everything together.

Bake for 32–36 minutes or until the cheesecake appears set on top and the edges are lightly browned. The bars will be puffy, but will sink slightly down as they cool. Place pan on a wire rack. Cool for 45 minutes at room temperature, then chill in the refrigerator for at least 3 hours (and up to 1 day) before slicing. If you plan to chill the bars for longer, loosely cover with aluminum foil after 3 hours of chilling.

To slice, lift the bars out of the pan as a whole using the parchment overhang on the sides. Cut into squares with a sharp knife. For extra neat squares, wipe the knife clean between each cut.

Cover and store leftover cheesecake bars in the refrigerator for up to 1 week. 


https://gscrochetdesigns.blogspot.com. one can see my crochet creations  

https://kneereplacement-stickclub.blogspot.com. for info on knee replacement

https://cancersupportindia.blogspot.com  for info on cancer and health related topics

https://GSiyers home remedies.blogspot.com   is the latest addition to my blogs


Sunday, March 22, 2026

Citrus Strawberry Rhubarb Pie


Ingredients:
All Butter Pie Dough
 
 ⅔ cup ice cold water
2 ⅔ cup all-purpose flour
1 tbsp granulated sugar 
½ tsp salt
1 cup very cold butter diced
1 egg
1 splash milk
turbinado sugar for sprinkling

Citrus Strawberry Rhubarb Filling
 
¾ lb fresh rhubarb cut into ½-inch pieces
2 cups ripe strawberries sliced
⅔ to ¾ cup granulated sugar depending on sweetness of berries
zest and juice of ½ and orange
⅛ to ¼ tsp cardamom  pdr
1 pinch salt
2 tbsp cornstarch
1 tbsp all-purpose flour
 
Preparations

All Butter Pie Dough In a large bowl, stir together the flour, salt, and sugar.  Cut in the cold butter with a pastry cutter or by hand, rubbing the pieces of butter between your thumb, index, and middle fingers.  Once the pieces are no longer lager than about a peanut, begin to flatten the pieces of butter in sheets between your palms.  Be careful not to over-work the butter or let it get too warm.
 
Working with only a couple tablespoons at a time, add in about 6 to 8 tablespoons of the water.  Stir together using a wooden spoon or even just a clean hand in the bowl.  The dough should appear fairly shaggy and not sticky.  Once you can squeeze a few pieces together and they hold, the dough is done being mixed and hydrated.  Do not over-mix or add too much water*.
 
Divide the dough into half and shape each piece into a disk.  Wrap in plastic and refrigerate for at least a couple of hours, or overnight (preferably).
 
When ready, bring one disc out of the refrigerator and allow to rest for about 10 minutes.  Lightly flour the work surface and begin to roll out the dough, working from the center out – rotating the dough after each roll.  Roll the dough until about ¼ inch thick and about 12 to 13 inches in diameter. 
 
Gently roll the dough around the rolling pin and transfer to a 8 or 9 inch pie tin.  Fit the dough into the bottom of the tin and up the sides, allowing for about an inch of overhang.  Trim with kitchen sheers and place back in the refrigerator.
 
For the lattice top, repeat step 5.  Using a ruler and a paring knife, cut about 24 strips, about ½-inch wide.  Braid two sets of three (strips) to create the briads, if desired. Place all the cut dough on a baking sheet or cutting board and place in the refrigerator.
 
Create the filling (see recipe to follow). Remove the pie tin from the fridge and tip in the filling. Leave a gap of about ½-inch from the top to keep the filling from spilling over too much (like mine did) while baking.
 
Remove the cut strips from the refrigerator and begin creating a the lattice pattern, carefully weaving over and under each strip of the opposite direction. For this design, I weaved pairs of strips, slipping in the braids for two regular strips.  Allow for some excess dough on the end of each strip, then trim. Fold the edges of the bottom crust up and over the lattice. Press to seal. Use your fingers to crimp the edges . Roll out any other the dough scraps and cut into strips. Coil the strip around itself and pinch one end to create the roses. Cut out leaves with a paring knife and arrange on top of the lattice. Return the pie back to refrigerator for at least 30 minutes.  Meanwhile, pre-heat oven to 425F. Just before heading into the over, create an egg wash by whisking together a whole egg and a splash of milk.  Brush the egg wash over the entire top of the crust and sprinkle with turbinado sugar Place pie on a baking sheet and bake for about 25 minutes. Turn down the heat to 375F and continue to bake for an additional 35 to 50 minutes or until the top is golden brown, the juices are bubbling, and the apples are cooked through.  If the top begins to brown too quickly, cover with foil. Allow the baked pie to completely cool before slicing and serving.

Citrus Strawberry Rhubarb Filling In a large bowl, toss all of the ingredients together. Adjust the sweetest as needed, but avoid eating any of the raw rhubarb.


https://gscrochetdesigns.blogspot.com. one can see my crochet creations  

https://kneereplacement-stickclub.blogspot.com. for info on knee replacement

https://cancersupportindia.blogspot.com  for info on cancer and health related topics

https://GSiyers home remedies.blogspot.com   is the latest addition to my blogs


Friday, March 20, 2026

Unbaked Milk Tarts

 The Best Classic South African Unbaked Milk Tarts 

 Ingredients:

  • 200 gm 1 packet biscuits ( Marie / Digestive / Glucose biscuits)
  • 100 gm butter melted
  • 700 ml full cream milk
  • 1 tin condensed milk
  • 2 tsp vanilla extract
  • 2 eggs separated
  • 50 gm cornstarch
  • 50 ml water
  • pinch of salt
  • Cinnamon to decorate

 Instructions

  • Break the biscuits into fine crumbs by hand or by using a food processor and mix in the melted butter until well combined.
  • Line a 25cm-26cm pie tin with the biscuit crumbs and press down to compact. Place in the fridge or freezer to set while you make the filling.
  • If you are making individual milk tarts, use 1 1/2 packets of biscuits (300 grams) and 150 grams of butter. Line the base and sides of 12 x 8cm individual tart cases with the biscuit crumbs and press to compact. Place in the fridge or freezer to set while you make the filling.
  • In a medium-sized pot, heat the milk, condensed milk and vanilla over a medium until boiling point (make sure you stir until the condensed milk is dissolved).
  • While that is heating up, separate the eggs and whisk the eggs whites to soft peak in a bowl. Set aside.
  • In another bowl whisk the egg yolks, cornstarch, water and salt. When the milk is at boiling point take it off the heat and allow it to cool for 3 minutes. Add the egg yolk mixture slowly while whisking vigorously all the time.
  • Return the pot to a low heat and continue to whisk constantly until it thickens, about 5 -7 minutes.
  • Add the egg whites to the milk mixture and whisk for about 2 more minutes until well combined.
  • Pour the filling into the lined pastry cases and allow it to cool to room temperature before putting it in the fridge to set completely.
  • Sprinkle generously with cinnamon and serve.

Notes

It is best to make this Milk tart the day before and allow it to fully set and cool in the fridge overnight. the flavour will also improve overnight. The filling can be used as a chilled thick custard for various other desserts. To make 12 mini milk tarts increase the crumb mixture to 1.5 packets (300 grams) and 150 grams of butter. Store the milk tart in the fridge.


https://gscrochetdesigns.blogspot.com. one can see my crochet creations  

https://kneereplacement-stickclub.blogspot.com. for info on knee replacement

https://cancersupportindia.blogspot.com  for info on cancer and health related topics

https://GSiyers home remedies.blogspot.com   is the latest addition to my blogs