Showing posts with label asafetida( hing). Show all posts

Tuesday, December 9, 2025

The Ancient Spice That Replaces Garlic and Onion With a Pinch

 What on earth do Devil's Dung, Merde du Diable, and Satan's Weed have in common with something the Persian Empire once called Food of the Gods? They're all colorful historical nicknames that different cultures have given the powerful spice asafetida—known as hing across South Asia—in an effort to capture its famously pungent aroma. (Traditionally in parts of India, whole chunks of the resin were tucked into sacks of grain or flour to deter insects, as its strong aroma is said to be unpleasant to pests.)

I didn't grow up with asafetida. My father disliked its infamous sulfurous aroma, so my mother never cooked with it at home. But his family outside our home did use it regularly, and whenever we visited them, I loved the depth and savoriness in their food—even if I couldn't quite place it at that time. Only years later, while researching my first cookbook—Maharashtrian Cuisine: A Family Treasury—did I realize that the flavor I'd been tasting on those occasions was asafetida.  

Asafetida is a resin that smells sharp and sulfurous in its raw form but transforms completely when it hits hot oil or warm liquid, turning mellow, savory, and deeply aromatic in cooking. A pinch is enough to bring an allium-like depth to lentils, vegetables, dals, and more, which is why it's central to many vegetarian traditions and seasoning techniques in India. Though still unfamiliar to many Western cooks, asafetida is one of the most powerful flavor builders you can keep in your pantry. Learn what it is, how it's used across India, and how to cook with and store it at home.

What Is Asafetida?

Native to Iran and Afghanistan, asafetida is a ground dried resin harvested from the roots of Ferula asafoetida, a plant in the carrot family that also includes fennel, parsley, and celery. A milky sap from the root hardens into an amber-like resin, which is ground into the pungent powder. In its raw form, its sulfurous aroma is so strong that that early European traders called it "devil's dung"—but the transformation it undergoes when cooked is remarkable. Because of that dramatic shift from raw to cooked, asafetida is almost always bloomed in fat or added directly to simmering liquid. 

A Short History of Asafetida

Long before asafetida became a cornerstone of Indian vegetarian cooking, it played an important role in ancient Mediterranean cuisine. In Roman times, a now-extinct herb called silphium was prized as a flavoring, medicinal plant, and even an aphrodisiac, according to a 2022 article in National Geographic. When silphium went extinct around the 1st century CE, Greek and Roman cooks turned to a cheaper spice that served a similar culinary role. According to a 2020 paper titled The Curious Case of Asafoetida by Sharmila Vaidyanathan for the Oxford Food Symposium, that substitute was asafetida, which traders sourced from regions including modern-day Libya and Persia. Silphium's exact species has never been identified, so its relationship to asafetida is uncertain, though ancient writers described the two as having similar flavor qualities.

But asafetida's history in South Asia stretches back even further. India's food historian K. T. Achaya notes that meat dishes seasoned with asafetida appear in the Mahabharata, one of the two major Sanskrit epics of ancient India, pointing to its presence in the subcontinent as early as the first millennium BCE. Assyrian clay tablets and early Persian medical texts mention the resin’s culinary and medicinal uses long before it became essential to Indian seasoning.

Over time, trade routes carried asafetida from present-day Iran and Afghanistan to northern India, where it took firm root in regional cuisines. Today it remains a defining spice in many parts of the country—especially in communities that culturally avoid onions and garlic—and its influence has only grown as more cooks discover just how transformative a single pinch can be. 


How Asafetida Is Traditionally Used Throughout India

My parents' coastal Maharashtra Brahmin communities share geography but not culinary rules. My mother's Brahmin community cooked with onions and garlic and traditionally ate fish, while my father's side came from a Konkanastha Brahmin sub-community whose priestly lineage shaped very strict dietary practices. They followed a fully vegetarian diet and avoided onions and garlic, ingredients considered overly "strong" or tempting. In their cooking, asafetida stepped in to provide the savoriness those ingredients would normally contribute.

That contrast shaped the food I grew up eating. My maternal grandmother cooked with ginger, garlic, and onions, layering gentle depth into vegetarian dishes such as lentils, as well as non-vegetarian dishes, both meat and fish. My father's side relied on a different set of techniques and flavors: quick, light cooking that kept vegetables crisp; a touch of jaggery to balance salt; cumin and coriander for warmth and aroma; and always a pinch of asafetida for a sharp backbone.

Across India, asafetida is widely used in seasoning techniques—known as vagar, tadka, or phodni, depending on the region—where spices are briefly bloomed in hot oil to build the base flavor of a dish. In northern India and West Bengal, asafetida is often paired with cumin in both vegetarian and meat dishes. In Gujarat, Maharashtra, and further south, it's more commonly paired with mustard seeds and turmeric. In all of these traditions, a little goes a very long way: A pinch is enough to permeate an entire pot, and you can often smell it as you walk past a home where someone is cooking with it.

It's interesting to note that India alone accounts for an estimated 40% of the world's asafetida consumption, according to a 2020 BBC article by Aparna Alluri, Outside India, it's used mostly in medicinal or pest-repelling contexts—particularly in parts of Iran and Afghanistan—rather than in everyday cooking.

Where to Buy Asafetida and How to Store It

Asafetida is easy to find once you know where to look. Most Indian grocery stores carry it under the name hing, usually sold in small jars near the spice section, and it's widely available online from South Asian brands. Asafetida is available as dried resin chunks or wet sap, but powdered asafetida—typically blended with starch or gum—is the most common and easiest form to use at home. A small jar is usually all you need.

Because the spice is so potent, proper storage is essential. Keep the container tightly sealed and tucked inside another airtight container or spice tin to prevent the aroma from escaping. Store it in a cool, dry place away from moisture. Since a small jar can last up to a year, it's worth taking a moment to store it well.

How to Cook With Asafetida in Everyday Cooking

While its history stretches back thousands of years, asafetida works beautifully in many everyday cooking applications. If you're new to it, start small—a pinch is all you need. Here are some easy ways to bring its savory flavor into your food:

  • Bloom a pinch in hot oil or ghee before cooking lentils or vegetables. The sharpness softens instantly and adds the savoriness that onions and garlic usually provide.
  • Add it to potato dishes—mashed, sautéed, or roasted—after blooming it in fat for a subtle savory backbone.
  • Stir a pinch into simmering beans (black, kidney, white, or chickpeas) to round out their flavor.
  • Bloom it with mustard seeds, cumin, turmeric, or curry leaves when making tadka, letting the spices sizzle briefly in hot oil to release their flavor. This works especially well as a seasoning base for Indian rice dishes like pohé (flattened rice) and as a pickling base for fruits and vegetables.
  • Add it to simple vegetable sautés like cabbage, okra, zucchini, or green beans.
  • Add a pinch to soups or stews as they cook to deepen their savory base.
  • Use it to season ground meat. Mix about 1/8 teaspoon asafetida into one pound of ground meat to enhance savoriness. Use the seasoned meat mixture to make meatballs or hamburgers
  • Bloom a pinch in butter or oil before scrambling eggs to give them a subtle, allium-like depth.

How to Avoid Pitfalls When Using Asafetida

Asafetida is simple to use once you understand how it behaves, but there are a few things to keep in mind. Because it's so potent—and because its aroma clings easily—it helps to know the best ways to handle it. Here are the main tips to keep in mind:

  • Don't consume asafetida raw. It needs heat to mellow out and will taste far too strong in its raw state.
  • Don't leave the jar open. Its aroma will cling to wood, plastic, and even other ingredients nearby.
  • Avoid refrigerating it, unless you want the smell to permeate everything inside the fridge.

Keep the container tightly sealed, ideally inside a second airtight container or spice tin, to prevent the smell from escaping.

The Takeaway

Asafetida may be bold in its raw form, but with a little heat and a restrained hand it opens up into one of the most reliable flavor builders I know. A single pinch adds savory depth and unmistakable character to everyday dishes, whether you're cooking lentils, vegetables, beans, or soups. If you're new to it, you'll be surprised by how quickly it becomes indispensable; if you already use it, consider this your nudge to reach for it even more. Keep a small jar on hand, and it will have a way of sneaking into your everyday cooking routine.


https://gscrochetdesigns.blogspot.com. one can see my crochet creations  

https://kneereplacement-stickclub.blogspot.com. for info on knee replacement

https://cancersupportindia.blogspot.com  for info on cancer and health related topics

https://GSiyers home remedies.blogspot.com   is the latest addition to my blogs


Sunday, July 20, 2025

Make Perfect Bedmi Poori With Urad Dal Stuffing

  Bedmi

Bedmi Poori is made with wheat flour and a spicy stuffing of urad dal. This urad dal stuffing makes this poori special. Many of us must have gone to the halwai and enjoyed Bedmi Poori and Aloo ki Sabzi because it is not easy for everyone to make it at home. But if you are among those people who want to make Bedmi Poori at home, then here we have come up with some easy tips to help you make Bedmi Poori with authentic taste. So let's look at these tips without any delay. 

Here Are 5 Tips To Make Bedmi Poori:

1. Knead soft dough

To make Bedmi Poori, add wheat flour, semolina, kasuri methi, salt, carom seeds, and oil in a bowl and mix everything well. After mixing all the ingredients well, knead a soft dough by adding lukewarm water.

2. Use lukewarm water

It is necessary to use lukewarm water while kneading the dough for Bedmi Poori because semolina is mixed with wheat flour and it takes time to swell and get harden. If kneaded with lukewarm water, it swells quickly and keeps the dough soft. However, do not knead the dough too soft; make it slightly soft.

3.Rest the dough

Resting the dough is also an important step. Let the Bedmi Poori dough rest for at least an hour. This helps all the ingredients to be absorbed in the flour.

4.Stuffing should not be too wet

While making the stuffing of urad dal, add the right amount of water. If the stuffing is too wet, it will burst when filled in the poori. After preparing the stuffing, keep it covered. This will make the coarse lentils soft.

5.Fry on a low-medium flame

Before frying Bedmi Poori, heat the oil properly. After that, set the flame on low-medium heat. If you fry the poori at this stage, the puris will become crispy.

 Ingredients

For the Filling:

1 cup dhuli urad dal (soaked in water for 3 hours)

1/8 tsp asafoetida

1 tsp cumin seeds/ jeera

1 tsp garam masala

1 tsp chili powder

1 tsp coriander powder

1/8 tsp black pepper, powdered

For the Dough:

2 cups whole-wheat flour

water as needed

Oil (to deep fry)


Preparations

Mix the salt and oil into the flour.

Knead into a soft and pliable dough with water.

Cover the dough and rest for at least half an hour. Grind the lentils coarsely, and add the rest of the ingredients for the filling.

Shape into small rounds.

You will need to wet your palms off and on, to make sure that the filling does not stick to them.

Make walnut-sized smooth balls with the dough and flatten between your palms.

Take one round, and pinch and wet the edges all around.

Place a round of filling in the center. Bring the edges together and pinch to seal.

Flatten by pressing gently and roll into rounds.

Grease the surface of the rolling pin, if necessary.

Heat the oil till such time as a piece of dough tossed in comes up immediately.

Fry the bedmis in it over medium heat, till golden on both sides.

Serve with Aloo ki sabzi.


https://gscrochetdesigns.blogspot.com. one can see my crochet creations  

https://kneereplacement-stickclub.blogspot.com. for info on knee replacement

https://cancersupportindia.blogspot.com  for info on cancer and health related topics

https://GSiyers home remedies.blogspot.com   is the latest addition to my blogs


Sunday, June 1, 2025

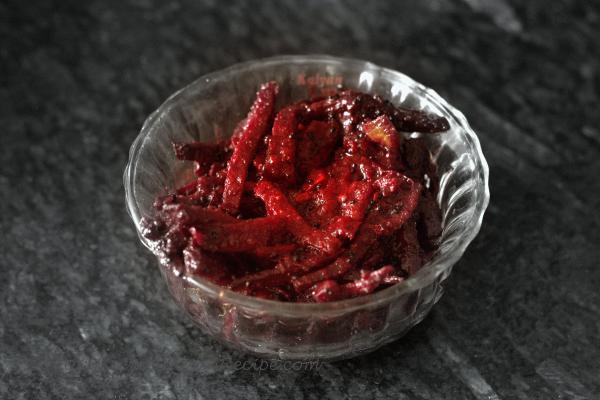
Beetroot Pickle

 photo of beetroot pickle  

 Ingredients: 

Beetroot- 200g
Garlic- 18 cloves
Ginger- 2 inch piece
Gingelly  oil- 100 ml
Turmeric powder- 1/2 tsp
Chili powder- 2tsp
Kashmiri Chili powder- 2 tbsp
Fenugreek seeds- 1 tsp
Asafoetida- a pinch
Jaggery- 50 g
Salt- 2 tsp
Vinegar- 2 tbsp
Mustard seeds- 1/4 tsp
 
Directions: 
Peel and cut thin strips of beetroot. Clean the ginger and garlic and cut them into small pieces.
Melt jaggery with 2 tbsp water and strain it. Boil 1 cup water with salt and vinegar set it aside too.
Heat the oil and fry the ginger strips and garlic pieces. Set the ginger and garlic aside in a plate after they are golden.
To the same oil add the mustard seeds. When the mustard splutters, add the beetroot and saute for 2-3 minutes.
Add the spice powders and saute for 2-3 minutes. Keep the flame low or you might burn the spice powders, and toss these ingredient with the spices.
Saute for 2-3 minutes so that the beetroot, ginger and garlic get coated with the spices.
Now add the vinegar with brine water and bring the pickle to a simmer. Add jaggery too and let it simmer till the pickle thickens a bit.
It might take 5-8 minutes for the pickle to thicken. Switch off the flame after 3 minutes.
Store in airtight jars once the pickle cools down.
 

https://gscrochetdesigns.blogspot.com. one can see my crochet creations  

https://kneereplacement-stickclub.blogspot.com. for info on knee replacement

https://cancersupportindia.blogspot.com  for info on cancer and health related topics

https://GSiyers home remedies.blogspot.com   is the latest addition to my blogs
 

Sunday, March 16, 2025

Bitter gourd powder OR pavakkai podi

 Podi in Tamil means powder. In our house, we all love paruppu podi, Ellu/ sesame seeds podi, thengai/ coconut podi, curry pdo, which is used for stuffing brinjal, bhindi. Now this will be the favourite for my son-in-law and granddaughter, who  both love pavakkai.

 INGREDIENTS

Pavakkai / Bitter gourd – 3

Yogurt – 2 tbsp

Mustard seeds – ½ tsp

Turmeric powder – ¼ tsp

Oil – 1 tbsp

Salt – to taste

Asafetida – ¼ tsp


Dry roast  

Channa dal – 1 tbsp

urad dal – 2 tbsp

Cumin seeds – 1 tsp

Coriander seeds – 1 tsp

Red chili – 3

Dry roast these ingredients, add put it over tamarind which will be easier to grind.

Tamarind – a small lime size

TIP- I start coughing if I've to roast red chilies, I add chilies when I roast the dal, then it will not make you cough. 


METHOD

Wash the bitter gourd and then slice them vertically. Remove the thick fibrous part in the middle and then grate the bitter gourd in a grater. Now squeeze the grated bitter gourd and spread over a paper towel or kitchen towel for about 10 minutes.

Transfer the bitter gourd to a bowl and mix it with the yogurt. Keep it aside for about 30 minutes. This helps to remove the bitterness from the vegetable. After 30 minutes, squeeze out the bitter gourd and keep it aside.

In the meantime, dry roast all the ingredients mentioned above and then grind it into a powder once they cool down.

In a pan, heat the oil and add the mustard seeds. Now add the turmeric powder and asafetida and fry it for about 20 seconds. Then add the squeezed bitter gourd and salt and fry it in low flame until the bitter gourds are golden brown and cooked. This takes a good 20 minutes. Make sure you fry it in low flame otherwise you might burn the vegetable.

Add the ground powder to the cooked bitter gourd and mix well. Let it fry for about 2 minutes in low flame and then take it off the flame.

Let it cool well and then store in an airtight container.

It will taste yummy with hot rice and ghee with roasted papad/ chips.


https://gscrochetdesigns.blogspot.com. one can see my crochet creations  

https://kneereplacement-stickclub.blogspot.com. for info on knee replacement

https://cancersupportindia.blogspot.com  for info on cancer and health related topics

https://GSiyers home remedies.blogspot.com   is the latest addition to my blogs


Wednesday, March 5, 2025

Samosa on a platter- baked !

 When you think of samosa, you think of the triangle shaped one. Well, this has the same ingredients, it is healthy, as it is baked, you can eat it comfortably with spoon !


INGREDIENTS

for base

oil 1 tbsp

potatoes boiled and chopped small cubes 2 cups

green peas blanched 1/2 cup

green chilies 2-3 finely chopped

turmeric pdr  1/2 tsp

jeera 1 tsp

hing little

salt to taste 

coriander pdr 1 tsp

red chili pdr to taste


for topping

wheat flour  1 cup

salt to taste

butter  3-4 tbsp

baking pdr 1 tsp


DIRECTIONS

heat a kadai/ pan with oil, add jeera, once it crackles, add hing , fry for few seconds with chopped green chilies,  add turmeric pdr, chili pdr and coriander pdr, fry for a minute, add little water, add green peas, let it cook for 2 minutes

 add potatoes, salt mix well, adding coriander leaves, cover and cook for 2 minutes, remove, spread on a greased tray or oven proof dish

mix well wheat flour, salt and butter to resemble crumbs, spread this crumbs on top of potato mixture

bake in pre-heated oven @ 180 C for 10-15 minutes till the top id golden

serve hot.


NOTE- depending on how many you're making, you can increase the amount of veges, also the topping, then bake in 2 parts if you don't have a big baking dish  or tray.  Healthy version of samosa, as it is not fried !

You may add amchur pdr, garam masala pdr in the potato mixture as per your taste.

 To make it gluten free, you may add quinoa flour, pearl millet flour, almond flour.


https://gscrochetdesigns.blogspot.com. one can see my crochet creations  

https://kneereplacement-stickclub.blogspot.com. for info on knee replacement

https://cancersupportindia.blogspot.com  for info on cancer and health related topics

https://GSiyers home remedies.blogspot.com   is the latest addition to my blogs


Friday, December 20, 2024

Bharwa Bhindi OR Okra in Stovetop / Air Fryer

 Ingredients

 1 pound okra / bhindi
teaspoon hing (asafetida)
2 tablespoon oil, (for stove top)

For Stuffing Masala Stuffing

2 tbsp coriander pdr

2 tsp cumin / jeera pdr

1 tsp turmeric pdr

2 tsp dry mango pdr  (amchur), adjust to taste

2 tsp red chili pdr, adjust to taste

1 tsp salt, adjust to taste

Instructions

Wash the okra. Spread okra on a clean kitchen towel and pat dry to absorb any extra moisture. Cut the top of the okra. Make a vertical (lengthwise) slit on each okra, be careful not to cut the okra in half. It will still be intact on the other side. Prepare the stuffing for the okra. Take a bowl, add all the dry spices - coriander powder, cumin powder, dried mango powder (amchur), red chili powder, turmeric and salt to taste. Mix all the spices until well combined. Take a bhindi (okra) and stuff it generously with the prepared stuffing (masala). Repeat the process with the remaining okras. Keep it aside. Save any leftover stuffing (masala) for later use.  Stove-top  Stuffed Okra Heat oil in a kadai or skillet. When oil is hot, add a pinch of asafetida. Carefully, slide all the stuffed okra into the skillet. Add all the leftover stuffing(masala). Let the bhindi (okra) sear for 30-60 seconds on a high heat. Reduce the heat to low, cover and cook. Gently, stir the okra every couple of minutes, until the okra is tender and cooked. It takes around 8-10 minutes for bhindi (okra) to be cooked. Dish out okra in a serving dish. Garnish with some fresh cilantro and freshly squeezed lemon juice (optional). Serve stuffed bhindi roti, naan, or paratha.  

Air Fryer Bharwa Bhindi (Stuffed Okra) Spray the air fryer basket with some cooking oil. Place the stuffed bhindi in a single layer in the air fryer basket. Spray okra with some cooking oil. Air fry bhindi  at 350F for 10 minutes. Remove the basket and check if fried properly
 Note: Different air fryer have different temperature settings. Add 1 to 2 minutes of cooking time if required.

Repeat the process for the remaining okra. Dish out okra in a serving dish. Garnish with fresh cilantro and freshly squeezed lemon juice (optional). Serve stuffed  bhindi  with roti, naan, or paratha.


https://gscrochetdesigns.blogspot.com. one can see my crochet creations  

https://kneereplacement-stickclub.blogspot.com. for info on knee replacement

https://cancersupportindia.blogspot.com  for info on cancer and health related topics

https://GSiyers home remedies.blogspot.com   is the latest addition to my blogs.


Saturday, December 14, 2024

Jharkhand’s Dhuska


Ingredients

1/4


Method :

Transfer the soaked rice, chana dal, and urad dal into a blending jar along with ginger and green chilies and blend everything into a smooth paste.
Transfer the prepared batter to a mixing bowl, add salt, turmeric, and cumin seeds along with fruit salt and give everything a good mix.
Heat some oil for frying, then using a spoon, add the prepared batter into medium-hot oil and fry until they are golden and crisp.
Enjoy these piping hot dhuska with mint and coriander chutney.


https://gscrochetdesigns.blogspot.com. one can see my crochet creations  

https://kneereplacement-stickclub.blogspot.com. for info on knee replacement

https://cancersupportindia.blogspot.com  for info on cancer and health related topics

https://GSiyers home remedies.blogspot.com   is the latest addition to my blogs.