Showing posts with label oven. Show all posts

Wednesday, March 4, 2026

How to Ripen an Avocado in 10 Minutes

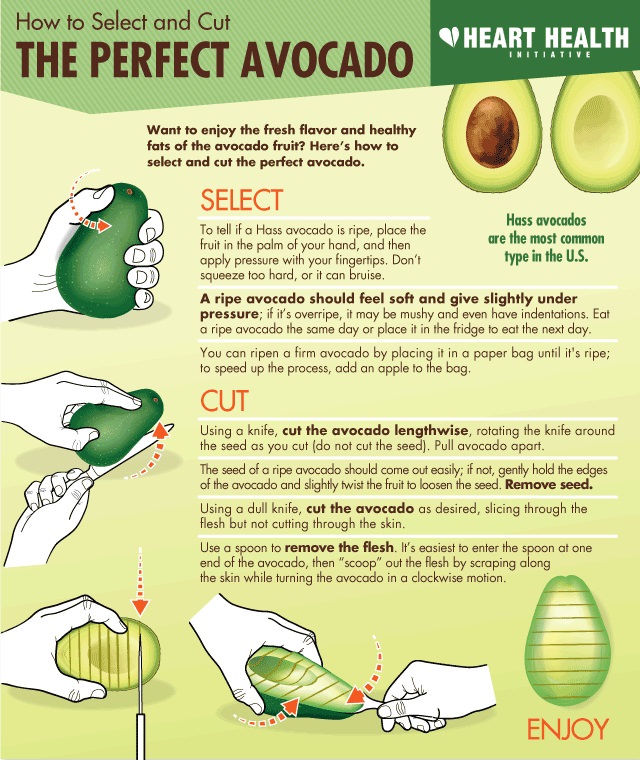
 Avocados are an incredibly popular fruit that can be enjoyed in a number of delicious ways - from stuffing it with various ingredients, to preparing guacamole, to making brownies and more. But, what if you've planned to prepare a recipe using avocados yet all you have is an unripe avocado? This foolproof trick will make your rock hard avocado soft and creamy in minutes. Just follow these simple instructions:

Before you start: 

Here's a short list of things you need: a baking sheet, some tinfoil, and an unripe avocado. 

What to do: 

1. Wrap the fruit in tin foil and set it on the baking sheet. 

2. Pop the avocado into the oven at 200°F (93°C) for 10 minutes or until the avocado has softened (depending on how hard it is, it may take up to an hour to soften.) 

 3. Remove the avocado from the oven and put your now soft and ripe avocado in the fridge until it has cooled. 

Why it works: This quick method is effective at ripening an avocado primarily because avocados produce ethylene gas, which is typically released slowly, causing the fruit to ripen. By wrapping the avocado in tin foil, the gas surrounds it, speeding up the ripening process.

How to Ripen an Avocado in 10 Minutes


https://gscrochetdesigns.blogspot.com. one can see my crochet creations  

https://kneereplacement-stickclub.blogspot.com. for info on knee replacement

https://cancersupportindia.blogspot.com  for info on cancer and health related topics

https://GSiyers home remedies.blogspot.com   is the latest addition to my blogs

Sunday, November 30, 2025

What the Bottom Drawer of Your Oven Is Really For—and How to Use It Properly

Newly updated contemporary classic open concept kitchen with new stainless steel stove range and hood appliances and granite counter top. 

 Ovens can vary quite a bit from home to home. You can have a gas oven, an electric oven, a convection oven, a double oven—the list goes on and on. Maybe you even have a vintage stove with a number of unique features. Most standard ovens, however, share one common feature: that drawer on the bottom.

While the drawer (or bottom compartment) itself is pretty commonplace, its purpose can vary. Here's what you need to know about that bottom drawer on your oven and what it's actually supposed to be used for.

What Is the Bottom Drawer of an Oven For?

Though the bottom of your oven may look generally the same as the bottom of your neighbor's oven, it could have an entirely different function. And, if you use your oven's bottom drawer wrong, it could lead to some kitchen disasters, and potentially, a fire. So, here are the three most common purposes for the bottom oven drawer.

Storage

Some drawers are just that, drawers. If the bottom compartment on your oven looks just like a deep, metal drawer, with no racks or heating components in sight, then it's probably intended just for storage. However, you should still be thoughtful about what you store here.

While this drawer isn't intended for heating purposes, it can still get warm from the oven's heat, so don't store anything plastic that could potentially get warped or anything flammable. Instead, you can use this drawer to store baking sheets, muffin pans, or any pots and pans (as long as they don't have any handles or components that aren't heat-safe).

Warming

On some ovens, the bottom compartment is for warming dishes after they've been cooked. This can be especially helpful if you're cooking lots of food for a large gathering or holiday—that casserole or side dish can stay fresh and warm while you finish cooking the main dish in the oven.

If your oven's bottom drawer is a warming drawer, you should be able to find a button or a dial on your oven that's labeled "Warming" or "Warming Drawer." You can also look up your appliance details to confirm the purpose of your bottom drawer and find out its recommended uses.

Broiling

A step up from warming, broiling is another common function of the bottom drawer of an oven. Broiler drawers are especially common on gas ovens, and will typically look more narrow than warming or storage drawers. The broiling function is typically used to finish a dish, quickly toasting or browning foods. (It's especially great for getting that crispy, browned look on top of cheesy dishes.)

Be careful when using the broiler function as it gets hot fast and can end up burning your food if you don't keep an eye on it. You definitely don't want to try to use this function for dishes you simply want to warm up—and you should never store anything in this drawer, either.

Sometimes, you might have a broiler option in the main part of your oven, while the bottom compartment is for warming or storage, so be sure to double-check where the broiling function is before you turn it on. 


https://gscrochetdesigns.blogspot.com. one can see my crochet creations  

https://kneereplacement-stickclub.blogspot.com. for info on knee replacement

https://cancersupportindia.blogspot.com  for info on cancer and health related topics

https://GSiyers home remedies.blogspot.com   is the latest addition to my blogs

Wednesday, September 3, 2025

A Great Pest Removal Method Using Lemons and an Oven

Many of us prefer to turn off the air conditioner in the evening when the weather is nice and open the windows to let fresh air into the house. However, opening the windows is actually a party invitation for various insects that no one wants in their home.

Mosquitoes, flies and other pests are unwanted guests that no one enjoys, but the next simple tip will help you get rid of them easily, while leaving your home smelling great. All you need is an oven and a couple of lemons!

This tip is based on the fact that insects don’t like (to say the least) the smell of lemons, and hurry to leave any lemony scented room. 
 lemons
 
Here's what you need to do to get the results: 
 
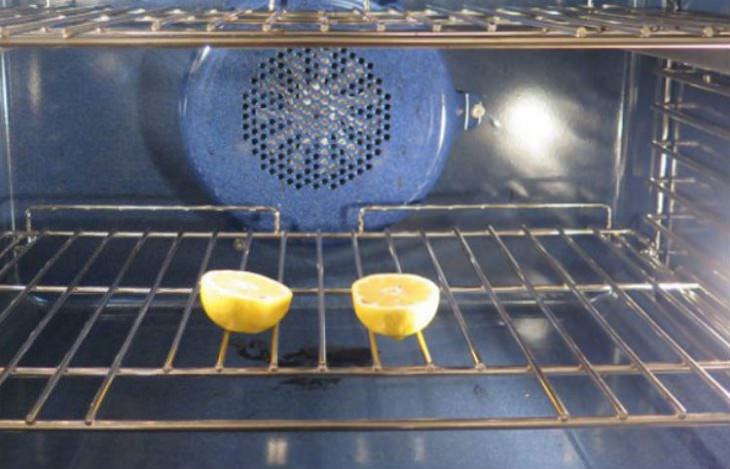
1. First, cut two or three lemons (depending on their size and the size of your house) into halves. In the morning, place the lemons in your oven while it’s off, cut side up and with the door open.
 
lemons
2. In the evening, close the door and turn on the oven for a few minutes on medium heat (so that the lemons don’t burn). 
 
3. Turn off the oven and let it cool for about 5 minutes. 
 
4. Next, open the oven door and place the lemons aside for further use as needed.

5. That's it! The lemon scent will spread from the oven to the kitchen and throughout your home, and you’ll get a great smelling, insect free house rather quickly!
 
Other pest removal methods using lemons: 
 
1. Place lemon peel or lemon zest by door frames, doors or near any cracks through which ants or other pests can get in. The smell will keep insects away, and even those who’ve already made their way in will prefer to find another home for themselves. 
 
2. Place half a lemon or lemon peel in a pot of water and bring to a boil. You can then transfer the liquid to a spray bottle and spray it in areas where ants frequent.
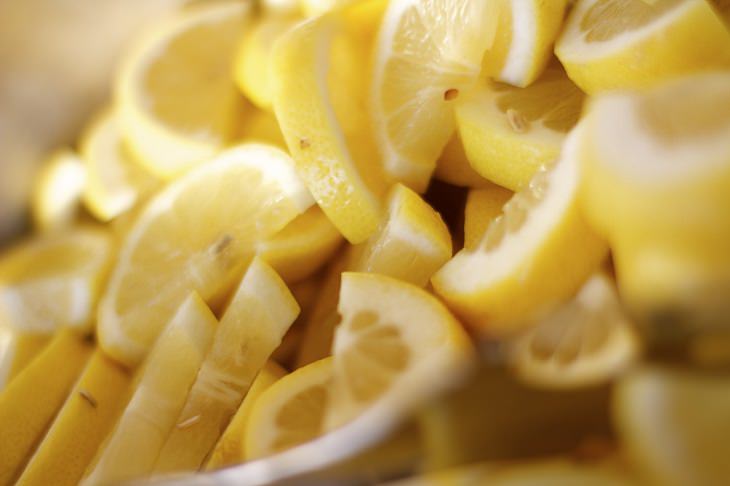
3. Are flies drawn to your plate during mealtime? Place a small bowl of lemon slices on the side of the table, lightly squeeze them, and you will be able to eat uninterrupted.


https://gscrochetdesigns.blogspot.com. one can see my crochet creations  

https://kneereplacement-stickclub.blogspot.com. for info on knee replacement

https://cancersupportindia.blogspot.com  for info on cancer and health related topics

https://GSiyers home remedies.blogspot.com   is the latest addition to my blogs


Thursday, September 19, 2024

Baked Tofu

 Ingredients:

  • Firm tofu cut into cubes – 200 gm
  • Besan – 1/2 cup
  • Onion powder – 1 tsp
  • Garlic powder – 1 tsp
  • Red chili powder – 3/4 tsp
  • Salt to taste – a pinch
  • Oil for brushing – 1 tsp
  • Chaat masala – a pinch

Method:

  1. Set the oven to preheat to 200°C. In a mixing bowl, add all the dry ingredients except chat masala and mix well.
  2. Coat the tofu cubes with the dry mixture very well. If the dry ingredients do not stick, then quickly dip the tofu cubes in water and roll in the dry mixture.
  3. Cover a baking tray with parchment paper, and brush it lightly with oil. Place the coated cubes of tofu on them. Brush the remaining oil on the cubes as well.
  4. Place the baking tray in the oven and bake at 200°C for 15-18 minutes or until they are baked well.
  5. Remove from the oven and sprinkle some chat masala over it. Cool slightly and enjoy!


https://gscrochetdesigns.blogspot.com. one can see my crochet creations  

 https://kneereplacement-stickclub.blogspot.com. for info on knee replacement

 https://cancersupportindia.blogspot.com  for info on cancer and health related topics

https://GSiyers home remedies.blogspot.com   is the latest addition to my blogs.

Monday, February 12, 2024

Baker's Cleaning Hacks

 Use vinegar and baking soda to clean your oven. Sprinkle baking soda on the bottom of your oven, then add enough vinegar to create a paste. Let it sit for a few hours, then scrub it away with a sponge or cloth.

Clean your mixer with warm water and dish soap. Use a soft cloth to avoid scratching the surface.

Use a damp cloth to clean your countertops. Wipe up any spills or crumbs right away to avoid stains.

Use a soft-bristled brush to clean your cookie sheets. Soak them in warm water and dish soap, then gently scrub the surface.

Use baking soda and lemon juice to clean your cutting board. Sprinkle baking soda on the board, then squeeze lemon juice on top. Scrub the surface with a sponge or cloth, then rinse with water.

Clean your kitchen appliances with a soft cloth and a mild detergent. Avoid using harsh chemicals that can damage the surfaces.

Store your baking tools and equipment in a clean and organized manner. This will make it easier to find what you need and avoid clutter in your kitchen.

Use a new toothbrush to clean small crevices in your baking pans - This is especially useful for getting into the corners and tight spaces of your baking pans. Simply dip a toothbrush in soapy water and use it to scrub away any dirt or grime.

Use baking soda and water to remove rust from baking pans: Mix baking soda and water to make a paste, then use a sponge to scrub the rust off the baking pans.


https://gscrochetdesigns.blogspot.com. one can see my crochet creations  

https://cancersupportindia.blogspot.com. feel free to view for easy, simple and health tips  

https://kneereplacement-stickclub.blogspot.com. for info on knee replacement

https://GSiyers home remedies.blogspot.com     is the latest addition to my blogs
.


Friday, December 18, 2020

How to Season a Cast Iron Pan: The Best Way

When it comes to cooking, a lot of it depends on the tools you use. The cast iron pan is probably one of the oldest and most needed utensils in the kitchen. You could use it for just about everything – from frying an omelette for breakfast to sautéing veggies for dinner. It’s truly a prized possession known for its versatility and ease of use passed on by grandmothers in many households. You heard us. The strong and sturdy pan is built to last for years, but just like any other cooking equipment, it needs to be taken care of.

The trick of maintaining a cast iron pan and making it last a lifetime lies in ‘seasoning’ or ‘curing’ it. Cast iron is a delicate material that may rust or chip off and therefore you need to pamper it time and again. If your food sticks to the pan, it’s probably because your cast iron pan is not seasoned right. Seasoning makes for a non-stick cooking surface naturally. It is a process of adding a protective coating that can help you use the pan better. Not only this, a well-seasoned pan can give you the crispiest pancakes or the best fried chicken without using too much oil. Moreover, the cast iron will not rust if it is properly seasoned. 

If you’ve never done it before or have just bought a new pan, it is well worth your time. Here’s how to season a cast iron pan. Learn it once and you’ll have it for life.

Things You Will Need:

Cast iron pan
Paper towel
Vegetable oil or butter
Sponge
Oven

Instructions:

Step 1: One of the simplest ways to season a cast iron pan is to rub some oil. You can use plant-based oils like sunflower or canola, but a lot of people swear by flaxseed oil. Pour in some oil and rub all over evenly, then use a paper towel to clean off the excess oil. A cast-iron pan is porous and the pores tend to soak in all oil creating a non-stick surface. Flaxseed oil gets more preference because it dries the hardest and creates a more long-lasting coating but it can also be a bit heavy on your wallet. Canola oil works as well. You can even try using butter or coconut oil; these may not be the best options though.

Step 2: Next, place the pan upside down in the oven and heat it to the highest. The heat allows the oil to break down and bond with the pan while forming a firm layer.  Leave it in the oven for an hour after which you can turn off and remove the pan when it is completely cool.

More Tips:

Listen to the latest songs, only on JioSaavn.com
If you’re seasoning a new pan repeat this process three to four times but with 30 minutes in the oven. This helps in giving a new pan a smooth, finished surface. If you are seasoning an old cast iron pan, your first step should be to remove the rust that has accumulated over the years. One way to do this is to make a mixture of salt and oil and scrub it all over the pan. Once done, dip the pan a few times on hot water to clean the surface. Another way to rescue a rusty cast iron pan is to submerge it in a tub full of white vinegar and water (half and half). Allow it to soak in for about two hours. The vinegar will help dissolve the rust. Later, scrub gently to scrape off the remnants.

Finally, here are the two most important things that you should bookmark. First, a cast iron pan that is seasoned well is used well. Second, every time you cook in your cast iron pan, you are actually seasoning it, which helps in filling up the pores that may have been exposed over the time. So, the simple rule is that the more you cook the smoother the surface will turn out to be.

A cast iron pan is also a very dependable cookware in your kitchen. Now that you have brushed up the basics, grab your pan and get cooking. Just promise us that you will keep it well-seasoned and cleaned. 

https://gscrochetdesigns.blogspot.com. one can see my crochet creations  

https://cancersupportindia.blogspot.com. feel free to view for easy, simple and health tips  
https://kneereplacement-stickclub.blogspot.com. for info on knee replacement


Saturday, March 7, 2020

How to Dehydrate Foods at Home

Making your own dehydrated foods is quite easy, and there are three main ways you can 
do it: in a dehydrator, in the oven, or in a DIY dehydrator.

1. Dehydrator

Dehydrators are specialized home appliances designed specifically for food dehydration. These are widely available in stores and online, and many models are available under the $50 price range.
The most important advantages of these appliances are:
  • They’re easy to use, as all you have to do is push a button and let the machine work without your supervision.
  • You can dehydrate a variety of foods at a time.
  • The dehydrator uses low temperatures, which help preserve the nutrients in the food.
To dehydrate food using a dehydrator, simply prep the foods by peeling and slicing them up, spread them evenly on the shelves of the device, and then turn on the dehydrator, selecting the intended setting. Once the dehydrator stops working, let the food cool off, remove the food from the shelves and put the food items in containers.

2. Oven

Dehydrated Foods Guide and Recipes dried apples in oven

The main advantage of dehydrating foods in your oven is, of course, the fact that you don't need to buy any new appliances. This method is also the fastest, although it might be less capable of preserving the nutrients in foods, as the lowest oven temperature is still relatively high compared to dehydrators you can purchase or fashion yourself.
To dehydrate foods in the oven, simply set your oven to the lowest possible temperature (usually around 175°F/ 80°C) and make sure the oven fan is turned on. Spread the thinly sliced foods onto the baking sheets lined with paper, and check up on them every half an hour to make sure they don't burn or harden too much. Every food type will take a different amount of time to prepare - with meats typically taking several hours while berries and other fruit being ready in a much shorter time.

3. DIY Dehydrator

To fashion a DIY dehydrator of your own you'll need a box fan, dehydrator sheets, and clean air conditioner filters. Unplug the fan and set it on the ground with the airflow directed upwards. Prop up on side of the fan 10-15 cm (4-6 in) and put an AC filter on top. Spread the thinly sliced foods on a dehydrator sheet and put an additional dehydrator sheet followed by another filter on top. You can sandwich several layers of food in this fashion, securing them with bungee cords. 
Since this method doesn't require any heat, the food will take the longest to be dried out, with most foods taking 2-3 days to be ready.

Homemade Dehydrated Food Recipes

When dehydrating foods, you can certainly let your imagination run wild, combining different types of cereals, nuts, and fruit into the mix to make homemade granola, trying out different combinations of fruit to make fruit leather, and also making more traditional foods, such as dried apple chips and raisins, for example. To inspire a bit of variety, we will show you 4 different dehydrated recipes you can try out.

1. Fruit Leather Recipe - a healthy sweet treat

Dehydrated Foods Guide and Recipes fruit leather
Ingredients:
½ cup mango*
½ cup strawberries*
1 cup applesauce
*you can use fresh or thawed frozen fruit. Any type of fruit you like will work for this recipe.
Preparation:
1. In a blender, puree the fruit until smooth and combine with applesauce.
2. In the oven: Spread the mixture onto a lined baking sheet in a thin even layer. Cook on the lowest temperature for 1-2 hours or until the mixture is no longer sticky. Check the mixture every 20 minutes to make sure it doesn't burn.
In the dehydrator: Line a dehydrator with baking paper and spread the mixture in a thin even layer. Dehydrate on 130-140°F (55-60°C) for about 6 hours.
3. Slice the fruit leather into thin strips and roll it up. Store in airtight container.

2. Mushroom Jerky Recipe - the healthier version of jerky

Dehydrated Foods Guide and Recipes mushroom jerky

Ingredients:
4 medium Portobello mushrooms, sliced into thin strips
1 tbsp olive oil
½ cup barbecue sauce
1 tbsp apple cider vinegar
Salt to taste
Preparation:
1. In a medium dish, mix all ingredients apart from the mushrooms.
2. Add in mushrooms and coat evenly in the marinade. Let them sit in the marinade for 1-2 hours or overnight.
3. Before dehydrating, shake each piece over the bowl to remove excess moisture. Then dehydrate, 2-3 hours in the oven at minimum temperature, or 4-5 hours at 145°F (62°C) in a dehydrator. The mushroom should be dry but also remain a bit chewy.

3. Kale Chips - the most nutritious 15-minute snack ever

Dehydrated Foods Guide and Recipes kale chips
Ingredients:
1 bunch of kale
1 tbsp olive oil
Salt, pepper, and any additional seasoning of your choice to taste
Preparation:
1. Wash and dry the kale first. Then remove the stem from the kale and tear the leaves into bite-sized pieces.
2. Toss the kale with oil, and then spread onto a baking sheet and season. If you're using the oven, set the oven to 300°F (150°C) and cook for 10-15 minutes or until golden brown on the edges. If using a dehydrator, set the temperature to 125°F (50°C) and dehydrate for about 3-6 hours.
links for my other 3 blogs-
https://gscrochetdesigns.blogspot.com. one can see my crochet creations  

https://cancersupportindia.blogspot.com. feel free to view for easy, simple and health tips  
https://kneereplacement-stickclub.blogspot.com. for info on knee replacement