Showing posts with label pie. Show all posts

Thursday, May 21, 2026

Kitchen Tips: How Long You Can Keep Leftovers

Food storage is one of the most important kitchen-related subjects because improperly stored food can quickly turn bad and become the source of dangerous diseases. Keep in mind that this doesn’t mean that leftover foods are bad and you should throw away food. It’s actually quite the opposite - eating leftovers is an excellent way to save your precious time and money while also reducing food waste, a serious problem in many developed countries, especially the US.

That said, it’s crucial to know how long different leftover foods can last in your fridge, and when it’s time to part ways with this or that food for your own safety. Learn about exactly that, as well as several useful food storage tips in this article. 

Which Foods Spoil Faster and Which Last Longer?

The period of time a specific type of food can safely be kept in the fridge and eaten will depend on a variety of factors. While some foods can be safely stored for days, others are more prone to harboring germs and have to be eaten within a day. Preparation also makes a big difference. 

Meals that feature a mixture of different foods, like stews, will only last as long as the ingredient with the shortest shelf life. Restaurant leftovers should be typically eaten within 3-4 days, as it's difficult to access the freshness of the ingredients used, with the exception of dishes that contain raw fish that should be eaten within 24 hours. 

It’s important to note that some foods will still taste good after the specified time we mention, but this doesn’t mean the food isn’t spoiled, as the process of decay and the spread of bacteria may not show immediately. In terms of their lasting potential, all foods can be divided into 3 main groups:

1. Low-risk foods.
 Things like bread, vegetables, and fruit can be stored in the refrigerator up to 7 days before they go bad. More specifically, bread and foods that are dough-based, like a simple cheese pizza, will stay fresh for 5-7 days, but you must make sure to wrap it thoroughly in plastic or put it in a resealable container to prevent it from drying out. 

Fresh fruit and vegetables that have been cut up previously also have a long shelf life - 3-5 days, but things like cucumber, watermelon, tomatoes, and other high-water-content fruit and veggies will typically spoil a bit faster. Store these foods in a sealable bag or container to keep them fresher for longer. Cooked canned or fresh veggies and fruit will likewise stay fresh from 3 to 5 days. 

2. Medium-risk foods include most, but not all, cooked grains, like pasta, quinoa, and buckwheat. These will typically stay fresh for about 3 days, and you can also freeze them to extend their shelf life by up to 3 months. Desserts and sweets, like cake and pie, will also typically last for about 3-4 days when refrigerated properly. 

3. High-risk foods are those that require special care when refrigerated, and will typically not last for more than 3 days. There are several categories of foods on this list, here are the main ones:

Cooked rice is probably one of the most surprising high-risk food. Rice should be stored very carefully because it commonly harbors Bacillus cereus, a dangerous foodborne pathogen. This is why you should refrigerate rice no more than 1 hour after cooking and eat it within 3 days. 

Meat and poultry are also prone to harboring various pathogens, so be careful when storing cooked meat or poultry. Steaks, roasts, whole birds, and chops should be eaten within 3 days. Foods made of ground beef or poultry like cutlets, lasagna, and pasta sauce spoil even quicker - after just 1-2 days. Though it may take longer, nutritionists also suggest to always thaw ground and whole meats in the fridge, and never on the kitchen counter to prevent the spread of pathogens. 

Eggs and seafood are also high-risk foods, as both can harbor Salmonella and other pathogens. Cooked eggs and egg salad should be eaten within a day, with the exception of unpeeled boiled eggs, which can stay fresh up to a week. Cooked seafood and fish dishes should be eaten within 3 days, but raw fish and seafood meals, like sushi, should be eaten immediately or kept in the fridge for up to 24 hours. 

Soups, stir-frys, and stews that contain meat or fish will usually stay fresh for 3-4 days, but they should be put in the fridge as soon as possible, ideally no longer than 2-3 hours after cooking. If you find it difficult to cool them fast, simply put the pot containing the dish into an ice bath - a sink or large bowl full of cold water and ice - and stir continuously until the food reaches room temperature and can be put in the fridge.

How Do I Know My Food Has Gone Bad?
Your nose is one of the best tools you can use to access your food’s freshness. If the food smells sour or just off, don’t take any chances and just throw it away. Other pointers to look out for are a change of color, as it is the case with guacamole that tends to turn brown and will no longer be enjoyable to eat. Vegetables, fruit, and greens, may also start browning on the edges, whereas meat and seafood can become slimy and sticky to the touch when it goes bad. 

Mold of any kind is also a surefire sign that it’s time to toss the food in the trashcan. Lastly, if you happen to reheat the food and take a bite only to realize the taste is stale, rancid, or sour, avoid eating it as well.

To prevent food from spoiling and extend their shelf life, follow these useful tips: 

1. Refrigerate leftovers within 1-2 hours maximum. Keeping foods at room temperature for a long time is a very bad idea, as bacteria and other pathogens thrive at temperatures between 40°F (4°C) and 140°F (60°C). If you're outdoors and the temperature is above 90°F (32°C), you need to put things in the fridge even quicker - no more than 1 hour. 

2. Store in shallow containers. Food in shallow containers will cool off quicker and more evenly than in tall ones, so opt for shallow ones. US food storage guidelines also recommend avoiding stacking more than 2 containers on top of one another because this may slow down the registration speed of the middle containers. Lastly, opt for sealable clear containers, jars, or bag, so that you can see which foods you have in the fridge clearly. 

Sealing is important to extend freshness and prevent germs from getting in or out of the container. Note that this also means you'll have to transfer improperly packaged foods you got from a takeaway menu or brought from a restaurant.

3. Take advantage of the freezer. Refrigerating foods isn't the best method of preserving food for a long time, as the temperature in the fridge isn't low enough. To extend the shelf life of ready-made foods, soup, bread, and cooked meat included, you can put them in the freezer. Most leftover foods will be safe to eat even after 3 months of being in the freezer! One thing to consider when freezing foods, however, is properly sealed packaging (see the point above) to prevent freezer burn. 

4. Whenever possible, store different foods separately. For example, keep rice, a side dish, in a separate container from stewed vegetables or seafood. This way, if one of the foods goes bad, you’ll be still able to utilize the rest. 

5. When reheating food, bring them to more than 165°F (74°C) to kill any germs that may have survived in the refrigeration. It is known that some foodborne pathogens, such as Listeria monocytogene can survive cold temperatures. If possible, you can even bring some foods to a boil, especially liquids, e.g. soups, sauces, and gravies, before eating.


https://gscrochetdesigns.blogspot.com. one can see my crochet creations  

https://kneereplacement-stickclub.blogspot.com. for info on knee replacement

https://cancersupportindia.blogspot.com  for info on cancer and health related topics

https://GSiyers home remedies.blogspot.com   is the latest addition to my blogs


Sunday, May 10, 2026

Rice, Cheddar & Spinach Pie

 INGREDIENTS

3 tbsp extra-virgin olive oil

1 small onion, finely chopped

3 cloves garlic, minced

1 10-ounce package frozen chopped spinach, thawed and squeezed dry

3 cups cooked instant or quick-cooking brown rice

1 cup diced extra-sharp Cheddar cheese

½ tsp freshly ground pepper

¼ tsp salt

4 large eggs

¼ cup nonfat milk


Preparations 

Preheat oven to 425 degrees F. Generously coat a 9-inch pie pan with cooking spray.

Heat oil in a large skillet over medium heat. Add onion and cook, stirring frequently, until beginning to brown, about 5 minutes. Add garlic and spinach; cook, stirring, 1 minute more. Transfer to a large bowl. Add rice, cheese, pepper and salt to the bowl and stir to combine.

Whisk eggs and milk in a medium bowl. Stir into the spinach-rice mixture. Transfer to the prepared pan and smooth the top with a spatula.

Bake the pie until lightly browned in spots, about 25 minutes. Let stand for 5 minutes before cutting into wedges.


https://gscrochetdesigns.blogspot.com. one can see my crochet creations  

https://kneereplacement-stickclub.blogspot.com. for info on knee replacement

https://cancersupportindia.blogspot.com  for info on cancer and health related topics

https://GSiyers home remedies.blogspot.com   is the latest addition to my blogs


Sunday, March 22, 2026

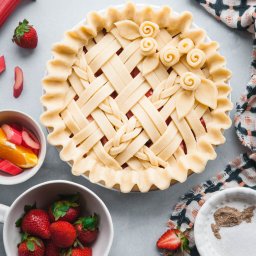
Citrus Strawberry Rhubarb Pie


Ingredients:
All Butter Pie Dough
 
 ⅔ cup ice cold water
2 ⅔ cup all-purpose flour
1 tbsp granulated sugar 
½ tsp salt
1 cup very cold butter diced
1 egg
1 splash milk
turbinado sugar for sprinkling

Citrus Strawberry Rhubarb Filling
 
¾ lb fresh rhubarb cut into ½-inch pieces
2 cups ripe strawberries sliced
⅔ to ¾ cup granulated sugar depending on sweetness of berries
zest and juice of ½ and orange
⅛ to ¼ tsp cardamom  pdr
1 pinch salt
2 tbsp cornstarch
1 tbsp all-purpose flour
 
Preparations

All Butter Pie Dough In a large bowl, stir together the flour, salt, and sugar.  Cut in the cold butter with a pastry cutter or by hand, rubbing the pieces of butter between your thumb, index, and middle fingers.  Once the pieces are no longer lager than about a peanut, begin to flatten the pieces of butter in sheets between your palms.  Be careful not to over-work the butter or let it get too warm.
 
Working with only a couple tablespoons at a time, add in about 6 to 8 tablespoons of the water.  Stir together using a wooden spoon or even just a clean hand in the bowl.  The dough should appear fairly shaggy and not sticky.  Once you can squeeze a few pieces together and they hold, the dough is done being mixed and hydrated.  Do not over-mix or add too much water*.
 
Divide the dough into half and shape each piece into a disk.  Wrap in plastic and refrigerate for at least a couple of hours, or overnight (preferably).
 
When ready, bring one disc out of the refrigerator and allow to rest for about 10 minutes.  Lightly flour the work surface and begin to roll out the dough, working from the center out – rotating the dough after each roll.  Roll the dough until about ¼ inch thick and about 12 to 13 inches in diameter. 
 
Gently roll the dough around the rolling pin and transfer to a 8 or 9 inch pie tin.  Fit the dough into the bottom of the tin and up the sides, allowing for about an inch of overhang.  Trim with kitchen sheers and place back in the refrigerator.
 
For the lattice top, repeat step 5.  Using a ruler and a paring knife, cut about 24 strips, about ½-inch wide.  Braid two sets of three (strips) to create the briads, if desired. Place all the cut dough on a baking sheet or cutting board and place in the refrigerator.
 
Create the filling (see recipe to follow). Remove the pie tin from the fridge and tip in the filling. Leave a gap of about ½-inch from the top to keep the filling from spilling over too much (like mine did) while baking.
 
Remove the cut strips from the refrigerator and begin creating a the lattice pattern, carefully weaving over and under each strip of the opposite direction. For this design, I weaved pairs of strips, slipping in the braids for two regular strips.  Allow for some excess dough on the end of each strip, then trim. Fold the edges of the bottom crust up and over the lattice. Press to seal. Use your fingers to crimp the edges . Roll out any other the dough scraps and cut into strips. Coil the strip around itself and pinch one end to create the roses. Cut out leaves with a paring knife and arrange on top of the lattice. Return the pie back to refrigerator for at least 30 minutes.  Meanwhile, pre-heat oven to 425F. Just before heading into the over, create an egg wash by whisking together a whole egg and a splash of milk.  Brush the egg wash over the entire top of the crust and sprinkle with turbinado sugar Place pie on a baking sheet and bake for about 25 minutes. Turn down the heat to 375F and continue to bake for an additional 35 to 50 minutes or until the top is golden brown, the juices are bubbling, and the apples are cooked through.  If the top begins to brown too quickly, cover with foil. Allow the baked pie to completely cool before slicing and serving.

Citrus Strawberry Rhubarb Filling In a large bowl, toss all of the ingredients together. Adjust the sweetest as needed, but avoid eating any of the raw rhubarb.


https://gscrochetdesigns.blogspot.com. one can see my crochet creations  

https://kneereplacement-stickclub.blogspot.com. for info on knee replacement

https://cancersupportindia.blogspot.com  for info on cancer and health related topics

https://GSiyers home remedies.blogspot.com   is the latest addition to my blogs


Wednesday, March 11, 2026

Spaghetti Pie

 Baked spaghetti pie fresh from the oven. It is on a white table with forks, tomatoes and a bowl of freshly chopped spinach next to it.  


Ingredients 

8 ounces spaghetti of your choice

3 tbsp olive oil divided 

3/4 cup finely chopped onion , about 1/2 a large onion 

1 cup grated carrot 

8 ounces crimini or button mushrooms, diced small 

  • 2-3 cloves garlic, minced
  •  
  •  salt 3/4 tbsp divided 
  • 1/2 tbsp Italian seasoning
  •  2 cups loosely packed baby spinach, roughly chopped

    1 1/2 cups canned crushed tomatoes

    2 large eggs beaten

    Parmesan cheese grated 3 tbsp 

    mozzarella cheese 1/2 cup or to taste 


    Preparations

  • Preheat oven to 375 ℉. Grease a 9-inch pie plate or round baking dish with oil.
  • Cook your spaghetti according to package directions. Meanwhile, prep your vegetables. Once the spaghetti is ‘al dente’, drain in a colander then place in a large bowl.
  • To make sauce, return the pot you cooked the pasta in (or another pot if you prefer) to the stove and heat 2 tablespoons of olive oil over medium-high heat. Add chopped onion and carrot and cook for 2 to 3 minutes.
  • Add chopped mushroom and saute until the mushrooms begin to brown. Add garlic, 1/2 teaspoon salt, and Italian seasoning and cook for 2 more minutes or until all the vegetables are soft. Stir in spinach and then crushed tomato. Lower heat and simmer while you prepare the spaghetti “crust”.
  • To the cooked spaghetti, add the remaining tablespoon of olive oil, eggs, parmesan cheese, the rest of the salt, and a few grinds of pepper. Mix well then press the spaghetti mixture into the bottom and up the sides of your pie pan.
  • Spoon the veggie sauce into the center of the spaghetti. Spread into an even layer, leaving an-inch boarder of spaghetti not covered in sauce. Sprinkle mozzarella cheese over the top.
  • Bake until cheese is golden brown, 20 to 22minutes. Allow to cool for 5 to 10 minutes, then cut into wedges and serve.  

    https://gscrochetdesigns.blogspot.com. one can see my crochet creations  

    https://kneereplacement-stickclub.blogspot.com. for info on knee replacement

    https://cancersupportindia.blogspot.com  for info on cancer and health related topics

    https://GSiyers home remedies.blogspot.com   is the latest addition to my blogs

     
  •  


    Friday, December 19, 2025

    Greek Spinach Pie


    Ingredients

    1/2 

    1/2 

    1/2 

    Preheat the oven to 190°C. Lightly grease a baking sheet.
    Wash and chop the spinach. Squeeze the extra water out. Mince the garlic. Mix the spinach, feta cheese, mozzarella cheese, Parmesan cheese, garlic and salt in a bowl.
    Arrange one sheet of puff pastry sheet on the baking dish and brush with melted butter.
    Fill a layer of the spinach mixture evenly over the puff pastry sheet and top it with another sheet brushing with very little butter on top.
    Bake in a preheated oven for about 25-30 minutes until the pastry is golden brown.
    Allow it to cool for 10 minutes and cut into portions.

    https://gscrochetdesigns.blogspot.com. one can see my crochet creations  

    https://kneereplacement-stickclub.blogspot.com. for info on knee replacement

    https://cancersupportindia.blogspot.com  for info on cancer and health related topics

    https://GSiyers home remedies.blogspot.com   is the latest addition to my blogs


    Friday, October 31, 2025

    Pumpkin Pie with Pecans and Cream


     Ingredients 

    for filling

    eggs 2

    sugar 1/4 cup

    salt a pinch

    cinnamon pdr 2 tsp 

    nutmeg pdr 1 tsp

    dry ginger pdr 1 tsp

    cloves pdr 1/2 tsp

    pumpkin puree 2 cups

    condensed milk 1 can 

    butter 2 tsp

    pecans 1 cup

    whipped cream

    For the crust

    maida 2 cups

    salt a pinch

    sugar 3 tsp

    cold butter 1 cup

    Water (optional)


    Preparations

    Make the crust by blending maida, salt, sugar, and cold butter until crumbly. Add a few drops of water and knead lightly. Roll, cover, and refrigerate.

    Preheat oven to 300 °C.For the filling, whisk eggs, sugar, salt, and spices. Add pumpkin puree, condensed milk, and butter; mix well.

    Pour the filling into the crust and bake for 20 minutes (or till the centre is firm but slightly wobbly).

    Cool fully, top with pecans and whipped cream.


    https://gscrochetdesigns.blogspot.com. one can see my crochet creations  

    https://kneereplacement-stickclub.blogspot.com. for info on knee replacement

    https://cancersupportindia.blogspot.com  for info on cancer and health related topics

    https://GSiyers home remedies.blogspot.com   is the latest addition to my blogs


    Sunday, September 21, 2025

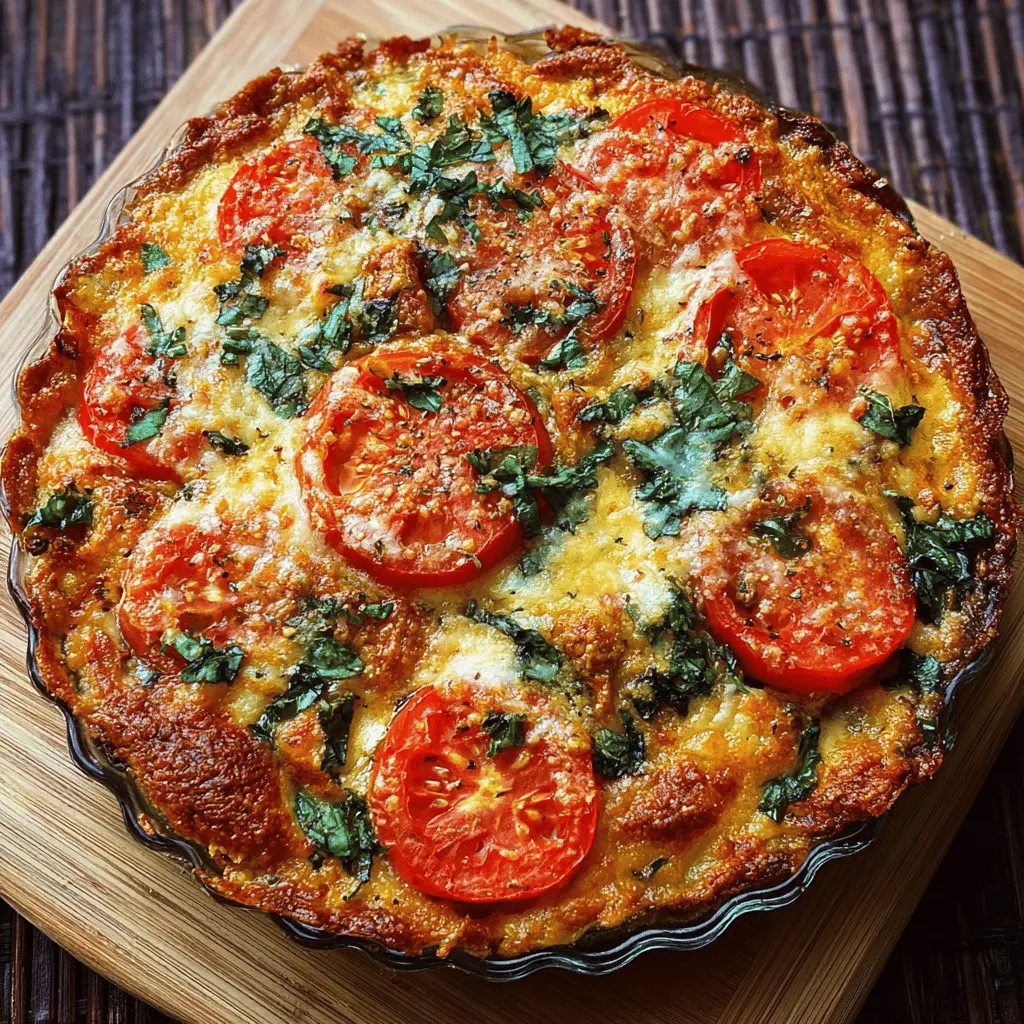
    Eggplant- tomato pie


    How Do I Cook Eggplant to Avoid Bitterness?

    Eggplants can sometimes taste bitter, especially if they are not prepared properly. The trick is to use salt. Here’s how to prepare them:

    • Slice the eggplant into 1/4-inch rounds.
    • Sprinkle lightly with salt and let sit for about 15 minutes. This process helps to draw out excess moisture and bitterness.
    • After resting, pat the slices dry with a paper towel before cooking.
    • Heat olive oil in a skillet and sauté them until they are golden and tender.

    This method not only improves the flavor but also gives the eggplant a nice texture in your pie!


    What’s the Best Way to Layer the Pie?

    Getting the layering right in your pie is key for a tasty result. Here’s how to do it:

    • Start with a nice base of cooked eggplant for a flavorful foundation.
    • Next, add the fresh tomato slices evenly, covering the eggplant.
    • Pour the seasoned egg mixture over the top, ensuring it seeps into the veggies.
    • Finally, sprinkle the cheeses on top for a gooey finish!

    Layering like this ensures every bite is deliciously balanced!

    Ingredients You’ll Need:

    For the Filling:

    1 medium eggplant, sliced into 1/4-inch rounds

    3 medium ripe tomatoes, sliced

    3 large eggs

    1 cup shredded mozzarella cheese

    1/2 cup grated Parmesan cheese

    2 cloves garlic, minced

    1/4 cup fresh basil leaves, chopped

    1/4 cup fresh parsley, chopped

    1/4 cup milk or cream

    2 tablespoons olive oil

    Salt and pepper to taste

    Non-stick cooking spray or additional olive oil for greasing the baking dish


    Preparations

    Start by preheating your oven to 375°F (190°C). While it’s warming up, take a 9-inch pie dish or a similar baking dish and lightly grease it with non-stick cooking spray or a little olive oil to prevent sticking.

    Slice your eggplant into 1/4-inch rounds and sprinkle them lightly with salt. Allow them to sit for about 15 minutes. This helps to draw out any bitterness. After the time is up, pat the slices dry with a paper towel to remove excess moisture.

    In a skillet, heat 1 tablespoon of olive oil over medium heat. Add the eggplant slices in batches (don’t crowd the pan!) and cook them for about 3-4 minutes on each side, until they are tender and lightly browned. Once cooked, remove them from the skillet and set aside.

    In a mixing bowl, whisk together the eggs, milk or cream, minced garlic, half of the mozzarella, half of the Parmesan cheese, chopped basil, chopped parsley, salt, and pepper. Make sure everything is well combined, creating a tasty mixture!

    Now it’s time to build your pie! Start by layering the cooked eggplant slices evenly at the bottom of the prepared baking dish. Next, arrange the fresh tomato slices on top of the eggplant.

    Pour your delicious egg and cheese mixture evenly over the layered vegetables, making sure each layer gets some of that yummy goodness!

    Sprinkle the remaining mozzarella and Parmesan cheese over the top of everything. This will create a lovely, cheesy crust as it bakes!

    Place your pie in the preheated oven and bake it for 30-35 minutes. You’ll know it’s done when the top is golden and the eggs are set – it should look absolutely delicious!    

    Once finished, carefully remove the pie from the oven and let it cool for about 5-10 minutes before slicing it up. This rest time helps the flavors meld and makes it easier to cut.

    Garnish with some extra fresh basil or parsley if you like, and serve warm. This savory pie is perfect as a light summer meal or a delightful vegetarian main course. Enjoy every yummy bite!                   


    https://gscrochetdesigns.blogspot.com. one can see my crochet creations  

    https://kneereplacement-stickclub.blogspot.com. for info on knee replacement

    https://cancersupportindia.blogspot.com  for info on cancer and health related topics

    https://GSiyers home remedies.blogspot.com   is the latest addition to my blogs