Showing posts with label Sugar. Show all posts

Monday, May 11, 2026

Double Chocolate Muffins With Raspberries

Double Chocolate Muffins With Raspberries  

 Ingredients:

2 cups (260 g) all-purpose flour

1 cup (200 g) granulated sugar

½ cup (42 g) Dutch-processed cocoa powder

1 tsp baking soda

½ tsp salt

1 cup (227 g) sour cream, or plain yogurt

½ cup (120 ml) whole milk

½ cup (120 ml) vegetable oil, or canola oil

1 large egg

1 tsp vanilla extract

4 ounces (112 g) coarsely chopped semisweet chocolate, or dark chocolate

1 cup (250 g) frozen raspberries


Instructions

Preheat the oven to 400ºF. Spray a 12-cup muffin pan with non-stick spray or line with paper liners. Set aside.

In a separate bowl combine the flour, sugar, cocoa powder, baking soda, and salt. Stir with a whisk. Make a well in the center of the flour mixture. 

In a separate bowl, combine the sour cream, milk, oil, egg, and vanilla. Stir with a whisk to combine.

Pour the sour cream mixture into the flour mixture. Stir with a silicone spatula just until the dry ingredients are just barely incorporated.

Add in the chopped chocolate and raspberries. Continue to stir until just a few streaks of dry flour remain visible.

Divide the batter evenly between the prepared muffin cups. Bake for 18-20 minutes or until a toothpick inserted into the center comes out clean.

Cool the muffins in the pan for 5 minutes then transfer them to a wire rack to cool completely. They can also be enjoyed warm!


https://gscrochetdesigns.blogspot.com. one can see my crochet creations  

https://kneereplacement-stickclub.blogspot.com. for info on knee replacement

https://cancersupportindia.blogspot.com  for info on cancer and health related topics

https://GSiyers home remedies.blogspot.com   is the latest addition to my blogs

Sunday, May 10, 2026

Watermelon Smoothie

 I had a lot of cut watermelon, but this one wasn't very tasty. I hate throwing food in the bin. Not that it wasn't eatable, just that it lacked a bit taste. So, I decided to make it into a healthy smoothie, by blending it with 2 bananas, pinch salt and wee bit sugar. It was yummy, the first time, I made like this. Earlier, I have made just watermelon juice by simply blending watermelon pieces in the mixer jar. 

Yesterday, this watermelon smoothie was my dinner, felt light and full. 


https://gscrochetdesigns.blogspot.com. one can see my crochet creations  

https://kneereplacement-stickclub.blogspot.com. for info on knee replacement

https://cancersupportindia.blogspot.com  for info on cancer and health related topics

https://GSiyers home remedies.blogspot.com   is the latest addition to my blogs


Tuesday, May 5, 2026

Mango Halwa


I made this mango halwa as usual only in the microwave- 1) save gas 2) to avoid to keep stirring continuously !

Ingredients

mangoes 2 chopped roughly, I didn't use mixer and potato masher to mash the mango slices.

sugar 1/4 cup or as per the sweetness of mangoes

maida 8 heaped tsp

milk 300 ml

as it was too sweet, as I didn't measure the sugar, I added about 1/4 cup of suji after about 3 minutes of cooking, as I tasted, found it too sweet.

chopped dates 2 tbsp ( optional)

chopped cashews 2 tbsp

ghee 2-3 tbsp

cardamom pdr 1/2 tsp

I put mangoes, maida, sugar and milk in the micro safe dish, mixed all well.

Micro high for 2 minutes, mixed well, again micro high for 2 minutes

when I tasted, as I felt that I added more sugar, added suji little at a time, kept mixing well, 1st about 2 tbsp of suji, cooked it on micro high for 2 minutes, tasted again felt sweet as I was going to add chopped dates and nuts, so added another 2-3 tbsp of suji. Honestly, I don't measure, just go by eye measure !

Mixed all well, micro for another 2 minutes, mixed well, added 2 tbsp of ghee, mixed well, micro high for another 2 minutes, added little more ghee, another 2 minutes, added cardamom pdr, mixed well.

There my dessert is ready. Made it to give to someone who loves sweet here on their birthday.


https://gscrochetdesigns.blogspot.com. one can see my crochet creations  

https://kneereplacement-stickclub.blogspot.com. for info on knee replacement

https://cancersupportindia.blogspot.com  for info on cancer and health related topics

https://GSiyers home remedies.blogspot.com   is the latest addition to my blogs


Thursday, April 30, 2026

Lemon-Raspberry Ricotta Pound Cake

 Lemon-Raspberry Ricotta Pound Cake 

Ingredients

¾ cup granulated sugar

5 tbsp butter, softened

3 large eggs, at room temperature

¾ cup whole-milk ricotta cheese

3 tbsp lemon juice plus 2 teaspoons, divided

2 tbsp lemon zest

1 tsp vanilla extract

¾ cup all-purpose flour

¾ cup white whole-wheat flour

1 ½ tsp baking powder

½ tsp salt

1 ½ cups fresh raspberries

2 tbsp packed confectioners' sugar  


 Preparations

Preheat oven to 350 degrees F. Generously coat a 9-by-5-inch loaf pan with cooking spray.

Beat granulated sugar and butter in a large bowl with an electric mixer on medium-high speed until creamy. Beat in eggs, one at a time, until fully incorporated. Reduce the mixer speed to medium-low and beat in ricotta, 3 tablespoons lemon juice, lemon zest and vanilla until combined.

Whisk all-purpose flour, whole-wheat flour, baking powder and salt together in a medium bowl. Add to the ricotta mixture and beat on low speed until almost combined. Gently fold raspberries into the batter. Transfer to the prepared pan.

Bake until browned around the edges and a cake tester inserted in the center comes out clean, 1 hour to 1 hour and 10 minutes. Let cool in the pan on a wire rack for 20 minutes. Run a knife around the edges to loosen the cake, then invert onto the rack. Carefully turn the cake right-side up. Let cool completely.

Whisk confectioners' sugar and the remaining 2 teaspoons lemon juice in a small bowl until smooth. Brush the glaze on the cooled cake.

To make ahead

Using toothpicks to hold the plastic wrap away from the glaze, loosely wrap the cake and store at room temperature for up to 1 day.


https://gscrochetdesigns.blogspot.com. one can see my crochet creations  

https://kneereplacement-stickclub.blogspot.com. for info on knee replacement

https://cancersupportindia.blogspot.com  for info on cancer and health related topics

https://GSiyers home remedies.blogspot.com   is the latest addition to my blogs


Sweet Potato Pie

 Image of Sweet Potato Pie - The Daring Gourmet

 Ingredients

1 lb sweet potatoes

1/2 cup unsalted butter, room temperature

1/2 cup granulated sugar

1/2 cup brown sugar

1/2 cup whole milk

2 large eggs

2 tsp vanilla extract

1 tsp cinnamon pdr

1/2 tsp nutmeg pdr

1/4 tsp salt

a pinch of  cloves pdr

1 (9 inch) unbaked pie crust (homemade or store bought)

Recommend topping options:

whip cream (or cool whip)

marshmallow fluff


Preparations

Preheat oven to 400 °F. Wrap sweet potatoes with foil and bake on a  cookie sheet until soft, about 45 minutes (or longer if your sweet potatoes are extra large).

Remove from the oven and allow to cool completely.

Once sweet potatoes are cooled, preheat oven to 350 °F. Remove foil and skin from sweet potatoes.

In a large bowl, mash sweet potatoes and butter until completely smooth. Whisk in sugar, brown sugar, whole milk, eggs, vanilla extract, cinnamon, nutmeg, salt and cloves. Whisk until mixture is well combined.

Pour filing into unbaked piecrust. Bake for 50 to 60 minutes, or until a toothpick inserted in the center comes out clean. The pie will rise while baking and then deflate as it cools.

Serve warm or chilled with a dollop of whip cream or marshmallow fluff! 


Tips

Allow sweet potato pie to cool completely on the counter. If you try to put it into the fridge too early, the top can crack and condensation can form and ruin the top of the pie.

Wrap the sweet potato pie tightly with saran wrap (or cling wrap/foil) and place in the fridge.


https://gscrochetdesigns.blogspot.com. one can see my crochet creations  

https://kneereplacement-stickclub.blogspot.com. for info on knee replacement

https://cancersupportindia.blogspot.com  for info on cancer and health related topics

https://GSiyers home remedies.blogspot.com   is the latest addition to my blogs


Saturday, April 25, 2026

Carrot cake

 Ingredients:

Cake: 

• 4 large eggs 

• 1 1/3 cup vegetable oil 

• 2 1/4 cup sugar 

• 2 1/4 cup all-purpose flour 

• 2 tsp baking soda 

• 2 tsp baking powder 

• 1/2 tsp salt 

• 2 tsp cinnamon pdr

• 1/2 tsp cloves pdr

• 1/2 tsp nutmeg pdr

• 20 oz. carrots, finely chopped (about 3 1/4 cups) 

• 1/2 cup chopped walnuts 

• 1 cup crushed pineapple, well-drained  

White Chocolate Cream Cheese Icing  

• 1 1/2 pounds cream cheese, room temperature 

• 2 cups white chocolate chips, melted 

• 3/4 cups (1 1/2 sticks) unsalted butter, room temperature 

• 2 tsp grated lemon rind 

• Chopped walnuts, for garnish 


Method For the Cake 

1. Preheat the oven to 350℉. Line the bottom of three 8-inch round cake pans with parchment paper. Leave sides of pans dry - no cooking spray needed. 

2. Combine eggs and oil in a large mixing bowl and beat for 2 minutes with a mixer on medium speed. Add 1 cup of sugar and continue mixing for 2 minutes. Add the remaining sugar and mix 3 to 4 minutes. 

3. Combine flour and the next 6 ingredients (flour through to nutmeg); add to the egg mixture, beating on low speed until blended, about 1 minute. Add carrots, walnuts, and pineapple; mix until well combined. 

4. Divide the batter evenly among pans. 

5. Bake for 60 minutes, or until a wooden pick inserted in the center comes out clean. 

6. Cool to room temperature on a wire rack. Run a knife around the edge of the cakes and remove from pans. Wrap in plastic wrap and refrigerate overnight.

To Prepare Icing 

 7. Place cream cheese in mixing bowl; beat with a mixer on medium speed until smooth. Add melted chocolate a little at a time, continuing to beat at medium speed. Add butter a little at a time. Scrape down sides of bowl; add lemon rind and beat until combined. 

8. Remove cakes from the fridge. Ice top of one layer. Places the second layer on top; ice top. Place the third layer on top; ice top and sides of cake. Press chopped walnuts into sides of cake.


https://gscrochetdesigns.blogspot.com. one can see my crochet creations  

https://kneereplacement-stickclub.blogspot.com. for info on knee replacement

https://cancersupportindia.blogspot.com  for info on cancer and health related topics

https://GSiyers home remedies.blogspot.com   is the latest addition to my blogs


Steamed Vegetable Buns ( Baozi)

 Baozi veg recipe from thewoksoflife.com 


Ingredients

For the filling:
1 pound baby bok choy(450g, washed thoroughly)
 8 fresh shiitake mushrooms
3 tbsp vegetable oil(divided)
4 ounces dried bean curd(115g)
1 tsp light soy sauce
½ tsp sugar
½ tbsp sesame oil
⅛ tsp ground white pepper
Salt(to taste, in this case, it’s ok to taste the filling as you’re mixing it, because everything is cooked)
For the dough:
¾ cup warm water
1 tsp instant yeast(3 grams)
1 tbsp sugar(granulated, 15 grams) 
1 tbsp vegetable oil(plus 1 teaspoon, divided)
2 cups all-purpose flour(300 grams)
2 tbsp cornstarch(20 grams)
¼ tsp salt
⅛ tsp baking soda

Instructions

Making the filling
Prepare a pot of boiling water and an ice bath. Once the pot of water is boiling, blanch the bok choy for a quick 10 seconds in two separate batches. With each batch, the water should be at a rolling boil before you add the bok choy. With a large slotted spoon, scoop out the blanched bok choy and immediately transfer to the ice bath to stop the cooking process.
Strain the bok choy once it’s cooled completely in the ice bath. Do your best to squeeze out as much water as you can. This step is very important for preventing soggy buns!
Next, finely chop the bok choy; a food processor is a great time-saver. Transfer to a mixing bowl. Chop the mushrooms finely. Cook them in a wok over medium heat with 2 tablespoons of oil for about 3 to 4 minutes, until they become fragrant. Cool completely.
Next, finely chop the dried bean curd and set aside.
To finish the filling, first pour off any visible liquid in the bowl of chopped bok choy before adding in the cooked mushrooms and dried bean curd. Next, add 1 tablespoon of oil, the light soy sauce, sugar, sesame oil, and white pepper. Mix well. Salt to taste, and put the filling in the refrigerator to marinate. Chilling also helps to keep the bok choy green.
Making the dough
In a bowl, whisk together the water, yeast, and sugar until the yeast dissolves. Let the mixture sit until the yeast “blooms” and foams (about 15 minutes). Stir in 1 tablespoon of oil, and set aside.
In the meantime, whisk together the flour, cornstarch, salt, and baking soda in a medium bowl. Stir in the yeast mixture using a spatula. After the dry and wet ingredients are incorporated, knead the dough with your hands (or using a mixer) until the dough becomes smooth and soft. If the dough looks sticky, add a bit more flour 1 tablespoon at a time. If the dough feels dry, add a few drops of water at a time, and continue kneading until the dough is smooth and soft. The dough should be soft, but not sticky.
Brush the dough with 1 teaspoon of oil and cover with plastic wrap. Let the dough rest until it doubles in size (about 1 hour). Once the dough has risen, punch it down, and knead it for a few minutes to get rid of all air bubbles. Portion the dough into 14 equal dough balls. Cover with a clean kitchen towel to prevent them from drying out.

Assembling and cooking the buns
Cut 14 pieces of parchment paper into 3”x3” squares, and set aside. On a clean and lightly floured flat surface, take a dough ball, roll it out from edge to center, rotate, and repeat until it forms a 4-inch circle. The center should be slightly thicker than the edges. Your buns need solid footing, after all.
Add about 2½ tablespoons of filling to the center, then pleat and twist the bun repeatedly until the top is closed. Sit the bun on a piece of the prepared parchment paper and place it on the rack of your steaming vessel of choice, with at least 1 cm of clearance on all sides. Repeat until all the buns are assembled.
Check our Chinese cooking tools page for steamer setup options. You could use a steamer rack in a wok, a multi-level metal steamer or a bamboo steamer. Just make sure the steaming rack is at least 1½ inches above the water so the boiling water doesn’t touch the buns during the cooking process. Carefully put the buns inside the steamer, cover the lid, and let the buns rest for about 20 minutes (do not turn on the stove yet!)
When the buns are ready to be cooked, turn the heat on high to start the steaming process. Once the water starts to boil and steam is visible, turn the heat down to medium, and steam the buns for another 10 minutes. After 10 minutes, shut off the heat, and let the buns rest inside the steamer for 5 minutes. DO NOT REMOVE THE COVER. This is an important step, because if you remove the cover too early, the buns will collapse and lose their fluffiness! And if you are steaming buns in multiple batches, be sure to start each batch with cold water!
These buns can be enjoyed immediately. You can also store any leftovers in an airtight container in the refrigerator or freezer. Reheat in the microwave for about 1 minute or re-steam for about 6-8 minutes.

https://gscrochetdesigns.blogspot.com. one can see my crochet creations  

https://kneereplacement-stickclub.blogspot.com. for info on knee replacement

https://cancersupportindia.blogspot.com  for info on cancer and health related topics

https://GSiyers home remedies.blogspot.com   is the latest addition to my blogs


Friday, April 24, 2026

Authentic Vegan Russian Pirozhki

 Snacks: pirozhki

Can you Make Authentic Vegan Russian Pirozhki?

 It's actually quite easy to veganize Russian pirozhki. For the best vegan Russian pirozhki, use soy milk in place of regular milk and omit the egg wash in the end. You will also need to make the following tweaks in the filling:

  • In the cabbage filling, omit the boiled egg for a vegan cabbage pirozhki
  • In the pumpkin filling, omit the feta for one-of-a-kind pumpkin, caramelized onion and dill vegetarian pirozhki. Thats the same advice I give my readers about veganizing my caramelized onion and pumpkin pizza. 
  • Omit the butter from the mushroom filling for vegan mushroom pirozhki (similar to my mushroom bourekas)

You can also stuff vegan pirozhki with mixed vegetables, sweet potato or potato filling.

A rustic wooden table displays pastries and piroshki on a decorative plate and in a bowl. A cup of tea sits beside them on a matching saucer. In the background, a jar with yellow and purple flowers and a black and white thermos add charm to the scene.  

 Do you need dipping sauce for Russian Vegetarian Pirozhki?

These vegetarian pirozhki are great on their own! If you're looking for a good dipping sauce, I recommend the sauce from my Ukrainian cucumber salad. It's super simple! All you gotta do is mix equal parts sour cream and mayo, add dried dill, salt and pepper. You can even dilute it with a touch of vinegar if you want a more liquid, pourable sauce. Indians, we can eat with green chutney/ tomato ketchup/ tomato chutney.

Making the Baked Pirozhki Dough Recipe:

First, you have to make the filling. Because this pirozhki recipe uses a traditional yeasted dough, the dough requires time to rise. While the dough is rising, make your favourite filling - or make all three to try them all out!

Make the Dough 

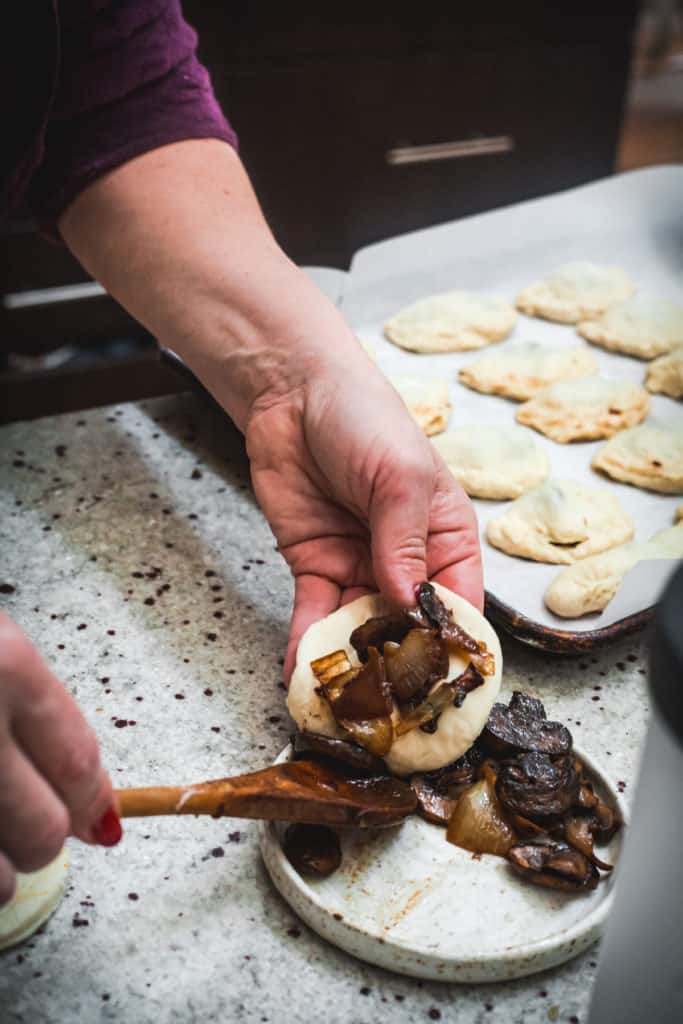
A person with red nail polish carefully uses a round metal cutter on rolled-out dough, preparing piroshki. In the background, a tray awaits with unbaked pastry shapes on a speckled countertop. A person with red nail polish carefully uses a round metal cutter on rolled-out dough, preparing piroshki. In the background, a tray awaits with unbaked pastry shapes on a speckled countertop. A person is spooning sautéed mushrooms and onions onto a small, round piece of dough for piroshki on a speckled countertop. More dough pieces await on a parchment-lined tray in the background. 

 Storage Instructions for Baked Vegetarian Pirozhki

Allow the pirozhki to cool completely before storing. Place them in an airtight container or wrap them tightly in plastic wrap. They will stay fresh in the refrigerator for up to 4 days. To reheat, warm them in a 350°F (175°C) oven for about 10 minutes or microwave for 30 seconds to 1 minute until heated through.

For longer storage, freeze baked pirozhki in a single layer on a baking sheet until solid, then transfer them to a freezer-safe bag or airtight container. They will keep for up to 3 months. To reheat, bake frozen pirozhki at 350°F (175°C) for 15-20 minutes, or microwave for 1-2 minutes, until heated through.

Ingredients for Russian Pirozhki Dough:

1tbsp Active Dry Yeast

2 tbsp  icing sugar

1cup water or enough to cover

1liter milk warmed to lukewarm (around 100-110°F)

a few pinches of salt

½ cup oil 

1kg flour(about 8 cups)

2 tbsp sugar

Ingredients for Mushroom Pirozhki Filling:

2 lb mushrooms/ 800 gm

1onion finely chopped

2 tbsp butter

Ingredients for Cabbage Pirozhki Filling:

2large onions

½head of cabbage

2 hard-boiled eggs

Ingredients for Pumpkin Pirozhki with Caramelized Onion and Feta:

1onion

1pumpkin or squash of your choice

½ bunch dill

100 gm feta

Instructions

How to make Russian Pirozhki Dough:

Combine yeast, sugar and water in a small bowl. Mix together and set aside, letting yeast activate for 10 minutes.

Then in a large bowl, combine ½ the milk, yeast mixture, sugar, salt, and oil. Mix to combine. Begin adding flour in batches; add more flour or milk as needed. Dough should be not too sticky and very soft and elastic. I make this with a Kitchenaid stand mixerf ollow, but you can also easily do it all by hand (see more on this below!). Cover with a clean kitchen towel and set aside in a dark, warm but well-ventilated place. Let dough rise for 1.5 hour, or until doubled in size (the dough should roughly fill twice the volume it started with). Mix dough again with spoon or stand mixer paddle, and see if need to add flour. Let rise again for 30 minutes. While dough is rising, prepare filling.

How to make mushroom filling for pirozhki:

Slice onion into half-moons. Heat pan to medium heat. Add 2 tbsp butter. Add onions and cook until colour changes and onions become translucent, about 10 minutes.

Slice mushrooms thinly. Add mushrooms to onions and sautee until mushrooms begin to brown, about 10 minutes.

Taste and add salt and pepper, as needed.

How to make cabbage filling for pirozhki: Slice onion into half-moons. Heat pan to medium heat. Add 2 TBs neutral-tasting oil, like Canola, grapeseed or vegetable oil. Add onions and cook until colour changes and onions become golden, about 15 minutes. Chop cabbage into thin strands. Add cabbage to large bowl with 2 TBs water. Put cabbage in microwave for 2 minutes, to soften slightly. Let cool until easy to handle and add 2 TBs of salt. Proceed to massage cabbage until it has softened considerably, approximately 5 minutes. Chop hard-boiled eggs into small pieces. ( can be omitted for vegetarians) Combine cabbage, sauteed onions and hard-boiled eggs. Taste and add salt and pepper, as needed.

How to make pumpkin, caramelized onion and feta filling for pirozhki: Set oven to 400F. Cover baking sheet with parchment paper or a reusable silicone matfollow. Cut pumpkin or squash in half, scoop out seeds and sprinkle with salt, pepper and a drizzle of oil. Place pumpkin face-down on the baking sheet. Pierce skin a few times to let steam escape. Bake until pumpkin collapses fully when poked with a fork, about 30-45 minutes, depending on the size of the pumpkin. Let cool until safe to handle and scoop out pumpkin flesh. Set aside. Slice onion into half-moons. Heat pan to medium heat. Add 2 TBs neutral-tasting oil, like Canola, grapeseed or vegetable oil. Add onions and cook until onions change colour, about 10 minutes. Lower heat and continue cooking until onions fully caramelize, an additional 15-20 minutes. Mix pumpkin, caramelized onions, dill and feta together.

Continue shaping pirozhki: ( I have put the photos how it is shaped before the ingredients) Divide dough into portions: Cover counter with flour, and roll dough out into thin layer. Cut circles using a 3-4 inch round cup or cookie cutter. Place about 1-2 tablespoons of filling in the center of each circle. Fold the dough over the filling to create a half-moon shape, then pinch the edges firmly together to seal. You can also bring all edges to the center for a round shape. To bake, cover baking sheet with parchment paper. Add a bit of oil. Place pirozhki about 2 inches apart on the baking sheet, and brush each with egg wash (1 egg beaten with 1 tablespoon water). Bake at 360F for 20-25 min, until golden up top. Remove from oven and cover with a soft kitchen towel until ready to serve. 


https://gscrochetdesigns.blogspot.com. one can see my crochet creations  

https://kneereplacement-stickclub.blogspot.com. for info on knee replacement

https://cancersupportindia.blogspot.com  for info on cancer and health related topics

https://GSiyers home remedies.blogspot.com   is the latest addition to my blogs