Showing posts with label basil. Show all posts

Sunday, August 9, 2026

Digestive Tea

 The tea is made using just a handful of kitchen ingredients:

  • 1 small cinnamon stick (1–2 inches)
  • 1 cm fresh ginger, lightly crushed
  • ¼ teaspoon fennel seeds
  • 2–3 basil leaves
  • 1 cup water

To prepare it, add all the ingredients to water, bring it to a boil and let it simmer for five to seven minutes before straining and serving.


Drinking this tea after a heavy meal, helps to support digestion and help reduce bloating. She also noted that while she finds it beneficial, the drink may not be suitable for everyone. She advised that people who are pregnant, taking blood thinners, have reflux or are on diabetes medication should consult their doctor before including it in their routine.

How The Ingredients Help

Each ingredient used in the tea has been associated with several health benefits.

·Ginger may help ease nausea, vomiting, indigestion, constipation and bloating.
·Fennel seeds are commonly consumed after meals and help reduce gas and bloating.
·Cinnamon has antioxidant and anti-inflammatory properties and reduced risk of chronic diseases such as heart disease and diabetes.
Basil is packed with nutrients and beneficial compounds and has been used to improve digestive function
.


https://gscrochetdesigns.blogspot.com. one can see my crochet creations  

https://kneereplacement-stickclub.blogspot.com. for info on knee replacement

https://cancersupportindia.blogspot.com  for info on cancer and health related topics

https://GSiyers home remedies.blogspot.com   is the latest addition to my blogs


Tuesday, July 28, 2026

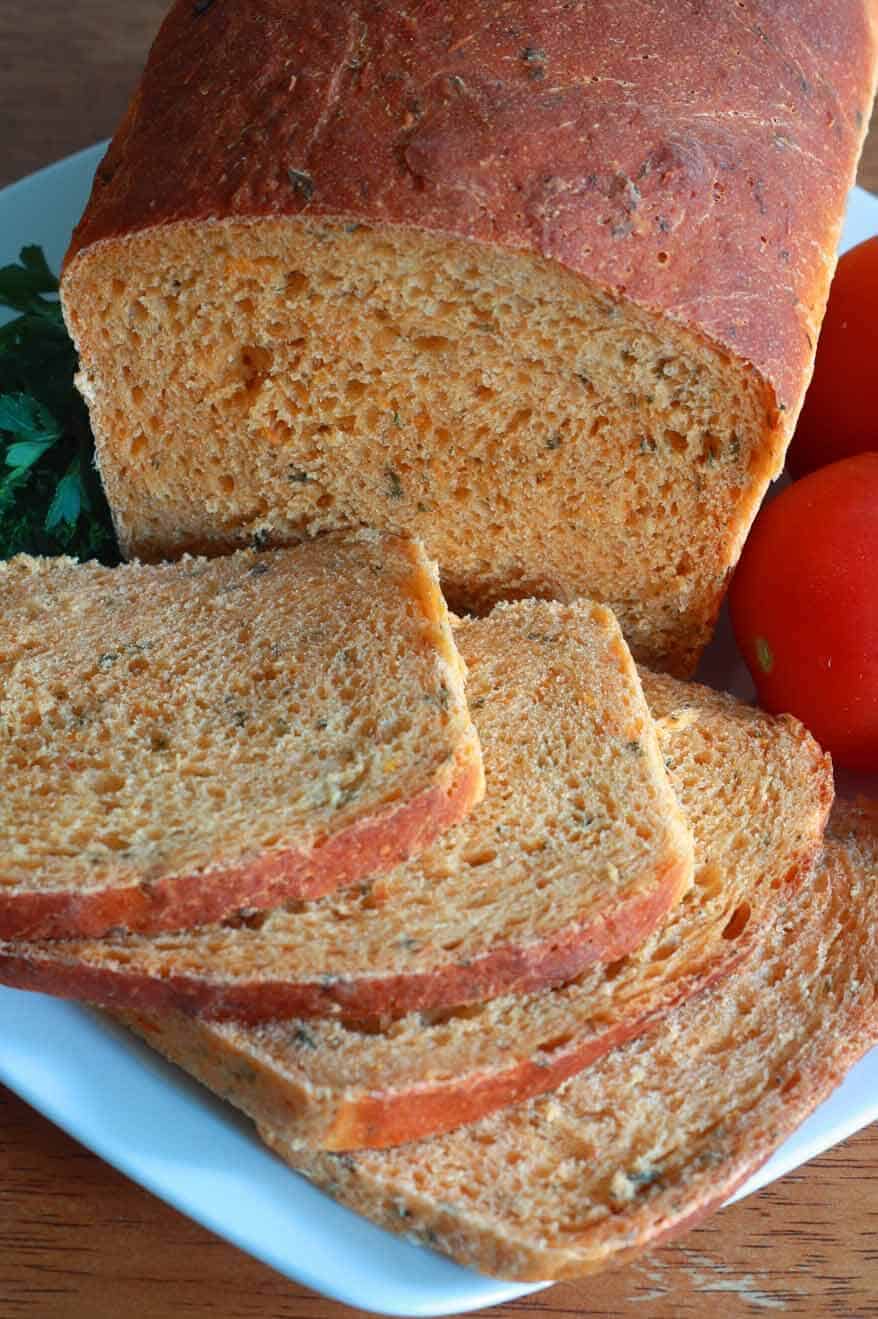
Roasted tomato and herb bread

 roasted tomato bread recipe herb 

 Ingredients

cups cherry tomatoes or quartered Roma tomatoes

Optional: For enhanced tomato flavor add 1/4 cup sun-dried tomatoes in oil, drained and chopped

tbsp extra virgin olive oil

2 1/4 tsp instant yeast

3/4 cup lukewarm water(be sure it's not too warm)

tbsp honey

tbsp extra virgin olive oil

cups all-purpose flour , or more or less as needed (the amount will depend on how much liquid remains in the tomatoes after roasting and blending them)

tsp salt

1/4 cup chopped mixed fresh Italian herbs(e.g., rosemary, basil, marjoram, thyme, sage, dill, oregano, parsley)


Preparations

To roast the tomatoes, spread them out on an aluminum foil-covered baking sheet and toss with 1 tablespoon olive oil. Preheat the oven to 400 degrees F and roast for 10-15 minutes or until the skins of the tomatoes are collapsed and just barely beginning to brown. Puree the tomatoes in a blender and set aside.

Combine the water, yeast, honey and 1 tablespoon of olive oil. Set aside.

Combine the flour and salt in the bowl of a standing mixer. Make a well in the middle of the flour and pour in the tomatoes, the water/yeast mixture and the herbs. Stir with a wooden spoon or wooden spatula just until the ingredients are starting to come together, then attach a dough hook to the standing mixer and knead the dough for about 8 minutes on medium ("2" on a stand mixer). The dough will still be a little sticky and tacky. If it's too wet, add a little more flour until you get a workable consistency. Remove the dough from the bowl and roll into a ball.

Lightly oil a clean bowl with oil and roll the dough ball around in it. Cover loosely with plastic wrap and place in a lightly warmed oven (not too hot) for about an hour, until doubled in size. Remove the dough and place it on a flat surface. Divide it in half. Form each half into an 8-inch square about 1 inch thick. Starting at one end, roll the dough firmly into a cylinder, making sure the dough sticks to itself. Turn the dough seam-side up and pinch the seam closed. Place the dough seam-side down in a greased 9×5 inch loaf pan and gently shake the dough until all four sides touch the edges of the pan. Repeat with the other half. Cover loosely with plastic wrap and returned to a warm place until it is almost doubled in size, about 30 minutes. Preheat the oven to 350 degrees F. Boil 2 cups of water and pour it into a baking pan and place it on the bottom rack. If possible, place the loaf pans above the rack with the pan of boiling water. If not, place the boiling water in two smaller pans on either side of the loaf pans. Bake for 40-50 minutes or until the top of the bread is browned and the loaf sounds hollow when you tap on it with your knuckles. Transfer the bread to a wire rack and cool completely before slicing. Makes two 9×5 inch loaves.


https://gscrochetdesigns.blogspot.com. one can see my crochet creations  

https://kneereplacement-stickclub.blogspot.com. for info on knee replacement

https://cancersupportindia.blogspot.com  for info on cancer and health related topics

https://GSiyers home remedies.blogspot.com   is the latest addition to my blogs

Tuesday, July 21, 2026

Roasted Tomato Bread

roasted tomato bread recipe herb 

Ingredients

cups cherry tomatoes or quartered Roma tomatoes

Optional: For enhanced tomato flavor add 1/4 cup sun-dried tomatoes in oil, drained and chopped

tbsp extra virgin olive oil

2 1/4 tsp instant yeast 

3/4 cup lukewarm water(be sure it's not too warm)

tbsp honey

tbsp  extra virgin olive oil

cups all-purpose flour , or more or less as needed (the amount will depend on how much liquid remains in the tomatoes after roasting and blending them)

tsp salt

1/4 cup chopped mixed fresh Italian herbs(e.g., rosemary, basil, marjoram, thyme, sage, dill, oregano, parsley) 


Instructions

 To roast the tomatoes, spread them out on an aluminum foil-covered baking sheet and toss with 1 tablespoon olive oil. Preheat the oven to 400 degrees F and roast for 10-15 minutes or until the skins of the tomatoes are collapsed and just barely beginning to brown. Puree the tomatoes in a blender and set aside.

Combine the water, yeast, honey and 1 tablespoon of olive oil. Set aside.

Combine the flour and salt in the bowl of a standing mixer. Make a well in the middle of the flour and pour in the tomatoes, the water/yeast mixture and the herbs. Stir with a wooden spoon or wooden spatula just until the ingredients are starting to come together, then attach a dough hook to the standing mixer and knead the dough for about 8 minutes on medium ("2" on a stand mixer). The dough will still be a little sticky and tacky. If it's too wet, add a little more flour until you get a workable consistency. Remove the dough from the bowl and roll into a ball.

Lightly oil a clean bowl with oil and roll the dough ball around in it. Cover loosely with plastic wrap and place in a lightly warmed oven (not too hot) for about an hour, until doubled in size.  Remove the dough and place it on a flat surface. Divide it in half. Form each half into an 8-inch square about 1 inch thick. Starting at one end, roll the dough firmly into a cylinder, making sure the dough sticks to itself. Turn the dough seam-side up and pinch the seam closed. Place the dough seam-side down in a greased 9×5 inch loaf pan and gently shake the dough until all four sides touch the edges of the pan. Repeat with the other half. Cover loosely with plastic wrap and returned to a warm place until it is almost doubled in size, about 30 minutes. Preheat the oven to 350 degrees F. Boil 2 cups of water and pour it into a baking pan and place it on the bottom rack. If possible, place the loaf pans above the rack with the pan of boiling water. If not, place the boiling water in two smaller pans on either side of the loaf pans. Bake for 40-50 minutes or until the top of the bread is browned and the loaf sounds hollow when you tap on it with your knuckles. Transfer the bread to a wire rack and cool completely before slicing. Makes two 9×5 inch loaves. 

https://gscrochetdesigns.blogspot.com. one can see my crochet creations  

https://kneereplacement-stickclub.blogspot.com. for info on knee replacement

https://cancersupportindia.blogspot.com  for info on cancer and health related topics

https://GSiyers home remedies.blogspot.com   is the latest addition to my blogs


Thursday, April 9, 2026

The Spice Cheat-Sheet

 There's usually a good reason for everything, like for the phrase, 'the spice of life', or for why spices used to cost a fortune in days gone by. Spices can make even the most ordinary recipe burst into life with exciting tastes, and turn an average dinner into a gourmet feast, delighting the tongue with exotic flavors from far-flung places. That's why the following spice guide is so useful, and will let you know which spices to mix with which food, so you'll be able to ascend the lofty heights of culinary delight!


spice infographic cheat sheet


https://gscrochetdesigns.blogspot.com. one can see my crochet creations  

https://kneereplacement-stickclub.blogspot.com. for info on knee replacement

https://cancersupportindia.blogspot.com  for info on cancer and health related topics

https://GSiyers home remedies.blogspot.com   is the latest addition to my blogs


Tuesday, January 13, 2026

20 Foods That Should Be Kept Out of the Refrigerator

Today we take it for granted, however, refrigerators are an ingenious product that changed everything when they were invented. With these special electrical devices, people could finally keep food for longer without worrying about spoiling, thus saving money and enjoying fresh food at all times. Despite the necessity of the refrigerator when it comes to keeping food fresh, you don’t actually need to store every food item you bring home from the grocery store in it. There are certain foods, both natural and processed, which are altered both in taste, texture and even nutritional value when refrigerated. The list of the following 20 foods, which are not recommended to be kept in the refrigerator, will allow you to save space and make the most of the taste and nutritional value of your favorite foods.
1. Bananas 
This favorite summer fruit ripens quickly when it’s outside, but that doesn’t mean that it needs to be kept in the refrigerator to prolong its life. This is because the nutrients, that is, the vitamins and minerals in the bananas, are stored better outside of the refrigerator than inside it. 
 
2. Whole watermelon 
Cold watermelon is a summer favorite, but it isn’t recommended to put the whole fruit into the refrigerator if you want to store it at home. Storage of a whole watermelon in the refrigerator damages the essential antioxidant content of beta-carotene, which is found in the fruit. Therefore, whole watermelons are best kept outside the refrigerator, and if you want some chilled pieces, cut them beforehand, put them in a sealed box and kept them in the refrigerator until you want a healthy snack.

3. Coffee 
Humidity conditions in the refrigerator are the enemies of coffee of all kinds, therefore, it is recommended to avoid storing whole and ground coffee beans of in the refrigerator. The moisture in the refrigerator "sticks" to coffee, changes its flavor and destroys its wonderful aroma.
4. Peaches 
 When peaches are placed in the refrigerator, their ripening process stops, and consequently, they don’t reach the stage where their taste becomes as it should be. Moreover, cooling causes damage to the nutritional components of these wonderful fruits, which is why it’s not recommended to keep them in the refrigerator. 
 
5. Mango 
 This exotic fruit is not used to cool temperatures, so it is not advisable to put it in the refrigerator. The essential components of the mango break down when they come into contact with cold, and so, they may lose the nutritional values that make them so healthy for us. 
 
6. Plums 
Many times, cold causes plums to shrink and lose their form and beloved juicy texture. The components in the purple fruit, like dietary fibers that help regulate digestive activity, are damaged by the cold and therefore should not be stored in the fruit drawer.
7. Oils 
Storage of oil in a place exposed to sunlight causes it to oxidize which is harmful to its composition, but on the other hand, storing it in the refrigerator also harms it. When storing different oils in the refrigerator - especially olive and avocado oil - they crystallize into a buttery texture which damages their taste. 
 
8. Pumpkin 
When storing pumpkin in the refrigerator, moisture causes it to develop mold, and even when that is not the case – its taste can still be damaged. The wetness in the refrigerator may seep into the pumpkin and change its taste, which is why it’s better to opt for cool and shaded places, such as the pantry, over keeping pumpkin in the refrigerator. 
 
9. Basil 
 foods
Basil is a delicate herb that quickly wilts in the cold, and it also absorbs odors that change its taste from the various items in the refrigerator. Therefore, it is recommended to place basil stalks into a vessel with water, cover its leaves with a bag and put it in a shaded place, so that they hold longer and don’t become damaged. 

10. Kiwi  
Despite its rough appearance, kiwi is sensitive to external influences such as cold. When this fuzzy, sour fruit is placed in the refrigerator, its nutritional value is also impaired as well as its appearance, taste, and texture, which is why the fridge is not the place for it. 
 
11. Onions (especially cut)  
Onions have a great amount of liquid, and when put into the refrigerator they are fertile ground for the development of mold that requires moisture to survive. Furthermore, chopped onion absorbs bacteria and odors from the refrigerator, so it is recommended to use it all if cut, or alternatively chop and freeze it. 
 
12. Garlic 
When garlic is placed in the refrigerator, the cold causes it to sprout, and it also develops mold and has a texture reminiscent of rubber. To prevent this, do not store it in the refrigerator, and choose a cool, dry place where it can be kept naturally for a long time.

13. Eggplant / Brinjal
Eggplants are especially sensitive to cold, and when placed in the fridge they quickly spoil and tend to shrink and develop a rubber-like texture as well as mold in their stem. In addition, the natural ethylene gas released from fruits and vegetables further damages the eggplant and causes them to spoil and lose their flavor. 
 
14. Sweet potatoes 
When sweet potatoes are brought into the refrigerator, the structure of their cell walls changes and becomes stiff and hard to cut. The cooling also damages their texture, so it takes longer to prepare them, unlike sweet potatoes kept outside the refrigerator. Refrigerator moisture also causes the development of mold and a stale taste, so this is definitely not the place for them.

15. Hot and sweet peppers 
 foods
 
When sweet peppers are put into the refrigerator, their natural color fades with time and humidity causes them to develop mold that harms their taste and also makes them inedible. They also tend to shrink when refrigerated, just like their little brothers - hot peppers, therefore, it is not recommended to put both types of peppers in there.

16. Peanut butter 
Fine peanut butter spreads wonderfully on bread and can be used as a snack in itself or even as an ingredient in cookies. When you put the salty-sweet spread to cool in the fridge, its texture becomes damaged and it becomes difficult and almost impossible to spread, so the refrigerator is definitely not the place for it. 
 
17. Nectarines  
This wonderful fruit is eaten in its fresh form and also used to make a variety of pastries, but refrigeration can damage its unique taste. The moisture created in the refrigerator causes the nectarines to soften, even if they are not yet ripe so that their delicate skins absorb unpleasant flavors. When nectarines are refrigerated, they tend to spoil quickly, so it is recommended to take them out of the fridge and store them on the counter. 
 
18. Cereal  
Sometimes cereal is kept in the refrigerator to prevent ant infestations, but instead, it is recommended to place them in a well-sealed container. When you put cereal in the refrigerator, it can become sponge-like and absorb the smells and flavors around it, as well as soften and lose its flavor and texture. If there is extra sugar in the grains, they crystallize into soft, inedible lumps that stick together and lose their well-known crispness and flavor.

19. Salad dressings  
Salad dressing based on vinegar and oil - like vinaigrettes - are found in almost every refrigerator, but it is certainly not their place. The vinegar and the oil preserve the wonderful taste of the sauces, and when stored in the refrigerator, this taste becomes damaged because they absorb odors around them, even when their container is closed. 
 
20. Chocolate 
Some chocolates soften at room temperature and can be refrigerated, but most of these sweet treats remain solid even when they are outside the refrigerator. If you put chocolate in the fridge, its crystalline structure changes, it develops white spots and its flavor changes dramatically.


https://gscrochetdesigns.blogspot.com. one can see my crochet creations  

https://kneereplacement-stickclub.blogspot.com. for info on knee replacement

https://cancersupportindia.blogspot.com  for info on cancer and health related topics

https://GSiyers home remedies.blogspot.com   is the latest addition to my blogs


Friday, November 7, 2025

Ricotta and Pesto Stuffed Tomatoes

 Ricotta and Pesto Stuffed Tomatoes  

This dish creates a fantastic combination between the acidity of the tomatoes and the light sweetness of the ricotta. You will need about 20 minutes to prepare the dish and another 20 to bake it to perfection. The result is a sweet, delicious treat that is still under 250 calories. A combination of cheese and tomato is always a delight for the senses, but that added honey and a bit of pesto make this a meal you can't stop eating.


Ingredients: 
Tomatoes - 4 
Ricotta cheese - 5 oz. 
Parmesan cheese - 2 tbsp.
Pesto - 1 1/2 tbsp. 
Lemon zest - 1 tsp. 
Tomatoes sauce - 1 cup (marinara) 
Honey - 1 tbsp. 
Basil - a handful
Parsley - a handful 
Chives - a handful 
Olive oil - as needed 
Salt and Pepper - to taste 

Preparations
 
Preheat the oven to 350°F (180°C). Cut the top of each tomato, save it on the side and scoop the seeds out. 
 
In a small bowl, mix the tomato sauce, honey, herbs, and a dash of salt and pepper.
 
In a separate bowl, mix ricotta, parmesan, pesto sauce and lemon zest. Add salt and pepper to taste. 
 
Pour the tomato sauce into a baking pan. Stuff each tomato with the cheese mix, place the top back on the tomato. 
 
Generously add olive oil to the tomatoes. 
 
Bake for 20 minutes, or until the tomatoes have gone soft. 

https://gscrochetdesigns.blogspot.com. one can see my crochet creations  

https://kneereplacement-stickclub.blogspot.com. for info on knee replacement

https://cancersupportindia.blogspot.com  for info on cancer and health related topics

https://GSiyers home remedies.blogspot.com   is the latest addition to my blogs


Chili Basil Paneer

 How to make Chili Basil Paneer

- 1 liter full fat milk

- 3 tbsp lemon juice

- 1/2 cup chopped basil

 - 1 tbsp chili flakes
 

- Salt to taste


Start by boiling your milk and then curdle it using lemon. Once it’s 

completely separated, add basil, chili flakes and salt.
 

Strain it over a paneer maker to get the perfect cubes, let it sit for an 

hour or two and  then cut into peaces and enjoy your flavoursome 

starter chili basil paneer.


https://gscrochetdesigns.blogspot.com. one can see my crochet creations  

https://kneereplacement-stickclub.blogspot.com. for info on knee replacement

https://cancersupportindia.blogspot.com  for info on cancer and health related topics

https://GSiyers home remedies.blogspot.com   is the latest addition to my blogs


Monday, October 27, 2025

5 Bean Salad

 Ingredients for a fivebean salad arranged in bowls including beans diced vegetables herbs and dressing components A recipe image of High-Protein Five Bean Salad. 

Ingredients

5 tbsp lemon juice (from 2 lemons)

5 tbsp extra-virgin olive oil

¼ cup finely chopped fresh tender herbs (such as parsley, basil or mint), plus more for garnish 

2 cloves garlic, minced (about 2 teaspoons)

1 tsp Dijon mustard

tsp salt

1 tsp Italian seasoning

½ tsp  pepper pdr

1 (15-ounce) can no-salt-added kidney beans, rinsed

1 (15-ounce) can no-salt-added chickpeas, rinsed

1 (15-ounce) can no-salt-added black beans, rinsed

1 (15-ounce) can no-salt-added pinto beans, rinsed

1 (15-ounce) can no-salt-added cannellini beans, rinsed

1 small (8-ounce) orange bell pepper, chopped (about cups)

½ cup chopped red onion


Preparations
 
Combine 5 tablespoons lemon juice, 5 tablespoons oil, ¼ cup chopped herbs, the minced garlic, 1 teaspoon mustard, 1¼ teaspoons salt, 1 teaspoon Italian seasoning and ½ teaspoon pepper in a large bowl; whisk well. 
 
Add rinsed kidney beans, chickpeas, black beans, pinto beans and cannellini beans and the chopped bell pepper and chopped onion; stir to coat evenly. 
 
Cover and refrigerate for at least 30 minutes, stirring occasionally, to allow the flavors to meld. Garnish with additional herbs before serving, if desired. 


https://gscrochetdesigns.blogspot.com. one can see my crochet creations  

https://kneereplacement-stickclub.blogspot.com. for info on knee replacement

https://cancersupportindia.blogspot.com  for info on cancer and health related topics

https://GSiyers home remedies.blogspot.com   is the latest addition to my blogs

Wednesday, October 15, 2025

Cheesy Garlic Bread

 Cheesy Garlic Bread

Garlic bread is something most people love to eat, and this recipe upgrades the dish tenfold! This delicious recipe will make garlic bread a must-have favorite in your house and will have your home smelling like a real Italian bakery

Ingredients
 
All-Purpose flour - 1 Ibs. / 400 gm
Active dry yeast - 1/2 tbsp. 
Salt - 1/2 tbsp. 
Sugar - 1/2 tbsp. 
Water - 1 1/2 cup (room temperature) 
Baking enhancer - 1/2 tsp. (optional) 
Garlic - 1 clove (crushed) 
Parsley - 1/3 cup (dry) 
Basil - 1/3 cup (dry) 
Rosemary - 1/4 cup (dry and chopped) 
Butter - 1 tbsp. 
Mozzarella - 2 cups (grated) 


 Preparations
Mix half the water, the dry yeast, the baking enhancer, the flour, the sugar, and salt into the mixer bowl and turn it on. Add the remaining water gradually, kneading until you get a uniform dough. 
 
Add the olive oil to the bowl and knead for about 2 minutes (add flour if the dough is too sticky), continue to work the dough for about 5 minutes until it separates from the sides of the bowl. 
 
Allow the dough to rise for about 1 - 1 1/2 hours or until it doubles in size. 
 
Once it rises, beat the dough to knock it down and let it rise again. After the second rise, remove the dough from the bowl onto a lightly floured work surface and roll out into a 50 x 25 cm sheet. 
 
Butter the top of the dough sheet and sprinkle with crushed garlic, the herb mixture, and grated cheese, and roll into a loaf. 
 
Place the loaf in a baking pan, let the bread rise for about 15 minutes. 
 
Bake in a preheated 350°F (180°C) oven for about 40 minutes until the top turns golden brown, remove the bread from the oven and let it cool for about 10 minutes before serving.


https://gscrochetdesigns.blogspot.com. one can see my crochet creations  

https://kneereplacement-stickclub.blogspot.com. for info on knee replacement

https://cancersupportindia.blogspot.com  for info on cancer and health related topics

https://GSiyers home remedies.blogspot.com   is the latest addition to my blogs


Sunday, September 21, 2025

Learn How to Grow Herbs in Water

Herbs are incredibly versatile. They offer many medicinal benefits and are a necessity in the kitchen. But wouldn't it be great to grow your own herbs all year round, without having to change the soil or water them frequently? This guide will teach you how to grow your own herbs in water. 

grow herbs in water

Here's How: 
 
1. To take a cutting from your herb growing in the garden, snip off 6-inch sections from the growing tips and put the cutting in the water-filled bottle. If you do not have a herb garden, you may use the herbs you get from the supermarket. Just wash them in plain water and cut off the lower part. 
 
2. Place the herb cuttings in a glass bottle (more on this below) with water - best use spring water as it is high in minerals. Do not use chlorinated water as this can damage the plant tissues. 

3. If using a glass bottle, opt for a colored bottle or wrap it with paper, ensuring that the roots are not exposed to light. A bottle is ideal as its narrow end will support the herbs, keeping them upright. Bear in mind that there should still be some room at the neck of the bottle, enabling a transition of air for the roots to be able to breathe. 
 
4. Be sure to remove the lower leaves from the water, as they can rot and spoil the herb. 
 
5. As the roots grow during the first 2 to 6 weeks, you need not change the water. To keep the roots and herbs healthy as they grow, you can add some rooting hormone powder. 

With these basic tips in mind, these are the 10 herbs you can grow in water: 
 grow herbs in water
 
1. Rosemary: The roots of this herb may take a while to grow, so be patient. But if grown in spring, they will grow a lot faster. For better results, keep the plant in a sunny spot. 
 
2. Sage: 
 Sage: The Wisest Herb | Home & Garden Information Center
Take some sage cuttings in the spring and place them in water. This herb should be placed in a bright spot in a well-aired environment, as it is prone to mildew. 
 
3. Peppermint:  
Care of Peppermint - How To Grow Peppermint Plants | Gardening Know How 
Peppermint is an easy herb to grow. Just place a few fresh cuttings in some water. It will grow in no time at all. 
 
4. Tarragon:  
 Herbs, Tarragon | FreshPoint
 
To grow this herb in water, take a few cuttings in spring, after new growth appears. You may take a few cuttings in the fall too, but they will take longer to grow in water. Keep the herb in a warm and bright spot. Opt for French tarragon if you plan to use it in your cooking. Russian tarragon is best used in salads. 
 
5. Basil:  
 2,199 Ocimum Basilicum Stock Illustrations, Vectors & Clipart - Dreamstime
Few herbs are easier to grow in water than basil. Take the cuttings any time before the herb starts to flower and keep the bottle in a sunny spot. 

6. Spearmint: 
 Growing Spearmint Plants - Information On The Care of ...
 
Just like peppermint, spearmint is just as easy to grow. Refer to the third point for growing tips. 
 
7. Thyme: For the best results, you need to take cuttings of new growth that is green. Old growth will be stiff and brown and may not sprout roots as easily. The best time to take the cuttings is in mid-spring to early summer, just before the plants start flowering. Be sure to put the thyme in water as soon as you take them, as the stems of thyme tend to dry out fast. Once the herb starts growing, cut the stems to promote branching. 
 
8. Oregano:  
 Oregano, White Flowered Greek (Organic) - Adaptive Seeds
This is a great herb to grow indoors. It's versatile and can be used in all sorts of dishes. Place the cuttings in water, then pinch the growing tips as soon as the plant starts to grow. 
 
9. Lemon Balm: 
 Lemon Balm - Mountain Top Seed Bank
Pick several cuttings in the spring, or come fall, then place them in water in a bright spot. After 3 or 4 weeks, the cuttings will have developed roots. Be sure to change the water often and if the weather is warm, you can keep it outdoors. 
 
10. Stevia:  
The plant Stevia rebaudiana 
This fantastic herb can be added to some beverages or tea. Place the stevia cuttings from actively growing branches in a container full of water, and keep it in a sunny and warm place. 


https://gscrochetdesigns.blogspot.com. one can see my crochet creations  

https://kneereplacement-stickclub.blogspot.com. for info on knee replacement

https://cancersupportindia.blogspot.com  for info on cancer and health related topics

https://GSiyers home remedies.blogspot.com   is the latest addition to my blogs