Showing posts with label mushrooms. Show all posts

Tuesday, August 11, 2026

Leftover Foods That Don't Belong in the Microwave

While popping some leftovers in the microwave might seem easy, the truth is that you might actually be damaging your health by microwaving and consuming certain foods. In many instances, it's preferential to heat up leftovers conventionally, in other words using an oven or stove. Here are 10 types of food that you shouldn't reheat using a microwave, together with an explanation of how they should be heated properly:

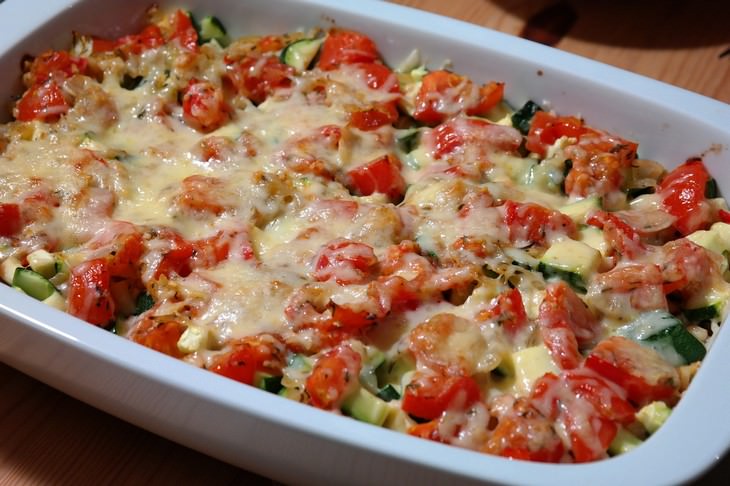
1. Casseroles Microwave, cooking, mistakes

How to reheat properly: Splash some water over the top of the casserole you want to reheat. Doing this keeps it from drying out when heating it in the oven. Cover lightly with aluminum foil and bake at 325°F (165°C) until heated through. Be sure to check the temperature in the middle of the casserole, as that’s where it takes the longest to warm up.

2.Chicken

How to reheat properly: Preheat your oven to 350°F (177°C). Line a baking sheet with aluminum foil, then place the chicken at the center. Wrap it tightly in the foil, then reheat until its internal temperature registers a minimum of 165°F (74°C) on a meat thermometer.

3. Pizza Microwave, cooking, mistakes

 How to reheat properly: Simply bake in the oven at 375°F (191°C) until the cheese has melted and the crust is crisp. If you’re only heating a slice or two, place the slices in a dry skillet and cover with aluminum foil. Heat on medium until the cheese has melted and the crust is crisp. 

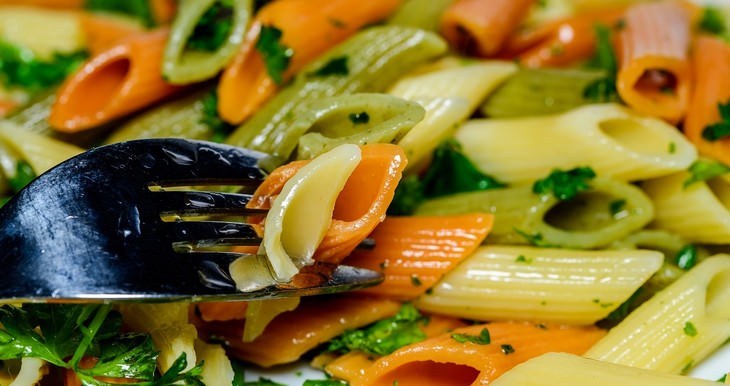
4. Pasta
Microwave, cooking, mistakes

How to reheat properly: Place the pasta in a saucepan and heat it on medium-low. If you used oil or cream when you first cooked it, add a small amount and stir frequently. If you used a tomato-based sauce, you can add a small amount of water to thin it out a little, as well as adjust the seasoning to taste.

5. Steak

How to reheat properly: Slice the steak leftovers thinly and place in a saute pan. Add a small amount of oil to the pan, and heat on medium until the edges have browned and the slices have warmed through. 

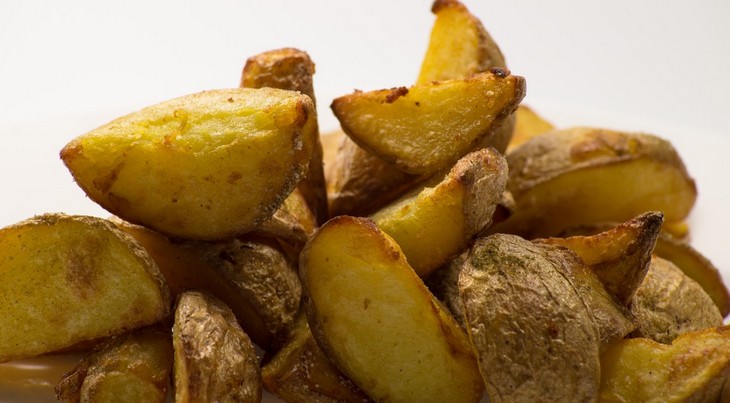
6. Potatoes
Microwave, cooking, mistakes
How to reheat properly: If you’re reheating French Fries, place a little oil in a non-stick saute pan and heat until it begins to simmer. Add the fries and fry them until brown and crisp. When the fries are done, take them out of the oil, then drain on a paper-towel-lined dinner plate. 

For mashed potatoes, place a large deep pot on the stove and fill it one-third of the way up with water. Bring the water to a boil and then reduce the heat to a low simmer. Place the mashed potatoes in a smaller pot and submerge in the larger pot, stirring frequently until the mixture warms through. You can add a splash of milk to thin it out if required. 

Boiled potatoes can be reheated in the oven. Place the potatoes in an oven-proof dish, adding a dash of olive oil. Place them in an oven set at 300°F (150°C) and leave to heat through. You can check that they’re done by pushing a fork into the middle of the largest potato. If it comes out hot, then you’re good to go. 

7. Spinach
Microwave, cooking, mistakes

How to reheat properly: Due to the possibility of harmful nitrosamines (which are carcinogenic) forming upon reheating, it’s better to avoid reheating spinach altogether. 

8. Mushrooms

How to reheat properly: Place the mushrooms in a skillet, preferably with a lid. Add a little olive oil or butter and heat over a medium-high heat for just a few minutes. 

9. Eggs

How to reheat properly: Reheating eggs should be avoided because they can become toxic if they’re exposed to high heat, however, cooked eggs and egg dishes can be reheated in the oven at a temperature of 165°F (73°C) before serving. 

10. Rice
Microwave, cooking, mistakes

How to reheat properly: Place the rice into an oven-proof baking dish and add a little water. You can also add a few knobs of butter or a little olive oil to prevent sticking. Cover the baking dish with a tight-fitting lid or cover tightly in aluminum foil. Bake at 300°F (149°C) for approximately 15 minutes.


https://gscrochetdesigns.blogspot.com. one can see my crochet creations  

https://kneereplacement-stickclub.blogspot.com. for info on knee replacement

https://cancersupportindia.blogspot.com  for info on cancer and health related topics

https://GSiyers home remedies.blogspot.com   is the latest addition to my blogs


Saturday, July 11, 2026

Sesame tofu and vegetable noodles- Anti-inflammatory food

Ingredients 

75 g wholewheat or soba noodles

100 gm firm tofu, cubed

1 cup sliced vegetables such as cabbage, carrot, mushrooms and capsicum

1 tsp sesame oil

1 tsp low-sodium soy sauce

1 tsp grated ginger

1 tsp sesame seeds

Lime juice

salt to taste 

How to make it:

Cook the noodles according to the packet instructions. Sear the tofu with a teaspoon of sesame oil in a hot pan until golden, then add the vegetables and ginger. Toss in the noodles and soy sauce. Finish with sesame seeds and lime juice.


https://gscrochetdesigns.blogspot.com. one can see my crochet creations  

https://kneereplacement-stickclub.blogspot.com. for info on knee replacement

https://cancersupportindia.blogspot.com  for info on cancer and health related topics

https://GSiyers home remedies.blogspot.com   is the latest addition to my blogs


Sunday, May 10, 2026

Vegetarian Spaghetti Squash Lasagna

 Ingredients

1 2 1/2- to 3-pound spaghetti squash, halved lengthwise and seeded

¼ cup water

2 tbsp extra-virgin olive oil

1 medium onion, chopped

4 cloves garlic, minced

10 ounces mushrooms, sliced

2 cups crushed tomatoes

1 tsp Italian seasoning

½ tsp pepper pdr, divided

¼ tsp crushed red pepper

¼ tsp salt, divided

¼ cup grated Parmesan cheese

1 cup shredded part-skim mozzarella cheese, divided

½ cup part-skim ricotta cheese

Vegetarian Spaghetti Squash Lasagna


Preparations

Position rack in upper third of oven; preheat to 450 degrees F.

Place squash cut-side down in a microwave-safe dish and add water. Microwave, uncovered, on High until the flesh is tender, 10 to 12 minutes. (Alternatively, place squash cut-side down on a large rimmed baking sheet. Bake at 400 degrees F until tender, 40 to 50 minutes.)

Meanwhile, heat oil in a large skillet over medium heat. Add onion and garlic; cook, stirring, until starting to soften, 3 to 4 minutes. Add mushrooms and cook, stirring, until the vegetables are tender and starting to brown, about 5 minutes more. Add tomatoes, Italian seasoning, 1/4 teaspoon pepper, crushed red pepper and 1/8 teaspoon salt. Cook until heated through and the flavors have blended, 1 to 2 minutes. Remove from heat and cover.

Use a fork to scrape the squash from the shells into a large bowl. Stir in Parmesan, the remaining 1/4 teaspoon pepper and the remaining 1/8 teaspoon salt. Place the shells cut-side up on a large rimmed baking sheet. Spoon one-fourth of the squash-Parmesan mixture into each shell. Layer one-fourth of the tomato mixture on top, then sprinkle 1/4 cup mozzarella into each shell. Dollop 1/4 cup ricotta over the mozzarella. Repeat with the remaining squash mixture, tomato sauce and mozzarella.

Bake the squash lasagnas for 15 minutes. Turn the broiler to high and broil, watching carefully, until the cheese starts to brown, 1 to 2 minutes. Cut each lasagna in half to serve.


https://gscrochetdesigns.blogspot.com. one can see my crochet creations  

https://kneereplacement-stickclub.blogspot.com. for info on knee replacement

https://cancersupportindia.blogspot.com  for info on cancer and health related topics

https://GSiyers home remedies.blogspot.com   is the latest addition to my blogs


High-Protein Veggie Breakfast Casserole

 A recipe image of High-Protein Veggie Breakfast Casserole. 

Ingredients

tbsp extra-virgin olive oil 

cups sliced cremini mushrooms 

 2cups chopped multicolored bell peppers 

small red onion, chopped 

1(5-ounce) package baby spinach, chopped 

1(15-ounce) can no-salt-added black beans, rinsed

cups shredded pepper Jack cheese 

large eggs 

⅔ cup half-and-half

½ cup small-curd 2% cottage cheese

tsp garlic powder

1tsp onion pdr

½ tsp pepper pdr 

¼ tsp salt

¼ tsp cayenne pepper (optional)

Sliced scallions, for garnish (optional)

Hot sauce or salsa, for serving (optional) 


Preparations

Preheat oven to 350°F. Lightly coat a 7-by-11-inch baking dish with cooking spray.

Heat 2 tablespoons oil in a large skillet over high heat. Add 2 cups mushrooms; cook, stirring occasionally, until golden brown, about 8 minutes. Reduce heat to medium-high and add 2 cups peppers and the chopped onion; cook, stirring often, until softened, about 5 minutes. Stir in chopped spinach; cook, stirring constantly, until wilted, about 2 minutes. Transfer the mixture to the prepared baking dish. Stir in rinsed black beans and 1½ cups cheese.

Combine 8 eggs, ⅔ cup half-and-half, ½ cup cottage cheese, 1 teaspoon each garlic powder and onion powder, ½ teaspoon pepper, ¼ teaspoon salt and ¼ teaspoon cayenne (if using) in a blender; process until smooth, about 20 seconds. Add the egg mixture to the black bean mixture in the baking dish; stir until evenly combined. Cover the dish tightly with foil.

Bake until puffed around the edges, lightly browned and just set in the center, about 1 hour 5 minutes, uncovering during the last 20 minutes of baking. Let stand for 10 minutes before serving. Garnish with sliced scallions and serve with hot sauce or salsa, if desired.  


https://gscrochetdesigns.blogspot.com. one can see my crochet creations  

https://kneereplacement-stickclub.blogspot.com. for info on knee replacement

https://cancersupportindia.blogspot.com  for info on cancer and health related topics

https://GSiyers home remedies.blogspot.com   is the latest addition to my blogs


Thursday, May 7, 2026

High-Protein Breakfast Casserole

 Ingredients

 2 tbsp extra-virgin olive oil, divided

4ounces sliced fresh wild mushrooms, such as oyster or shiitake (about 1cup

1 medium red bell pepper, chopped (about cups)

 1smallyellow onion, chopped (about 1cup)

¼tsp salt, divided

1(5-ounce) package baby kale

1½ tsp garlic powder

¼ tsp crushed red pepper

large eggs

½ cup small-curd 2% reduced-fat cottage cheese

 cup whole milk

 cups shredded Colby-Jack cheese, divided OR mozzarella / mild cheddar cheese can be substituted


Preparations

Preheat oven to 350°F. Lightly coat an 8-inch-square baking dish with cooking spray. 

Heat 1 tablespoon oil in a large skillet over medium-high heat. Add 4 ounces sliced mushrooms; cook, undisturbed, until browned, about 4 minutes. Stir and continue to cook, stirring occasionally, until the moisture has evaporated, about 3 more minutes. Add chopped bell pepper, chopped onion, ⅛ teaspoon salt and the remaining 1 tablespoon oil; cook, stirring often, until softened, about 4 minutes. Add 5 ounces baby kale, 1½ teaspoons garlic powder and ¼ teaspoon crushed red pepper; cook and stir until the kale is wilted, about 2 minutes. Set aside to cool slightly, about 5 minutes.  

Combine 8 eggs, ½ cup cottage cheese, ⅓ cup milk, ¾ cup Colby-Jack and the remaining ⅛ teaspoon salt in a blender; process on low speed until smooth, about 20 seconds. 

Spread half of the kale mixture in the bottom of the prepared dish; pour the egg mixture over the top. Scatter the remaining kale mixture over the egg mixture (most of the vegetables will sink to the middle). Top with the remaining ¾ cup Colby-Jack. Bake until puffed around the edges and golden brown, about 40 minutes. Let stand for 10 minutes before serving.


https://gscrochetdesigns.blogspot.com. one can see my crochet creations  

https://kneereplacement-stickclub.blogspot.com. for info on knee replacement

https://cancersupportindia.blogspot.com  for info on cancer and health related topics

https://GSiyers home remedies.blogspot.com   is the latest addition to my blogs

Monday, May 4, 2026

Tofu & Vegetable Scramble

 4565087.jpg 

Ingredients

1 ½ tsp extra-virgin olive oil

5 ounces extra-firm tofu, drained and cubed

1 cup chopped vegetables, such as zucchini, mushrooms and onions

½ tsp spice of choice, such as chili powder or cumin pdr

Pinch of  pepper pdr

cup canned chickpeas, rinsed

¼ cup  salsa

¼ cup shredded Cheddar cheese, preferably sharp (1 oz.)

1 dash Hot sauce and chopped coriander leaves to taste


Preparations

Heat oil in a large nonstick skillet over medium-high heat. Add tofu, vegetables, spice and pepper; cook, stirring often, until the vegetables are softened, 5 to 7 minutes.  

Add chickpeas and salsa and heat through, 1 to 2 minutes.  

Remove from heat, gather the scramble into one section of the pan, top with Cheddar cheese and let melt off the heat. Serve with hot sauce and cilantro, if desired.  


https://gscrochetdesigns.blogspot.com. one can see my crochet creations  

https://kneereplacement-stickclub.blogspot.com. for info on knee replacement

https://cancersupportindia.blogspot.com  for info on cancer and health related topics

https://GSiyers home remedies.blogspot.com   is the latest addition to my blogs


Friday, April 24, 2026

Authentic Vegan Russian Pirozhki

 Snacks: pirozhki

Can you Make Authentic Vegan Russian Pirozhki?

 It's actually quite easy to veganize Russian pirozhki. For the best vegan Russian pirozhki, use soy milk in place of regular milk and omit the egg wash in the end. You will also need to make the following tweaks in the filling:

  • In the cabbage filling, omit the boiled egg for a vegan cabbage pirozhki
  • In the pumpkin filling, omit the feta for one-of-a-kind pumpkin, caramelized onion and dill vegetarian pirozhki. Thats the same advice I give my readers about veganizing my caramelized onion and pumpkin pizza
  • Omit the butter from the mushroom filling for vegan mushroom pirozhki (similar to my mushroom bourekas)

You can also stuff vegan pirozhki with mixed vegetables, sweet potato or potato filling.

A rustic wooden table displays pastries and piroshki on a decorative plate and in a bowl. A cup of tea sits beside them on a matching saucer. In the background, a jar with yellow and purple flowers and a black and white thermos add charm to the scene.  

 Do you need dipping sauce for Russian Vegetarian Pirozhki?

These vegetarian pirozhki are great on their own! If you're looking for a good dipping sauce, I recommend the sauce from my Ukrainian cucumber salad. It's super simple! All you gotta do is mix equal parts sour cream and mayo, add dried dill, salt and pepper. You can even dilute it with a touch of vinegar if you want a more liquid, pourable sauce. Indians, we can eat with green chutney/ tomato ketchup/ tomato chutney.

Making the Baked Pirozhki Dough Recipe:

First, you have to make the filling. Because this pirozhki recipe uses a traditional yeasted dough, the dough requires time to rise. While the dough is rising, make your favourite filling - or make all three to try them all out!

Make the Dough 

A person with red nail polish carefully uses a round metal cutter on rolled-out dough, preparing piroshki. In the background, a tray awaits with unbaked pastry shapes on a speckled countertop. A person with red nail polish carefully uses a round metal cutter on rolled-out dough, preparing piroshki. In the background, a tray awaits with unbaked pastry shapes on a speckled countertop. A person is spooning sautéed mushrooms and onions onto a small, round piece of dough for piroshki on a speckled countertop. More dough pieces await on a parchment-lined tray in the background. 

 Storage Instructions for Baked Vegetarian Pirozhki

Allow the pirozhki to cool completely before storing. Place them in an airtight container or wrap them tightly in plastic wrap. They will stay fresh in the refrigerator for up to 4 days. To reheat, warm them in a 350°F (175°C) oven for about 10 minutes or microwave for 30 seconds to 1 minute until heated through.

For longer storage, freeze baked pirozhki in a single layer on a baking sheet until solid, then transfer them to a freezer-safe bag or airtight container. They will keep for up to 3 months. To reheat, bake frozen pirozhki at 350°F (175°C) for 15-20 minutes, or microwave for 1-2 minutes, until heated through.

Ingredients for Russian Pirozhki Dough:

1tbsp Active Dry Yeast

2 tbsp  icing sugar

1cup water or enough to cover

1liter milk warmed to lukewarm (around 100-110°F)

a few pinches of salt

½ cup oil 

1kg flour(about 8 cups)

2 tbsp sugar

Ingredients for Mushroom Pirozhki Filling:

2 lb mushrooms/ 800 gm

1onion finely chopped

2 tbsp butter

Ingredients for Cabbage Pirozhki Filling:

2large onions

½head of cabbage

2 hard-boiled eggs

Ingredients for Pumpkin Pirozhki with Caramelized Onion and Feta:

1onion

1pumpkin or squash of your choice

½ bunch dill

100 gm feta

Instructions

How to make Russian Pirozhki Dough:

Combine yeast, sugar and water in a small bowl. Mix together and set aside, letting yeast activate for 10 minutes.

Then in a large bowl, combine ½ the milk, yeast mixture, sugar, salt, and oil. Mix to combine. Begin adding flour in batches; add more flour or milk as needed. Dough should be not too sticky and very soft and elastic. I make this with a Kitchenaid stand mixerf ollow, but you can also easily do it all by hand (see more on this below!). Cover with a clean kitchen towel and set aside in a dark, warm but well-ventilated place. Let dough rise for 1.5 hour, or until doubled in size (the dough should roughly fill twice the volume it started with). Mix dough again with spoon or stand mixer paddle, and see if need to add flour. Let rise again for 30 minutes. While dough is rising, prepare filling.

How to make mushroom filling for pirozhki:

Slice onion into half-moons. Heat pan to medium heat. Add 2 tbsp butter. Add onions and cook until colour changes and onions become translucent, about 10 minutes.

Slice mushrooms thinly. Add mushrooms to onions and sautee until mushrooms begin to brown, about 10 minutes.

Taste and add salt and pepper, as needed.

How to make cabbage filling for pirozhki: Slice onion into half-moons. Heat pan to medium heat. Add 2 TBs neutral-tasting oil, like Canola, grapeseed or vegetable oil. Add onions and cook until colour changes and onions become golden, about 15 minutes. Chop cabbage into thin strands. Add cabbage to large bowl with 2 TBs water. Put cabbage in microwave for 2 minutes, to soften slightly. Let cool until easy to handle and add 2 TBs of salt. Proceed to massage cabbage until it has softened considerably, approximately 5 minutes. Chop hard-boiled eggs into small pieces. ( can be omitted for vegetarians) Combine cabbage, sauteed onions and hard-boiled eggs. Taste and add salt and pepper, as needed.

How to make pumpkin, caramelized onion and feta filling for pirozhki: Set oven to 400F. Cover baking sheet with parchment paper or a reusable silicone matfollow. Cut pumpkin or squash in half, scoop out seeds and sprinkle with salt, pepper and a drizzle of oil. Place pumpkin face-down on the baking sheet. Pierce skin a few times to let steam escape. Bake until pumpkin collapses fully when poked with a fork, about 30-45 minutes, depending on the size of the pumpkin. Let cool until safe to handle and scoop out pumpkin flesh. Set aside. Slice onion into half-moons. Heat pan to medium heat. Add 2 TBs neutral-tasting oil, like Canola, grapeseed or vegetable oil. Add onions and cook until onions change colour, about 10 minutes. Lower heat and continue cooking until onions fully caramelize, an additional 15-20 minutes. Mix pumpkin, caramelized onions, dill and feta together.

Continue shaping pirozhki: ( I have put the photos how it is shaped before the ingredients) Divide dough into portions: Cover counter with flour, and roll dough out into thin layer. Cut circles using a 3-4 inch round cup or cookie cutter. Place about 1-2 tablespoons of filling in the center of each circle. Fold the dough over the filling to create a half-moon shape, then pinch the edges firmly together to seal. You can also bring all edges to the center for a round shape. To bake, cover baking sheet with parchment paper. Add a bit of oil. Place pirozhki about 2 inches apart on the baking sheet, and brush each with egg wash (1 egg beaten with 1 tablespoon water). Bake at 360F for 20-25 min, until golden up top. Remove from oven and cover with a soft kitchen towel until ready to serve. 


https://gscrochetdesigns.blogspot.com. one can see my crochet creations  

https://kneereplacement-stickclub.blogspot.com. for info on knee replacement

https://cancersupportindia.blogspot.com  for info on cancer and health related topics

https://GSiyers home remedies.blogspot.com   is the latest addition to my blogs


Thursday, April 16, 2026

Classic Veg Stuffed Cabbage Rolls

 Stuffed cabbage rolls may not be a traditional Indian dish, but they have steadily found fans among home cooks looking for healthy, comforting, and versatile meal ideas. Made by wrapping flavourful fillings inside tender cabbage leaves, these rolls can be adapted in countless ways. They are light, satisfying, and perfect for those who want something wholesome yet exciting for lunch or dinner.

 Stuffed cabbage rolls may not be a traditional Indian dish, but they have steadily found fans among home cooks looking for healthy, comforting, and versatile meal ideas. Made by wrapping flavourful fillings inside tender cabbage leaves, these rolls can be adapted in countless ways. They are light, satisfying, and perfect for those who want something wholesome yet exciting for lunch or dinner.  Classic Veg Stuffed Cabbage Rolls: A simple and healthy option, these rolls are filled with a mix of sautéed vegetables like carrots, beans, capsicum, and onions, seasoned with garlic and herbs. They are light, colourful, and ideal for a nutritious family meal.Classic Veg Stuffed Cabbage Rolls: A simple and healthy option, these rolls are filled with a mix of sautéed vegetables like carrots, beans, capsicum, and onions, seasoned with garlic and herbs. They are light, colourful, and ideal for a nutritious family meal. 

Classic Veg Stuffed Cabbage Rolls: A simple and healthy option, these rolls are filled with a mix of sautéed vegetables like carrots, beans, capsicum, and onions, seasoned with garlic and herbs. They are light, colourful, and ideal for a nutritious family meal.

Paneer Masala Cabbage Rolls: Give the dish an Indian twist by stuffing cabbage leaves with spiced crumbled paneer, onions, green chillies, and coriander. This version offers the familiar flavours of paneer bhurji in a fun new format. 

 Paneer Masala Cabbage Rolls: Give the dish an Indian twist by stuffing cabbage leaves with spiced crumbled paneer, onions, green chilies, and coriander. This version offers the familiar flavours of paneer bhurji in a fun new format.

 Cheese Corn Cabbage Rolls: Loved by kids and adults alike, this creamy filling combines sweet corn, cheese, and mild spices for a cheesy, comforting bite. It is a great option for snack platters or party appetisers.

Cheese Corn Cabbage Rolls: Loved by kids and adults alike, this creamy filling combines sweet corn, cheese, and mild spices for a cheesy, comforting bite. It is a great option for snack platters or party appetisers. 

 Spicy Soya Stuffed Cabbage Rolls

Spicy Soya Stuffed Cabbage Rolls: A vegetarian protein-rich alternative, soya granules cooked with masalas, peas, and onions create a delicious and filling stuffing. It is perfect for those looking for a meat-free but satisfying meal.

 Rice And Veg Masala Cabbage Rolls

 Rice And Veg Masala Cabbage Rolls: Inspired by Indian-style stuffed vegetables, this recipe uses leftover rice mixed with vegetables and spices as the filling. It is a smart and tasty way to repurpose leftover pulao or plain rice.

 Mushroom Garlic Cabbage Rolls: This earthy and flavourful variation combines chopped mushrooms with garlic, pepper, and herbs for a savoury filling. It is perfect for those who enjoy bold umami flavours.

 Mushroom Garlic Cabbage Rolls: This earthy and flavourful variation combines chopped mushrooms with garlic, pepper, and herbs for a savoury filling. It is perfect for those who enjoy bold umami flavours.

It is totally left to you with what you want to stuff cabbage leaves. Many people don't like cabbage or may not eat some of the things that you stuff, like mushrooms, soya, some vegetables and so on. When things are made with slight variant and presented differently, the family will simply gobble it all. You can even stuff some leftover veges/ dal by combining other vegetables, masalas to camouflage the stuffings. Be innovative. I've given you lots of options to use with cabbage leaves. Enjoy your sumptuous meal in a different way. 


https://gscrochetdesigns.blogspot.com. one can see my crochet creations  

https://kneereplacement-stickclub.blogspot.com. for info on knee replacement

https://cancersupportindia.blogspot.com  for info on cancer and health related topics

https://GSiyers home remedies.blogspot.com   is the latest addition to my blogs