Showing posts with label dried herbs. Show all posts

Friday, January 9, 2026

Herby Yogurt Dip

Yogurt Dip With Herb Oil  

Ingredients

1/2 cup olive oil

3 tsp dried herbs (such as parsley, oregano, basil, and mint)

1 tsp crushed red pepper

2 cloves garlic, grated on a Microplane (about 3/4 tsp.)

5 scallions, finely chopped, divided

2 cups plain whole-milk Greek-style yogurt

1 tsp lemon zest

1 tbsp lemon juice

1 1/2 tsp kosher salt

Crusty bread or warm pita and/or vegetables, for dipping

Directions

Heat oil, dried herbs, and crushed red pepper in a small saucepan over medium-low, swirling pan often, until shimmering, about 3 minutes. Remove from heat. Add garlic and 3/4 of the scallions (they will sizzle). Stir to combine. Let cool for 5 to 10 minutes.

Meanwhile, combine yogurt, lemon zest, lemon juice, and salt in a medium bowl.

Transfer yogurt mixture to a serving dish. Top with oil mixture and remaining scallions. Serve with crusty bread or pita and vegetables.


https://gscrochetdesigns.blogspot.com. one can see my crochet creations  

https://kneereplacement-stickclub.blogspot.com. for info on knee replacement

https://cancersupportindia.blogspot.com  for info on cancer and health related topics

https://GSiyers home remedies.blogspot.com   is the latest addition to my blogs


Monday, November 10, 2025

Carrot Flatbread

carrot flatbread from madewithaloha.de 

Ingredients - 
1 small raw cauliflower head, plus the stem 
1 large raw carrot, peeled 
100 g / 1 cup almond flour/ground almonds 
4 eggs 
1/2 tsp. sea salt and black pepper 
 
Optional - 
1 tsp. of any dried herbs (e.g. oregano, thyme, lemon pepper)

The directions are the same as before. Instead of brilliant broccoli, use a healthy cauliflower with either beet or carrot. Note, however, that in these recipes, your dough will be a little moister than with the broccoli flatbread. Nevertheless, it will dry well in your oven.


https://gscrochetdesigns.blogspot.com. one can see my crochet creations  

https://kneereplacement-stickclub.blogspot.com. for info on knee replacement

https://cancersupportindia.blogspot.com  for info on cancer and health related topics

https://GSiyers home remedies.blogspot.com   is the latest addition to my blogs

Beetroot Flatbread


Ingredients - 
1 small raw cauliflower head, plus the stem - 
2 medium raw beetroots, peeled  
1 cup almond flour or ground almonds  
4 eggs  
1/2 tsp. sea salt and black pepper 
 
Optional -  
1 tsp. of any dried herbs (e.g. oregano, thyme, lemon pepper)

The directions same as broccoli, instead of that use cauliflower with either beet / carrot.
 
Note- however, that in these recipes, your dough will be a little moister than with the broccoli flatbread. Nevertheless, it will dry well in your oven.

https://gscrochetdesigns.blogspot.com. one can see my crochet creations  

https://kneereplacement-stickclub.blogspot.com. for info on knee replacement

https://cancersupportindia.blogspot.com  for info on cancer and health related topics

https://GSiyers home remedies.blogspot.com   is the latest addition to my blogs


Broccoli Flatbread

Veggie Flatbread                                                                                                                      

Ingredients (For 12 slices) - 
1 large raw broccoli head  
 
1 cup almond flour or ground almonds  
 
4 eggs  
 
1/2 tsp. sea salt and black pepper 
 
Optional  
1 tsp. of any dried herbs (e.g. oregano, thyme, lemon pepper)

Directions  
1. Preheat your oven to 400°F. Then line your baking tray with baking paper. 
 
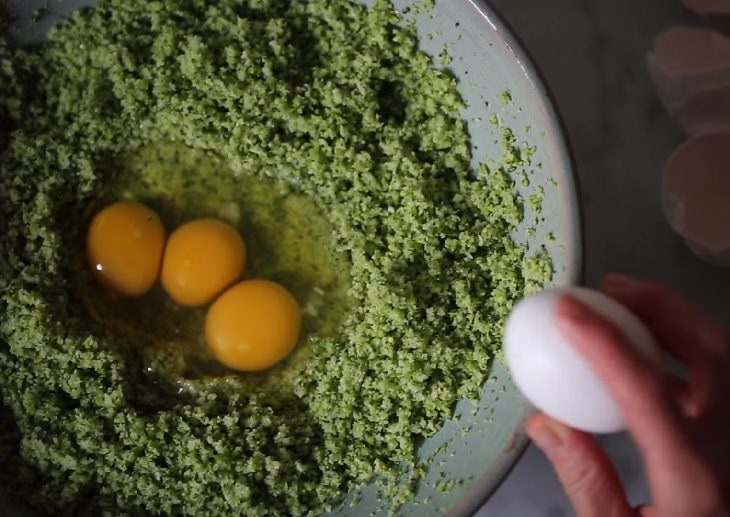
2. Roughly chop up the broccoli, including the brightest part of its stem. Blend the broccoli in a food processor to give yourself a fine, grainy texture similar to rice. 
 
3. Put 4 cups of the freshly processed broccoli into a mixing bowl. With your hands, mix it together with the ground almonds, salt, and pepper. And, if you like, add your favorite herbs too. 
 
4. Making a well in the center of the mixture, add your eggs and whisk using a fork. Then, with your fork or hands, gradually bring the dry mixture into the egg well, mixing while you go. When it is all combined, shape into a slightly looser and damper ball than with typical bread. 
 
5. Move your dough to the baking tray, and flatten it into a large rectangular base with your hands. 
 
6. Slide the tray onto the middle rack in your oven. Bake for 23-25 minutes, or until the bread has gone golden and firm. 
 
7. Take the tray out of the oven and leave to cool. 
 
8. Holding it upside down, gently separate the bread from the baking paper. 
 
9. Cut your delicious flatbread into 12 equal rectangular slices. Store the slices in the refrigerator.


https://gscrochetdesigns.blogspot.com. one can see my crochet creations  

https://kneereplacement-stickclub.blogspot.com. for info on knee replacement

https://cancersupportindia.blogspot.com  for info on cancer and health related topics

https://GSiyers home remedies.blogspot.com   is the latest addition to my blogs


Thursday, October 23, 2025

Your Microwave Can Do So Much More

Microwave ovens provide us with quick alternative solutions to heat up our meals, but they're also responsible for a wide assortment of functions you might not believe. This helpful microwave guide will show you 21 interesting tips that will actually make your life a bit simpler.

microwave tips infographic


https://gscrochetdesigns.blogspot.com. one can see my crochet creations  

https://kneereplacement-stickclub.blogspot.com. for info on knee replacement

https://cancersupportindia.blogspot.com  for info on cancer and health related topics

https://GSiyers home remedies.blogspot.com   is the latest addition to my blogs


Saturday, September 13, 2025

Zucchini Flatbread with Herbs

  Easy zucchini flatbread with herbs from www.lifeofsimpletreats.com

Ingredients

1 medium zucchini (approximately 200g/7oz)

4 tbsp (30g) oat flour

100g (1 cup) grated mozzarella cheese

2 large eggs

1/2 tsp salt

1/4 tsp freshly ground black pepper

1 tsp dried herbs (thyme, oregano, or Italian seasoning)

1/2 tsp garlic powder (optional)

1 tbsp olive oil (for greasing the parchment paper)

Fresh herbs for garnish (optional)

 Preparations

Preheat your oven to 200°C (400°F). Line a round baking pan with parchment paper and lightly brush with olive oil.

Wash the zucchini thoroughly and trim off both ends. Grate the zucchini using the large holes of a box grater or a food processor with a grating attachment.

Place the grated zucchini in a clean kitchen towel or several layers of cheesecloth. Gather the edges together and squeeze firmly to remove as much moisture as possible. This step is crucial for achieving a crisp rather than soggy flatbread.

In a medium bowl, beat the eggs lightly. Add the drained grated zucchini, oat flour, 3/4 of the grated mozzarella (reserve some for topping), salt, pepper, dried herbs, and garlic powder if using.

Stir the mixture until all ingredients are well combined. The batter should be moist but not watery.

Transfer the zucchini mixture to the prepared baking pan. Use a spatula or the back of a spoon to spread it evenly into a circle, about 1/2 inch (1.25 cm) thick.

Sprinkle the remaining mozzarella cheese evenly over the top of the flatbread.

Place the pan in the preheated oven and bake for 25-30 minutes, until the flatbread is golden brown and the cheese has melted and begun to bubble and brown slightly.

Remove from the oven and let the flatbread rest for 5 minutes before cutting. This allows it to set and makes it easier to slice. Cut into triangular slices like a pizza and serve warm.


https://gscrochetdesigns.blogspot.com. one can see my crochet creations  

https://kneereplacement-stickclub.blogspot.com. for info on knee replacement

https://cancersupportindia.blogspot.com  for info on cancer and health related topics

https://GSiyers home remedies.blogspot.com   is the latest addition to my blogs

Tuesday, April 29, 2025

Zucchini flatbread

Ingredients

1 medium zucchini (approximately 200g/7oz)*

4 tbsp (30g) oat flour

100g (1 cup) grated mozzarella cheese

2 large eggs

1/2 tsp salt or to taste

1/4 tsp freshly ground black pepper

1 tsp dried herbs (thyme, oregano, or Italian seasoning)

1/2 tsp garlic powder (optional)

1 tbsp olive oil (for greasing the parchment paper)

Fresh herbs for garnish (optional)

 Preparations

 Preheat your oven to 200°C (400°F). Line a round baking pan with parchment paper and lightly brush with olive oil.

Wash the zucchini thoroughly and trim off both ends. Grate the zucchini using the large holes of a box grater or a food processor with a grating attachment.

Place the grated zucchini in a clean kitchen towel or several layers of cheesecloth. Gather the edges together and squeeze firmly to remove as much moisture as possible. This step is crucial for achieving a crisp rather than soggy flatbread.

 In a medium bowl, beat the eggs lightly. Add the drained grated zucchini, oat flour, 3/4 of the grated mozzarella (reserve some for topping), salt, pepper, dried herbs, and garlic powder if using.

Stir the mixture until all ingredients are well combined. The batter should be moist but not watery.

Transfer the zucchini mixture to the prepared baking pan. Use a spatula or the back of a spoon to spread it evenly into a circle, about 1/2 inch (1.25 cm) thick.

Sprinkle the remaining mozzarella cheese evenly over the top of the flatbread.

Place the pan in the preheated oven and bake for 25-30 minutes, until the flatbread is golden brown and the cheese has melted and begun to bubble and brown slightly.

Remove from the oven and let the flatbread rest for 5 minutes before cutting. This allows it to set and makes it easier to slice. Cut into triangular slices like a pizza and serve warm.

* Those who don't get zucchini easily, can use tender bottle gourd/ lauki as it is called, wash well, peel and grate it, squeeze out the excess moisture well, or it will absorb more flour. 


Tips 

Adjust flour as needed: If your batter seems too wet even after squeezing the zucchini, add an extra tablespoon of oat flour.

For a more cohesive mixture, let the batter rest for 5 minutes before spreading it in the pan. This allows the oat flour to absorb some moisture.

Use the back of a measuring cup to press the mixture into an even layer for consistent baking.

Parchment paper is key: Don’t skip the parchment paper, as it prevents sticking and makes removal easy.

If your oven has hot spots, rotate the pan halfway through baking for even browning.


https://gscrochetdesigns.blogspot.com. one can see my crochet creations  

https://kneereplacement-stickclub.blogspot.com. for info on knee replacement

https://cancersupportindia.blogspot.com  for info on cancer and health related topics

https://GSiyers home remedies.blogspot.com   is the latest addition to my blogs


Wednesday, November 27, 2024

Mushroom-Dal Tikkis Baked

Ingredients of Baked Mushroom and Lentils Fritters

  • 1/2 cup masoor daal
  • 1 bay leaf
  • 1/2 cube vegetable (broth)/water
  • 100 gm white mushrooms
  • 1/4 cup oats
  • Mixed dried herbs and spices (oregano, parsley, thyme, red chili flakes)
  • 1 small onion (finely chopped)
  • 1-2 garlic cloves (finely chopped)
  • 2 Tbsp red wine ( optional)
  • 1 tsp soy sauce
  • 1 egg (optional) / cornflour slurry
  • Salt and pepper to taste


 How to Make Baked Mushroom and Lentils Fritters

Rinse the dal and add to a pan with 1 cup of water.

To the pan add the water and bay leaf. Bring the water to boil, then lower the flame, and let it simmer for 10-12 minutes. The dal needs to become soft but not completely done.

Remove from the heat, drain, and let it cool for a few minutes.

In a food processor, add the cooked dal, mushrooms, oats, and spices. Pulse, until the mixture is semi-coarse.

In a pan saute the onions and garlic.

Add the pulsed mushroom-dal-oats mixture and cook for a few minutes.

Add the red wine (brings out deep flavours), soy sauce, and salt and pepper. Mix to form a consistent mixture.

Now is the turn to make the fritters. Add whisked egg into the mix to help binding while baking. This is optional and vegetarians can bake without the egg

Make fritters out of the mixture and bake in full temperature (250 C) in a well pre-heated oven for about 25 - 30 minutes or until the fritters become crisp on the outside.

Serve with mayo dip or chutney of your choice.

https://gscrochetdesigns.blogspot.com. one can see my crochet creations  

https://kneereplacement-stickclub.blogspot.com. for info on knee replacement

https://cancersupportindia.blogspot.com  for info on cancer and health related topics

https://GSiyers home remedies.blogspot.com   is the latest addition to my blogs.


Tuesday, March 15, 2022

Food substitutions are your friend

Have you ever been in the middle of cooking dinner when you suddenly realize that you don't actually have all the ingredients the recipe calls for?

It's taken years to get comfortable improvising in the kitchen, and I still do plenty of Googling to get ideas of what I can swap out. But learning what makes up flavor, knowing my palate and getting comfortable with taking risks have been key to unlocking how to substitute while cooking – and it's made cooking a lot more fun.

Here are some tips to help you get there, too.

1) If you’re out of fresh herbs like dill, thyme, oregano, rosemary or parsley, try substituting in their dried counterparts. Start with ¼ of the amount called for in the recipe when subbing in dried herbs as they’re about 3 times stronger than fresh.

2) If you’re cutting butter from a recipe, you can substitute with different oils like coconut oil, olive oil, canola or sunflower oil at a 1: 1 ratio. Typically oils work best when butter is called for at the beginning of a dish to saute with. Milks like whole milk, heavy whipping cream or plant-based milk can be used as a butter substitute when butter is called for at the end of a dish, to add texture.

3) If you’re out of brown sugar, you can try substituting raw or cane sugar, white sugar mixed with a little bit of molasses, maple syrup or honey. These typically will be at a 1: 1 ratio, but it’s safe to start with half and go from there.

4) Instead of white wine, try clear or light coloured vinegar ( white wine vinegar, champagne, rice vinegar), lemon juice or medium-coloured vinegar ( red wine vinegar, sherry vinegar, apple cider vinegar).

5) If you’re out of fine sea salt, you can substitute with other salts, like kosher, soy sauce or capers. Just start with ½ the amount or less, that the recipe calls for, and taste as you go.

6) No fresh garlic, ginger or onions on hand? No problem. You can use the powdered version. Just start with ¼ the amount of the dried ingredient.

Get to know your taste-buds

Lean into your senses to understand what you're tasting and how you're tasting it.

To get started, ask yourself some questions: Where does the flavor hit your tongue? Do you feel the heat from something spicy? What do you smell? Does the smell impact what you taste? Does the bite you just took feel creamy or silky in your mouth? Is there a little sweetness coating your tongue? Are your cheeks contracting like you just sucked on a lemon? Does the dish taste bland or is it popping with the flavor of the tomatoes you added?

As you start to understand those sensations, you'll be able to figure out what categories of flavors the dish's components fall into: acidic, aromatic, fatty, salty, sweet.

One rule of thumb: ingredients that fall into the same category can be swapped out for each other more easily.

Acids are flavors that add a brightness to a dish – and they're usually sour. They include lemon or lime juice, vinegars or wines. Sour dairies like buttermilk, sour cream and yogurt are also acids.

Aromatics really affect the way your dish smells, so think about the role of spices and herbs in your dish. They include garlic, onions, ginger, cumin, paprika, parsley, basil or cilantro.

Fats are great to soften vegetables over high heat, and they can give a richness to a dish. Butters, oils, margarine, ghee all count as fats. So do cheeses, milks and creams and their vegan alternatives, and they're usually used more to finish off a dish to make it creamy.

Salt comes in many forms: sea salt, kosher salt, table salt, coarse or fine. You can also add salt with soy sauce, fish sauce, capers, canned anchovies or bacon bits. It's really important to taste as you salt so you don't accidentally add too much.

Sweet ingredients include sugars, maple syrup, honey or molasses.

Taste as you go – and adjust your seasonings accordingly

One relatively fool-proof way to get your seasoning just right – whether it's the one in your recipe or something you're subbing in: keep tasting your dish as you go.

"You could be cooking for 20 years and still have your seasoning off in the dish," says Deb Perelman, cookbook author and the voice behind Smitten Kitchen, one of my most trusted sources for recipes. "Taste as you go, and [your dish] won't end up over seasoned or over-salted or under-salted." 

How much you use depends on what your substitute ingredient is. Say you want to swap in dried herbs for fresh ones, like rosemary, basil, ginger or garlic. They're great alternatives to their fresh counterparts, but they're also stronger in flavor, so you'll want to use less than what the recipe calls for.

When in doubt, start with less seasoning and add more once your dish is almost done cooking. "With most flavors, it's very easy to add things but difficult to take them away," says López-Alt. "So as you're tasting, you want your dishes to generally be a little bit under-seasoned through the cooking process so that you can adjust the seasoning at the end."

How you cook your food is just as important as what you put in it

Flavor isn't just about the ingredients in a dish, but also about the technique used to prepare it.

"If you start really sort of thinking about it that way, then you realize that cooking is not just a series of recipes, but it's a series of techniques that you can adapt to your own taste," says López-Alt.

Sometimes, searing or browning before you start adding other ingredients can add a more robust flavor to a dish. If you simmer a bunch of ingredients over the course of an hour, flavors will mingle together more intimately and develop differently than if you let them simmer together for 15 minutes. Slowly sauteing vegetables, like onions, can help them "caramelize," or become sweet and jam-like. But if you quickly pan fry them, or roast them in the oven on high heat, they can become crispy.

Understanding the technique can give you a lot of flexibility to figure out what you can substitute – including what type of pan you should use, especially if you don't have the same equipment a recipe suggests.

"If it's a recipe that requires a lot of heavy searing ... You generally want something really heavy that's going to retain heat," explains Lopez-Alt. "So you could do it in a Dutch oven, you could do it in a cast iron pan, you could do it in a tri-ply stainless steel skillet."

If you're stir-frying and need to change temperatures quickly, Lopez-Alt suggests a carbon steel or aluminum pan.

Remember that recipes – and recipe writers – "are not God"

A recipe is there as a guide, but it's not the law. "We just write this stuff down because we want it to be the best-case scenario for you," says Perlman. "We are not God. We are not here to tell you how to cook and how not to cook."

So if you find yourself reading a recipe that asks for an ingredient that's hard to find or too expensive, Perelman says you can ask yourself, "Is this ingredient essential? Is it a deal-breaker if I don't have it? What's lost if I don't use it?"

Ultimately, "you should make food the way you want it," says Perelman. If an experiment doesn't go quite as planned, that's OK.

"I think it really, honestly, all starts with just being kind to yourself," says López-Alt, "and understanding that if you mess something up, it's not really that big a deal."