Thursday, April 30, 2026

Is It Safe to Microwave Plastic Wrap? Here’s What Food Scientists Say

 Key Points


  • Microwaving with plastic wrap can transfer chemicals, especially with high heat or food contact.
  • Use microwave-safe plastic wrap, allow ventilation and keep it from touching food.
  • For a safer, worry-free option, reheat foods in glass or ceramic containers instead of plastic.
  •  

    After a long day, a fridge that’s stocked with leftovers can feel like a lifesaver. Reheating them in the microwave is easy—but what about leaving the plastic wrap on? With growing concerns about microplastics and chemicals in food, it’s natural to wonder: could the wrap melt? Could chemicals leach into your meal? Could this affect your hormones and overall health? Those are all good questions, and experts say the answers involve a bit of nuance.

    Here’s what food safety experts and scientists say about microwaving food with plastic wrap, and tips for doing it safely.

    Is It Safe to Microwave Food with Plastic Wrap?

    According to the USDA, it’s safe to microwave food in plastic wrap as long as it is labeled as microwave-safe. You also need to make sure the plastic wrap doesn’t touch the food directly and that it’s vented to let steam escape.

    “Plastic wrap is designed to handle steam generated during microwaving, but direct contact with hot food can expose it to higher temperatures that increase the risk of chemical migration,” says Melissa Vaccaro, M.S. “If the wrap isn’t microwave-safe, or if it melts or contacts hot food, it should not be used in the microwave.”

    There’s a possibility that plastic wrap can melt onto food or release tiny particles and chemicals—a process called migration.  Po-Yen Chen, Ph.D., explains that this is more likely when the wrap is in direct contact with the food, especially with high heat, longer heating times or fatty and oily foods, which tend to heat more on the surface. “Plastic wrap can also soften and warp in microwave hot spots, increasing contact with the food and the chance of transfer.”

    While research specifically on microwaving food in plastic wrap is limited, studies on other food packaging plastics show they may contain chemicals that affect hormones and metabolism, such as phthalates. This is especially concerning when these materials are heated to high temperatures, such as during microwave cooking.

    Laurie Beyranevand, J.D., notes that modern plastic wrap has been phthalate-free for many years, but it’s often made from substances that are chemically similar to phthalates and may pose similar health concerns.

    “While levels from a single microwaving event are generally expected to be low, heating plastics and allowing direct contact with food can increase exposure,” says Chen. ”For this reason, reducing unnecessary heat-contact between plastics and food, especially for routine cooking or reheating, as a practical way to limit avoidable exposure.”

    How to Heat Food Safely

    • Use a Glass or Ceramic Storage Container. Whenever possible, microwave your food in a microwave-safe glass or ceramic plate, bowl or container. “Never reheat food in the packaging it came in or was wrapped in as leftovers from a restaurant,” says Beyranevand. 
    • Use an Alternative Food Cover. “Cover food with a microwave-safe lid, paper towel or wax paper instead of plastic wrap,” says Vaccaro. 
    • Make Sure Plastic Wrap Is Microwave-Safe. If you do use plastic wrap, make sure it’s microwave-safe and doesn’t touch the food. “Plastic wrap is designed to withstand steam heat, not the higher temperatures that can occur when it’s in direct contact with hot food,” Vaccaro says.

    Our Expert Take

    Heating food that’s covered in plastic wrap can be safe—as long as the wrap is microwave-safe, properly vented and doesn’t touch the food. Otherwise, there’s a chance that it could melt or transfer chemicals to your food. That said, this risk is higher with high heat or long cooking times, and lower for a quick 30-second reheat.

    For a worry-free option, skip the plastic wrap and use a microwave-safe glass or ceramic storage container, plate or bowl instead. 


    https://gscrochetdesigns.blogspot.com. one can see my crochet creations  

    https://kneereplacement-stickclub.blogspot.com. for info on knee replacement

    https://cancersupportindia.blogspot.com  for info on cancer and health related topics

    https://GSiyers home remedies.blogspot.com   is the latest addition to my blogs


    Berry-Almond Smoothie Bowl

      Ingredients

    cup frozen raspberries

    ½ cup frozen sliced banana

    ½ cup plain unsweetened almond milk

    5 tbsp sliced almonds, divided

    ¼ tsp cinnamon pdr

    tsp cardamom pdr

    tsp vanilla extract

    ¼ cup blueberries

    1 tbsp unsweetened coconut flakes


    Method

    Blend raspberries, banana, almond milk, 3 tablespoons almonds, cinnamon, cardamom and vanilla in a blender until very smooth.

    Pour the smoothie into a bowl and top with blueberries, the remaining 2 tablespoons almonds and coconut. 


    https://gscrochetdesigns.blogspot.com. one can see my crochet creations  

    https://kneereplacement-stickclub.blogspot.com. for info on knee replacement

    https://cancersupportindia.blogspot.com  for info on cancer and health related topics

    https://GSiyers home remedies.blogspot.com   is the latest addition to my blogs


    Broccoli-Cheddar Butter Beans

     A skillet containing a creamy broccoli and bean dip being dipped into with a slice of bread by a hand 

     Ingredients

    1 tbsp unsalted butter

    ½ cup finely chopped yellow onion

    3 medium cloves garlic, finely chopped (about 1 tablespoon)

    12 ounces fresh broccoli florets, cut into ½-inch pieces (about 4 cups)

    cup lower-sodium vegetable broth

    1 (15-ounce) can no-salt-added butter beans, rinsed

    ¾ cup half-and-half

    ½ tsp pepper pdr

    ½ tsp dry mustard

    ½ tsp salt

    1 cup shredded sharp Cheddar cheese, divided

    8 (½-inch) slices crusty whole-wheat baguette, toasted

     Method

    Melt 1 tablespoon butter in a large skillet over medium heat. Add ½ cup onion and the chopped garlic; cook, stirring occasionally, until softened, about 2 minutes. Add cut broccoli, stirring until well combined. Pour in ⅓ cup broth; cover and cook, stirring occasionally, until the broccoli is tender-crisp and bright green, 3 to 4 minutes. 

    Stir in rinsed beans, ¾ cup half-and-half and ½ teaspoon each pepper, dry mustard and salt. Bring to a lively simmer over medium-high heat. Simmer, uncovered, stirring occasionally, until the beans are warmed through and the sauce has thickened slightly, about 2 minutes. Let cool for 2 minutes, then stir in ¾ cup Cheddar until melted. Sprinkle with the remaining ¼ cup Cheddar. Serve with toasted baguette slices.  


    https://gscrochetdesigns.blogspot.com. one can see my crochet creations  

    https://kneereplacement-stickclub.blogspot.com. for info on knee replacement

    https://cancersupportindia.blogspot.com  for info on cancer and health related topics

    https://GSiyers home remedies.blogspot.com   is the latest addition to my blogs


    Brothy Cacio e Pepe Beans

     Ingredients

    1 tbsp unsalted butter

    3 tbsp extra-virgin olive oil, divided

    1 medium shallot, minced

    3 cloves garlic, minced

    tsp ground pepper, plus more for garnish

    2 cups low-sodium vegetable broth

    ¼ tsp salt

    2 (15-ounce) cans no-salt-added cannellini beans, rinsed

    ½ cup grated Pecorino Romano cheese OR Feta OR Nutritional Yeast

    Finely chopped fresh parsley, for garnish (optional)

    8 slices whole-wheat baguette, lightly toasted

    Directions

    Melt 1 tablespoon butter with 1 tablespoon oil in a large skillet over medium heat. Add minced shallot and garlic; cook, stirring often, until softened, about 2 minutes. Add 1½ teaspoons pepper; cook, stirring constantly, until fragrant, 1 to 2 minutes. Stir in 2 cups broth and ¼ teaspoon salt; bring to a boil over medium-high heat. Add rinsed beans; cook, stirring occasionally, until heated through, about 2 minutes.

     Divide the bean mixture among 4 bowls. Sprinkle with ½ cup Pecorino and drizzle with the remaining 2 tablespoons oil. Garnish with additional pepper and/or parsley, if desired. Serve with toasted baguette slices. 


    https://gscrochetdesigns.blogspot.com. one can see my crochet creations  

    https://kneereplacement-stickclub.blogspot.com. for info on knee replacement

    https://cancersupportindia.blogspot.com  for info on cancer and health related topics

    https://GSiyers home remedies.blogspot.com   is the latest addition to my blogs


    Berry-Banana Cauliflower Smoothie

     5492260.jpg 

    Ingredients

    1 cup frozen riced cauliflower ( cauliflower grated or pulsed in food processor into crumbs like rice)
     
    ½ cup frozen mixed berries
     
    1cup sliced frozen banana
     
    2 cups unsweetened plain almond milk
     
    2 tsp maple syrup

    Directions

    Place cauliflower, berries, banana, almond milk and maple syrup in a blender; blend until smooth, 3 to 4 minutes.


    https://gscrochetdesigns.blogspot.com. one can see my crochet creations  

    https://kneereplacement-stickclub.blogspot.com. for info on knee replacement

    https://cancersupportindia.blogspot.com  for info on cancer and health related topics

    https://GSiyers home remedies.blogspot.com   is the latest addition to my blogs


    7 Easy Ways To Check The Purity of the Paneer At Home

    1)  The Water Test: Drop a small piece of paneer into a bowl of water. Pure paneer stays intact, while adulterated paneer may dissolve or turn the water turns cloudy.

    2) The Heat Test: Heat paneer in a pan without oil. Pure paneer softens slightly, while fake paneer may release excess oil or become rubbery.

    3) The Texture Test:  
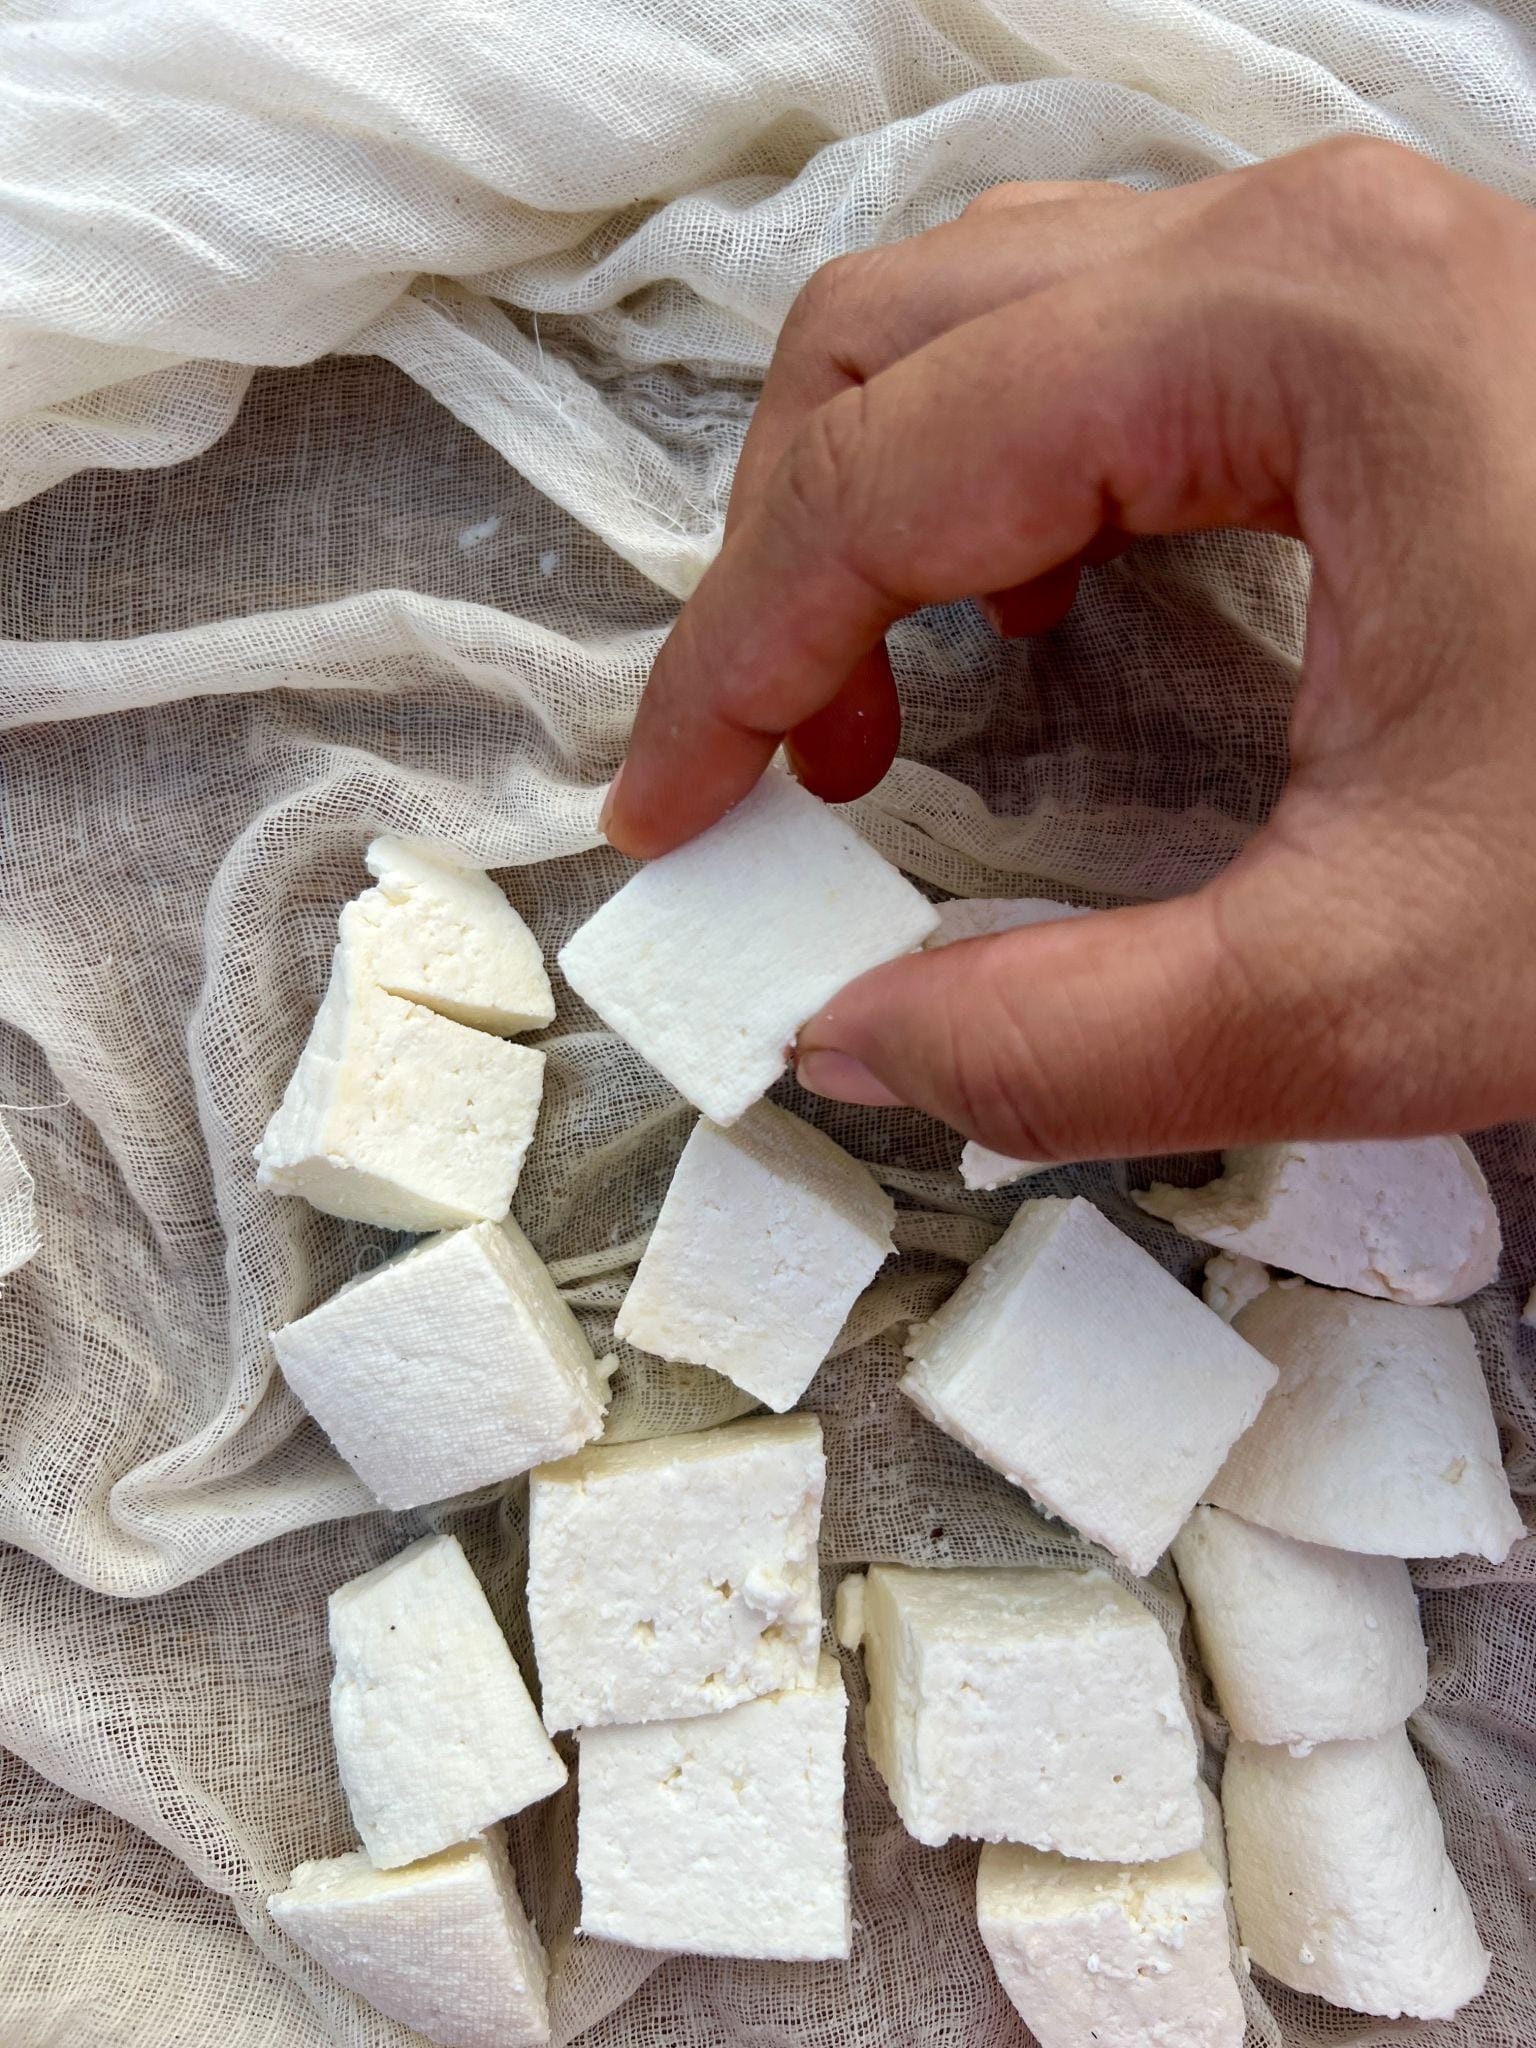
Press paneer gently between your fingers. Fresh, pure paneer feels soft and crumbly, not rubbery or overly firm. 

    4) The Smell Test: Smell the paneer closely. Pure paneer has a mild milky aroma; a sour or chemical smell indicates spoilage or adulteration. 

    5)  The Iodine Test (Starch Check):  

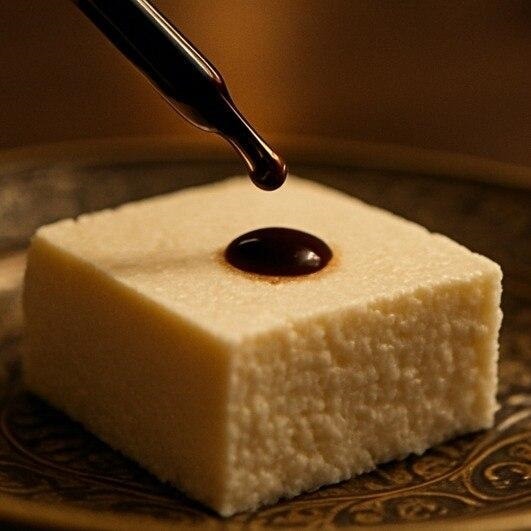
      Add a drop of iodine solution. If the paneer turns blue or black, it contains starch, indicating adulteration.

    6)  The Boiling Test:  

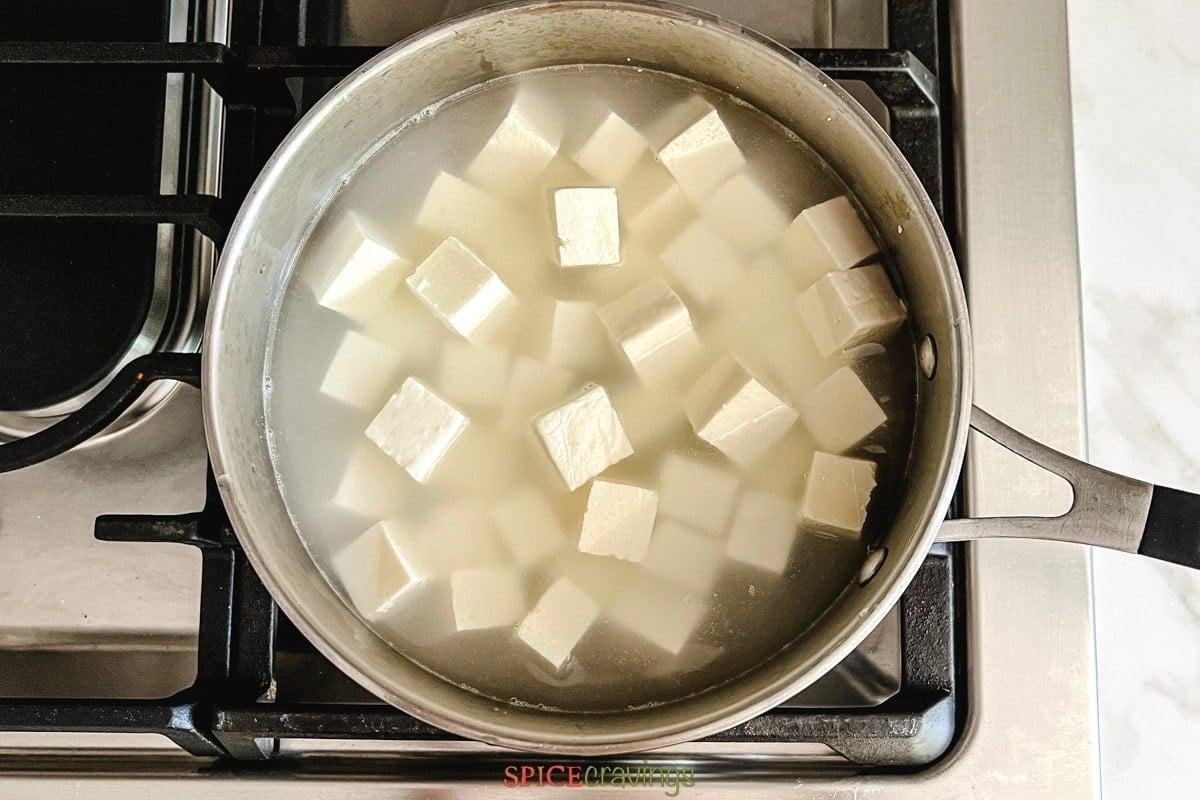
      Boil paneer in water for a few minutes. Pure paneer retains shape, while adulterated paneer may break apart or become slimy.

    7)  The Lemon Test: Add a few drops of lemon juice. Pure paneer shows no major reaction, but adulterated paneer may start dissolving or changing texture.


    https://gscrochetdesigns.blogspot.com. one can see my crochet creations  

    https://kneereplacement-stickclub.blogspot.com. for info on knee replacement

    https://cancersupportindia.blogspot.com  for info on cancer and health related topics

    https://GSiyers home remedies.blogspot.com   is the latest addition to my blogs 

    Soya Matar Kheema

     Ingredients:

    Soya granules: 50 g

    Green peas: 25 g

    Cauliflower (finely chopped): 15 g

    Beans (finely chopped): 5 g

    Carrot (finely chopped): 15 g

    High-protein yoghurt: 50 g

    Green chillies: as per taste

    Salt: to taste

    Boiled millets: 1 cup

    Fried onions: 2 tbsp

    Dry spices:

    Kashmiri red chilli powder: 1 tsp

    Coriander powder: 1 tsp

    Cumin powder: 1 tsp

    Biryani masala: 1 tsp

    Salt: 1 tbsp (adjust to taste)

    For cooking:

    Ghee: 1 tsp

    Green cardamom: 2

    Cinnamon: 1 small stick

    Bay leaf: 1

    Cloves: 3–4

    Air-fried birista: 2 tbsp *

    Ginger-garlic paste: 1 tbsp

    Chili–coriander paste: 1 tbsp

    * Making birista (crispy fried onions) in an air fryer is a healthy, low-oil alternative to deep-frying, requiring only 1–2 teaspoons of oil for 2-3 large onions. Slice onions thinly, toss with oil, and air fry at

    (
    ) for 12–20 minutes, shaking every 5 minutes until golden brown.

    Method:

    In a bowl, combine soya granules, peas, cauliflower, beans, carrot, yoghurt, all dry spices, and salt.

    Mix well until evenly coated.

    Cover and marinate for 15–20 minutes.

    Heat ghee in a pan.

    Add cardamom, cinnamon, bay leaf, and cloves; sauté until aromatic.

    Add air-fried birista and sauté lightly.

    Add ginger-garlic paste and cook until the raw smell disappears.

    Stir in chilli–coriander paste and sauté for 30–40 seconds.

    Add the marinated mixture.

    Cook on medium heat for 10–15 minutes, stirring occasionally, until the kheema is well cooked and the masala is well combined.

    Switch off the heat and keep ready for layering.


    Cool slightly and blend into a smooth paste.

    Strain for a silky texture.

    Heat oil, add the gravy, and simmer for 8–10 minutes until thick and glossy.

    Adjust salt and add a pinch of honey if needed.

    Step 3: Final Finish (No Cream)

    Ingredients:

    Roasted paneer tikka

    Protein yoghurt (whisked): 3 tbsp

    Kasturi methi: 1 tsp

    Garlic (finely chopped): 1 tsp

    Red chilli powder: ½ tsp

    Oil: 1 tsp

    Fresh coriander: for garnish

    Method:

    Lower the heat completely.

    Slowly add whisked yoghurt while stirring continuously (to prevent curdling).

    Add paneer tikka and mix gently.

    Simmer for 2–3 minutes only.

     Light Tadka

    Heat oil

    Add garlic and sauté until lightly golden

    Switch off the heat, then add red chilli powder and kasturi methi

    Pour over the curry


    https://gscrochetdesigns.blogspot.com. one can see my crochet creations  

    https://kneereplacement-stickclub.blogspot.com. for info on knee replacement

    https://cancersupportindia.blogspot.com  for info on cancer and health related topics

    https://GSiyers home remedies.blogspot.com   is the latest addition to my blogs


    Healthy Paneer Makhani

    Protein Paneer Tikka (Oven-Roasted)

    Ingredients:

    Low-fat paneer: 250 g (cubed)

    Thick protein yoghurt (Greek-style): 4 tbsp

    Ginger-garlic paste: 1 tbsp

    Cumin powder: ½ tsp

    Coriander powder: 1 tsp

    Turmeric powder: ¼ tsp

    Kashmiri red chilli powder: ½–1 tsp

    Garam masala: ½ tsp

    Kasturi methi (crushed): 1 tsp

    Mustard oil: 1 tsp

    Salt: to taste

    Lemon juice: 1 tsp

    Method:

    Preheat the oven to 200°C.

    Whisk the yoghurt until smooth. Add spices, mustard oil, lemon juice, and salt.

    Coat the paneer gently and rest for 20–30 minutes.

    Bake at 200°C for 12–15 minutes, flipping halfway, until lightly charred.

    (Optional) Broil for 2–3 minutes for a smoky finish.

    Set aside.

     Makhani Gravy Base

    Ingredients:

    Ripe tomatoes: 4 medium (chopped)

    Onion: 1 small (chopped)

    Watermelon seeds (magaz): 2 tbsp

    Garlic: 6 cloves

    Dry ginger powder: ½ tsp

    Kashmiri dried red chillies: 2

    Coriander stalks: 2 tbsp

    Salt: to taste

    Water: as required

    Oil: 1 tsp

    Method:

    (Optional but recommended) Soak watermelon seeds in warm water for 20–30 minutes for smoother blending.

    In a pan, add tomatoes, onion, soaked seeds, garlic, red chillies, coriander stalks, dry ginger, salt, and a little water.

    Cook for 10–12 minutes until soft.

    Cool slightly and blend into a smooth paste.

    Strain for a silky texture.

    Heat oil, add the gravy, and simmer for 8–10 minutes until thick and glossy.

    Adjust salt and add a pinch of honey if needed.

    Final Finish (No Cream)

    Ingredients:

    Roasted paneer tikka

    Protein yoghurt (whisked): 3 tbsp

    Kasuri methi: 1 tsp

    Garlic (finely chopped): 1 tsp

    Red chilli powder: ½ tsp

    Oil: 1 tsp

    Fresh coriander: for garnish

    Method:

    Lower the heat completely.

    Slowly add whisked yoghurt while stirring continuously (to prevent curdling).

    Add paneer tikka and mix gently.

    Simmer for 2–3 minutes only.

    Light Tadka

    Heat oil

    Add garlic and sauté until lightly golden

    Switch off the heat, then add red chilli powder and kasturi methi

    Pour over the curry


    https://gscrochetdesigns.blogspot.com. one can see my crochet creations  

    https://kneereplacement-stickclub.blogspot.com. for info on knee replacement

    https://cancersupportindia.blogspot.com  for info on cancer and health related topics

    https://GSiyers home remedies.blogspot.com   is the latest addition to my blogs

    Gulkand Milkshake

     As temperatures continue to soar, most of us are constantly looking for ways to stay cool. While packaged cold drinks may offer instant relief, they often fall short when it comes to health. That’s where traditional remedies step in—simple, refreshing, and surprisingly effective.

    One such summer favourite that is both delicious and naturally cooling is Gulkand milkshake, a drink that works like a charm in beating the heat from within.

    Gulkand, made from rose petals, is known for its cooling properties. It helps reduce body heat and soothes issues like acidity and stomach irritation—making it ideal for harsh summer days.

    A Quick Cooling Drink In Minutes

    If you are looking for something easy, the classic version is perfect. All you need is a glass of chilled milk and 1–2 spoons of gulkand. Mix it well, add some ice, and top it with chopped dry fruits for an instant refreshing drink.

    Ingredients

    Chilled milk

    2 spoons of gulkand

    1 scoop vanilla ice cream ( optional)

    Fresh cream

    Soaked almonds and pistachios

    A few drops of rose water

    Here’s How To Make It

    Blend milk, gulkand, vanilla ice cream, and a little fresh cream until smooth. Add soaked almonds, pistachios, and a few drops of rose water, then blend again until the shake turns thick and creamy.

    Pour it into a glass and garnish with dried rose petals and chopped dry fruits for that perfect café-style finish.

    This indulgent yet cooling drink is not just a hit with kids—adults love it too. It’s a great way to stay refreshed and protect yourself from heat and dehydration.


    https://gscrochetdesigns.blogspot.com. one can see my crochet creations  

    https://kneereplacement-stickclub.blogspot.com. for info on knee replacement

    https://cancersupportindia.blogspot.com  for info on cancer and health related topics

    https://GSiyers home remedies.blogspot.com   is the latest addition to my blogs