Showing posts with label red onion. Show all posts

Sunday, August 30, 2026

How to Make a Delicious Guacamole

 All you really need to make a perfect guacamole is some ripe avocados and salt. After that, bit of lime or lemon juice - a splash of acidity to counter-balance the richness of the avocado. Then you can add some chopped chilies, onions, cilantro, and tomato, if you so wish. To make sure the avocado is ripe, gently push on the outside of the fruit. If there is a little give, the avocado is ripe. If there is a lot of give, the avocado may not be good. In this case, it's best to try some before using.
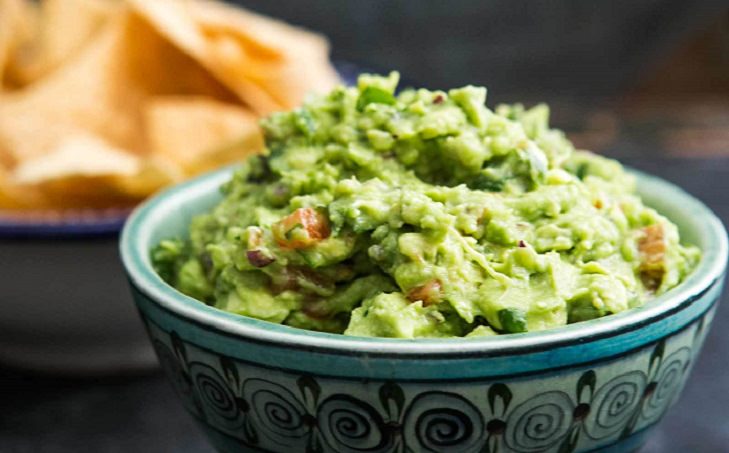

Recipe: Guacamole

Guacamole (Serves 2-4) 

Ingredients  

• 2 ripe avocados 

• 1/2 tsp salt 

• 1 tbsp  of fresh lime or lemon juice 

• 2 tbsp to 1/4 cup of minced red onion or thinly sliced green onion 

• 1-2 green chilies, stems, and seeds removed, minced 

• 2 tbsp cilantro/ coriander (leaves and tender stems), finely chopped 

• A dash of freshly grated black pepper

• 1/2 ripe tomato, seeds and pulp removed, chopped. 

Method 

1. Cut the avocado, remove flesh: Cut the avocados in half. Remove the seed and score the inside of the avocado using a blunt knife, and then scoop out the flesh with a spoon. Place in a bowl. 

2. Mash with a fork: Using a fork, roughly mash the avocado (don't overdo it as the guacamole should be a little chunky). 

3. Add salt, lime juice, and the rest: Sprinkle with salt and lime (or lemon) juice. The acid from the juice will help to delay the avocados from turning brown. Add the chopped onion, black pepper, chilies, and cilantro. Chili peppers vary in heat, so it's best to add the chili gradually until you reach your desired spiciness. 

 4. Cover with plastic and chill to store: Place some plastic wrap over the guacamole so that air cannot reach it (air will cause oxidation which will turn the guacamole brown). Refrigerate until ready to serve.


https://gscrochetdesigns.blogspot.com. one can see my crochet creations  

https://kneereplacement-stickclub.blogspot.com. for info on knee replacement

https://cancersupportindia.blogspot.com  for info on cancer and health related topics

https://GSiyers home remedies.blogspot.com   is the latest addition to my blogs


Thursday, May 28, 2026

Basic Indian Curry Paste /Instant Pot Onion Tomato Masala

 Ingredients

¾ cup Oil

3 lbs Red onion

4 tbsp Salt

2.5 oz Ginger/ 2 tbsp

 2 oz or 25 cloves Garlic

5 Green chilies

4 lbs Tomatoes

1 ½ tbsp turmeric pdr

⅓ to ½ cup Red chili powder

½ cup Coriander powder


Preparations

Roughly chop the onions and soak in warm water for 15-20 minutes.

Pulse them in food processor to make it finely chopped. Do it in batches.

Turn on the saute mode in IP and add oil. Once hot add onions and salt.

Mix and let it cook till mixture gets light brown color, do stir occasionally. This process takes 30-40 minutes.

Meantime, prep ginger, green chili and garlic. Take them into food processor and pulse to make it minced mixture. Keep it aside.

In the same food processor jar, make chunky puree of tomatoes.

Once onions are ready, add ginger, garlic green chili mixture and cook for 3-4 minutes.

Add tomatoes, turmeric powder, red chili powder and coriander powder. Mix very well.

Close the IP with lid and cook on manual (high pressure) for 10 minutes. Let NPR and then open.

Remove half of the chunky masala and using hand blender make smooth puree of rest of the masala.

Freeze ¼ cup portion into silicone cupcake liners till frozen. Then remove and store in Ziploc bag in the freezer.

Label the bags with ‘chunky’ and ‘smooth’ onion tomato masala with date.

Use as needed in the recipe.


https://gscrochetdesigns.blogspot.com. one can see my crochet creations  

https://kneereplacement-stickclub.blogspot.com. for info on knee replacement

https://cancersupportindia.blogspot.com  for info on cancer and health related topics

https://GSiyers home remedies.blogspot.com   is the latest addition to my blogs


Thursday, May 14, 2026

Mango Salsa

 Mango Salsa (Mexico): A vibrant Mexican condiment combining diced mango, onions, tomatoes, lime juice, chili peppers, and cilantro. This sweet-spicy salsa pairs beautifully with grilled fish, tacos, and chips. The mango adds tropical sweetness, balancing heat and acidity, making it a refreshing accompaniment in Mexican and fusion cuisines globally. 

 Ingredients

3 ripe mangoes, diced 

1 medium red bell pepper, chopped

½ cup chopped red onion

¼ cup packed fresh coriander leaves, chopped

1 jalapeño, seeded and minced

1 large lime, juiced (about ¼ cup lime juice)

⅛ to ¼ tsp  salt, to taste


Instructions

In a serving bowl, combine the prepared mango, bell pepper, onion, cilantro and jalapeño. Drizzle with the juice of one lime.

Using a large spoon, stir the ingredients together. Season to taste with salt, and stir again. For the best flavor, let the salsa rest for 10 minutes or longer. 


https://gscrochetdesigns.blogspot.com. one can see my crochet creations  

https://kneereplacement-stickclub.blogspot.com. for info on knee replacement

https://cancersupportindia.blogspot.com  for info on cancer and health related topics

https://GSiyers home remedies.blogspot.com   is the latest addition to my blogs


Monday, April 13, 2026

Salad with Guava Vinaigrette

 Ingredients

½ cup guava puree/paste (thawed if frozen)

¼ cup extra-virgin olive oil

¼ cup rice vinegar

1 clove garlic, crushed and peeled

½ tsp salt 

1/4  tsp pepper pdr 

 ¼ cup grape seed oil 

 ½ cup no-salt-added canned small white beans, rinsed

8 okra pods, thinly sliced

2 cups fresh amaranth leaves (see Tip) or microgreens

6 cups packed arugula

⅔ cup crumbled farmer’s cheese*

¼ cup thinly sliced red onion 

*Farmer's cheese, a fresh cheese variety, is a pressed cottage cheese that is slightly more acidic and has a firmer texture, thanks to a lower moisture content. Or farmer's cheese is pressed curds or an unripened cheese made by adding rennet and bacterial starter to coagulate and acidify milk.


Preparations

Combine guava, olive oil, vinegar, garlic, salt and pepper in a blender. Blend until smooth.

Heat grape-seed oil in a medium skillet over medium-high heat. Add beans and okra; cook, stirring occasionally, until softened, about 5 minutes. Add amaranth (or microgreens) and cook, stirring, until wilted, about 1 minute. Remove from heat.

Toss arugula with the vinaigrette in a large bowl. Top with the bean mixture, cheese and onion.  

 Tip

Amaranth (celosia) is a leafy plant that is cultivated for both its leaves and seeds. You can use the leaves as you would spinach, while the protein-packed seeds are often sold dried and can be cooked and prepared as a grain.  


https://gscrochetdesigns.blogspot.com. one can see my crochet creations  

https://kneereplacement-stickclub.blogspot.com. for info on knee replacement

https://cancersupportindia.blogspot.com  for info on cancer and health related topics

https://GSiyers home remedies.blogspot.com   is the latest addition to my blogs


Friday, March 20, 2026

Herbed Potato Salad without Mayonnaise

 Herbed Potato Salad Recipe without Mayonnaise 

 Ingredients:

3 pounds Small Red Potatoes – scrubbed, washed and quartered

2 tbsp Granulated Sugar – PLUS a pinch for dressing

4 tbsp White Wine Vinegar – DIVIDED

as needed Kosher Salt & Ground Black Pepper

½ Cup Extra Virgin Olive Oil

2-3 cloves Garlic – minced

2 tsp Dijon Mustard

¼ – ½ tsp Crushed Red Pepper Flakes – to taste

½ Cup Fresh Parsley – gently packed & chopped

¼ Cup Fresh Dill – gently packed & chopped

3 tbsp Fresh Cilantro – gently packed & chopped

4 whole Scallions (green part only) – thinly sliced (about ½ cup)

3 whole Ribs Celery – finely diced (about 1 cup)

1 small Red Onion – finely diced (about ¾ cup)


Preparations

Boil the Potatoes: Add 2 ½ quarts of COLD water to a large saucepan or pot. Then, add the cut potatoes and bring the water to a gentle boil over high heat (SEE NOTES).

Once boiling, add 2 tablespoons of salt, 2 tablespoons of sugar, and 2 tablespoons of vinegar to the water. Immediately reduce the heat to maintain a simmer. Let the potatoes simmer, stirring occasionally, until they're fork tender, about 10-12 minutes. Remove the pot from the heat, drain the potatoes in a colander, and then transfer the warm potatoes to a large mixing bowl. Meanwhile, Make the Mayo-Free Vinaigrette Dressing: To a small bowl, add the oil, garlic, remaining 2 tablespoons of vinegar, Dijon, and crushed red pepper flakes, along with a generous pinch of sugar. Season with 3/4 teaspoon of kosher salt and ¼ teaspoon ground black pepper.  Then, grab a whisk and vigorously stir until all the ingredients are emulsified and fully combined. Add in the fresh parsley, dill, and cilantro. Whisk again until fully combined. Taste the herb vinaigrette dressing and adjust to suit your personal taste before setting it aside.

Toss the Potato Salad with Dressing and Herbs: Drizzle half of the dressing over the warm potatoes and gently toss to combine (SEE NOTES).

Add in the scallions, celery, and red onion. Then gently toss the potato salad again. Next, taste the potato salad and adjust as you see fit, adding more dressing if the potatoes seem dry, salt and pepper for overall flavor, and herbs for freshness. Then, gently toss the potatoes again.  Serve The No Mayo Potato Salad: Serve the herb potato salad warm, at room temperature or chilled, depending upon your personal preferences. Serving Warm: For the best flavor, let the no-mayo potato salad sit out on the counter for 10 minutes before serving – this gives the flavor a chance to marry and meld. Serving at Room Temperature: Follow instruction above; however, let the herb potato salad sit at room temperature for 20-30 minutes. (Do not leave the potatoes salad at room temp. for more than 2 hours.) Serving Chilled: Store the potato salad in the refrigerator. Remove the salad from the fridge and let sit at room temperature for 20-30 minutes (Note: You want the potatoes to be chilled, not freezing cold). Gently toss the herb potato salad before serving. 

Notes

Potatoes: Waxy potato varieties, such as Yukon, baby, and fingerling potatoes work great. Just be sure to check on the potatoes while they’re boiling as the cooking times may vary. 

Boiling potatoes: Make sure you simmer the potatoes – don’t continuously and harshly boil the potatoes or they will be more susceptible to falling apart and becoming mushy.

Dressing potatoes: Be sure the potatoes are still warm when you toss them with the dressing. Warm potatoes will soak up the dressing much better than cool potatoes.

Storage: Potato salad can be kept in an airtight container in the refrigerator for up to 4 days.


https://gscrochetdesigns.blogspot.com. one can see my crochet creations  

https://kneereplacement-stickclub.blogspot.com. for info on knee replacement

https://cancersupportindia.blogspot.com  for info on cancer and health related topics

https://GSiyers home remedies.blogspot.com   is the latest addition to my blogs


Tuesday, March 17, 2026

Edamame Pasta Salad

 Edamame pasta salad in a serving dish displayed with roasted lemons 


Ingredients

  • 8 Ounces Rotini Pasta or other short pasta
  • 12 Ounces Frozen Shelled Edamame, cooked according to package instructions
  • 1 Small Red Onion, diced
  • 1 Medium Bell Pepper, diced
  • ⅓ Cup Vegan Feta, optional
  • 2 tbsp Red Wine Vinegar
  • 1 tbsp Lemon Juice
  • 1 tsp Garlic Powder
  • 1 tsp Onion Powder
  • ½ tsp Salt                                                                                                                           

    Instructions

    • Cook the pasta according to the package instructions. Drain and rinse with cold water.
    • When the pasta is cool, place it in a large bowl along with the remaining ingredients toss well. Serve and enjoy!  

      https://gscrochetdesigns.blogspot.com. one can see my crochet creations  

      https://kneereplacement-stickclub.blogspot.com. for info on knee replacement

      https://cancersupportindia.blogspot.com  for info on cancer and health related topics

      https://GSiyers home remedies.blogspot.com   is the latest addition to my blogs


Tuesday, March 3, 2026

Chili cheese toast

Ingredients

300g boiled potatoes, peeled and crushed
1 tsp chaat masala
1 pinch ground black pepper
¼ tsp black salt
150g green capsicum finely chopped
100g finely chopped red onion
8 slices white bread, crusts trimmed off
Softened butter
250g  cheese of your choice thinly sliced

For the green chutney
200g mint leaves
100g coriander leaves
Juice of ½ lemon
1 green chili, or 2 if you like things spicy
30g roughly chopped red onion
1⅓cm piece fresh ginger, peeled and roughly chopped
½ tsp caster sugar
Salt, to taste

Put all the ingredients for the chutney in a blender, add a splash of water and blitz to a thick paste. This may make more chutney than you need here, but any leftovers keep well in the fridge for three or four days, and go with all sorts.

In a large bowl, mix the crushed boiled potatoes with the chaat masala, black pepper and salt. Add the green peppers and red onion, and stir well to combine.

Lay four of the bread slices on a large plate and apply butter generously to one side of each slice. Spread a little of the green chutney on top of two slices, then spread the potato filling over the other two slices and top the potato filling with a slice or two of the cheese. Lay the first two slices of bread chutney-side down on top of the cheese, then press down lightly to seal. Spread butter on both sides of the outside of the sandwiches, then repeat with the remaining bread, butter, chutney, spiced potato mix and cheese.

Put a large, nonstick frying pan on a medium heat, then lay in two sandwiches, cover with a lid and leave to fry for two minutes, until the base turns crisp, is evenly coloured and light brown. Flip over with a spatula, cover again and fry on the other side for two minutes more. Cook the remaining two toasties in the same way, and serve warm with any remaining chutney or with tomato ketchup.


https://gscrochetdesigns.blogspot.com. one can see my crochet creations  

https://kneereplacement-stickclub.blogspot.com. for info on knee replacement

https://cancersupportindia.blogspot.com  for info on cancer and health related topics

https://GSiyers home remedies.blogspot.com   is the latest addition to my blogs

Saturday, January 17, 2026

Quinoa Patties

 Design sans titre 2025 02 18T213831.432 

 Ingredients

1 cup cooked quinoa

2 large eggs / cornflour/ flax eggs/ arrow root flour

½ tsp dried oregano

½ tsp garlic powder

½ tsp salt

½ tsp black pepper

½ cup mozzarella cheese, shredded

¼ cup red onion, finely minced

1 cup breadcrumbs

4 tbsp oil (divided)


Preparations

In a medium bowl, combine the cooked quinoa, eggs, oregano, garlic powder, salt, and black pepper. Stir in the mozzarella cheese and minced red onion until well combined

Add the breadcrumbs to the mixture and stir. Let the mixture sit for a few minutes so the breadcrumbs can absorb some of the moisture.

Using a ¼ cup measuring cup, scoop the quinoa mixture and wet your hands with water. Form the mixture into patties (you should get about 10 patties).

Heat 2 tablespoons of  oil in a large non-stick skillet over medium heat. Once hot, add half of the quinoa patties and cook for 3-4 minutes per side, or until golden brown and crispy. Remove from the skillet and set aside.

Add the remaining 2 tablespoons of oil to the pan and cook the remaining patties in the same way. Serve warm.


https://gscrochetdesigns.blogspot.com. one can see my crochet creations  

https://kneereplacement-stickclub.blogspot.com. for info on knee replacement

https://cancersupportindia.blogspot.com  for info on cancer and health related topics

https://GSiyers home remedies.blogspot.com   is the latest addition to my blogs


Wednesday, January 14, 2026

Rye Berry and Carrot Salad

 20140220-rye-carrot-salad.jpg 


Ingredients

  • 1 1/2 cups dried rye berries (see note)

  • 2 bay leaves

  • Kosher salt

  • 1 pound small carrots

  • 1 cup  almonds, roughly chopped

  • 2 tsp whole grain or Dijon mustard

  • 1 medium garlic clove, minced (about 1 teaspoon)

  • 2 tsp juice from 1 whole lemon

  • 2 tsp balsamic or sherry vinegar

  • 3 tbsp extra-virgin olive oil

  • 2 stalks celery, peeled, and thinly sliced on a bias

  • 1/2 small red onion, thinly sliced

  • 1/4 cup chopped fresh coriander leaves

  • Freshly ground black pepper

Directions

  1. Place rye berries in a medium saucepan and cover with water by 2 inches. Add 1 bay leaf and season heavily with salt. Bring to a boil, reduce to a simmer, and cook until rye berries are tender, about 30 minutes. Drain in a fine mesh strainer and run under cool water until well chilled. Discard bay leaf. Place strainer over a large bowl and let drain for at least 15 minutes.

  2. While rye berries cook, place carrots and remaining bay leaf bay leaf in a large saucepan and cover with cold water by 1 inch. Season heavily with salt. Bring to a boil over high heat, reduce to a simmer, and cook until tender, about 10 minutes. Drain under cold running water and peel by rubbing skin off under running water. Cut carrots into 1- to 1/2-inch chunks on a bias. Set aside.

  3. Toast almonds in a medium skillet over medium heat, tossing frequently, until nutty brown and dark in spots, about 5 minutes. Transfer to a bowl and set aside.

  4. Combine mustard, garlic, lemon juice, vinegar, and olive oil in a large bowl and whisk to combine. Add drained rye berries, carrots, almonds, celery, onion, and cilantro. Season to taste with salt and pepper. Toss gently with your hands until the salad is coated in the dressing. Serve immediately or store in a sealed container for up to 3 days.

Notes

Wheat berries or barley can be used in place of rye berries. 


https://gscrochetdesigns.blogspot.com. one can see my crochet creations  

https://kneereplacement-stickclub.blogspot.com. for info on knee replacement

https://cancersupportindia.blogspot.com  for info on cancer and health related topics

https://GSiyers home remedies.blogspot.com   is the latest addition to my blogs


Tuesday, December 2, 2025

Slow Cooker Vegetarian Chili With Sweet Potatoes

 Ingredients

  • 1 medium red onion, chopped (about 1 1/2 cups)

  • 1 green bell pepper, chopped (about 1 cup)

  • 4 garlic cloves, finely chopped (about 1 1/2 Tbsp.)

  • 1 tbsp chili powder

  • 1 tbsp cumin pdr

  • 2 tsp unsweetened cocoa powder

  • 1 3/4 tsp. kosher salt

  • ¼ tsp cinnamon pdr

  • 1 28-ounce can fire-roasted diced tomatoes (undrained)

  • 1 15.5-ounce can black beans, drained and rinsed

  • 1 15.5-ounce can kidney beans, drained and rinsed

  • 1 medium sweet potato, peeled and cut into 1⁄2-inch pieces (about 2 cups)

  • Sour cream, sliced jalapeños, sliced radishes, and/or tortilla chips, for serving

Directions

  1. Add ingredients to slow cooker:


    Stir together onion, bell pepper, garlic, chili powder, cumin, cocoa powder, salt, pepper, and cinnamon in a 4-to-6-quart slow cooker. Stir in tomatoes, beans, sweet potato, and 1 cup water.

  2. Cook and serve:

    Slow Cooker Vegetarian Chili with Sweet Potatoes One Pot Recipe                                                             Cover and cook until sweet potato is tender and chili has thickened, 4 to 5 hours on high or 7 to 8 hours on low. Serve garnished with sour cream, jalapeños, radishes, and/or tortilla chips.                                                                                                      

    Stove-top Instructions

    No slow cooker or in a hurry? No problem. Here's how to to make this recipe in a large pot or Dutch oven on the stove-top.

    1. Cook the onion and bell pepper in 2 tablespoons of olive oil over medium-low heat for 5 minutes. Add the garlic and spices and cook, stirring, for one minute.
    2. Add the remaining ingredients, including 1 cup water. Bring to a boil. Reduce heat to a simmer, cover, and cook, stirring occasionally for 45 minutes.             

      Make-Ahead and Storage

      This chili can be made up to four days in advance and refrigerated in an airtight container. As with many soups and stews, the flavors will continue to develop as it sits, so this is definitely a great make-ahead and meal prep recipe. The chili also freezes well; freeze it in an airtight container for up to three months.            


      https://gscrochetdesigns.blogspot.com. one can see my crochet creations  


      https://kneereplacement-stickclub.blogspot.com. for info on knee replacement

      https://cancersupportindia.blogspot.com  for info on cancer and health related topics

      https://GSiyers home remedies.blogspot.com   is the latest addition to my blogs

     
    Stove-top Instructions

No slow cooker or in a hurry? No problem. Here's how to to make this recipe in a large pot or Dutch oven on the stovetop.

  1. Cook the onion and bell pepper in 2 tablespoons of olive oil over medium-low heat for 5 minutes. Add the garlic and spices and cook, stirring, for one minute.
  2. Add the remaining ingredients, including 1 cup water. Bring to a boil. Reduce heat to a simmer, cover, and cook, stirring occasionally for 45 minutes.

Make-Ahead and Storage

This chili can be made up to four days in advance and refrigerated in an airtight container. As with many soups and stews, the flavors will continue to develop as it sits, so this is definitely a great make-ahead and meal prep recipe. The chili also freezes well; freeze it in an airtight container for up to three months.