Friday, February 27, 2026

These Tasty Energy Snacks Will Leave You Wanting More

 I'm a huge fan of nutty, chewy, fruit-filled energy bars and these little bars which you're about to make have enough energy to get you through an exhausting afternoon while keeping the hunger at bay. This is pretty amazing when you realize that they are made up of equal parts of just three ingredients - nuts, dried fruit and pitted dried dates. 

3-ingredient - Energy - Bars 3-ingredient - Energy - Bars

3-ingredient - Energy - Bars

3-ingredient - Energy - Bars
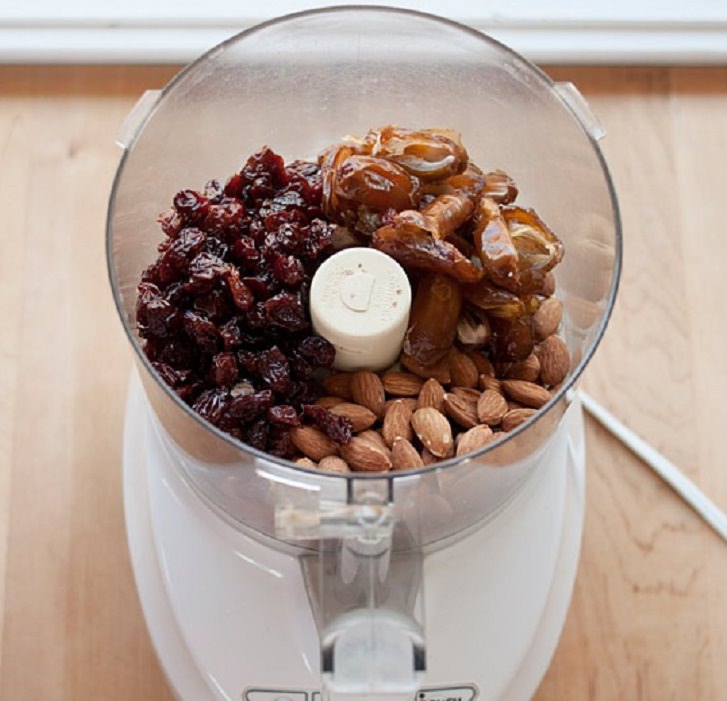
Our favorite dried fruit and nuts to use are cherries and almonds, but you can swap these out for whatever dried fruits or nuts just happen to take your fancy. Please keep the dates though as they help bind and sweeten the bars without the need for sugar. 

If you like, you can also play around with adding some more ingredients to the mix: a couple of tablespoons of chia seeds, a handful of coconut, or even some chocolate chips. Keep the equal parts of the base ingredients (1 part dried fruit, 1 part nuts, and 1 part dates), and add any extras a bit at a time until you get the taste and texture that you're looking for. As you're about to find out, making energy bars is so simple that you'll never need to buy them again. 

How to Make 3-Ingredient Energy Bars at Home Makes 8 large bars or 16 small square-shaped bars. 

Ingredients  

1 cup nuts 

1 cup dried fruit 

1 cup (12-15) pitted dried dates  

Instructions 

1. Roast the nuts (optional). Nuts can be used roasted or raw; roasting will add a nutty and toasty depth to the bars. If desired, roast the nuts at 350°F for around 10 minutes, until fragrant and golden. Let them cool before using. 

2. Add the nuts, dried fruit and dates to the food processor and pulse a few times, just to break them up. Separate the dates if they start to clump together.

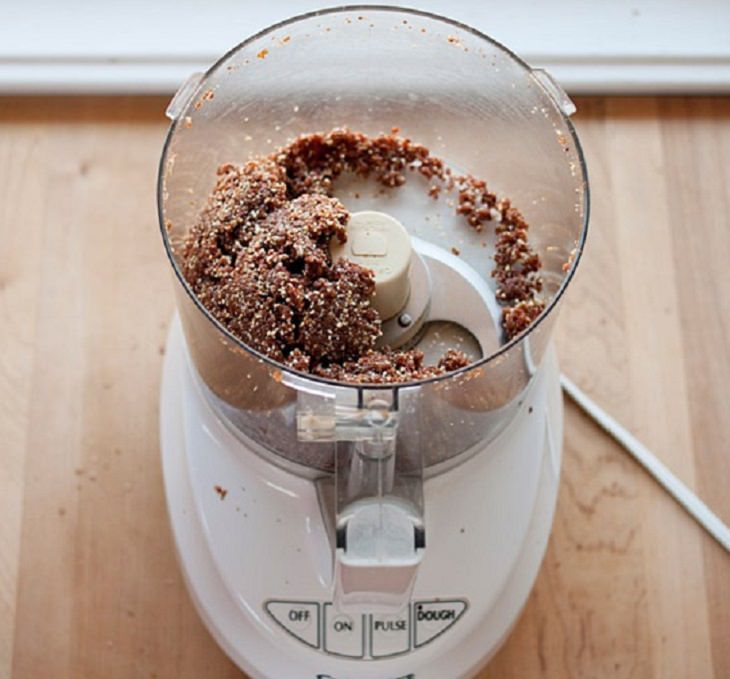
3. Process continuously for 30 seconds. At this point, all the ingredients should have been broken down into smaller pieces. Scrape the edges of the bowl to make sure nothing is sticking.

4. Continue processing for another minute or two, until the ingredients have clumped together into a ball.

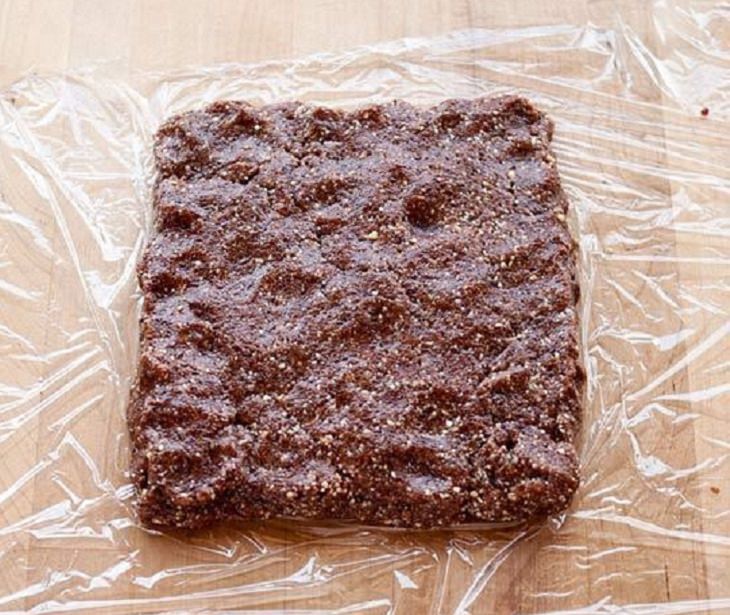
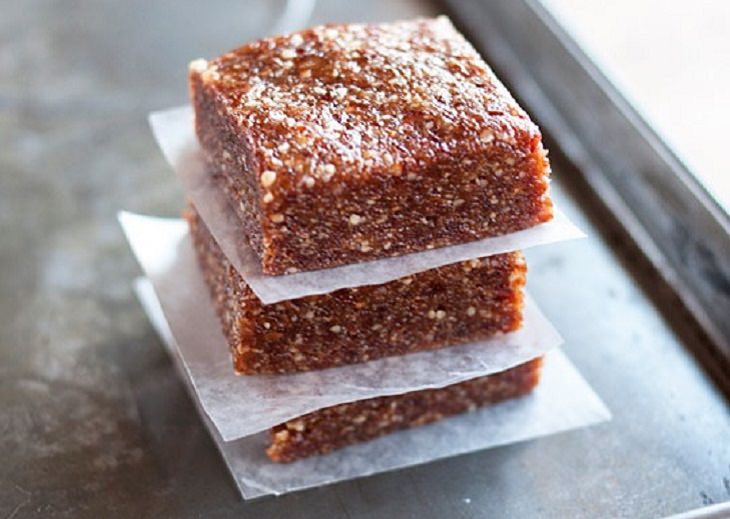
5. Place a piece of plastic wrap or wax paper on your work surface and dump the dough on top. Press the dough with your hands until a thick square, roughly 8" by 8" in size, has formed. Wrap and chill for an hour, or leave in the fridge overnight.

6. Divide into bars. Unwrap the chilled dough and place on a cutting board. Cut into 8 large bars or 16 small squares, as desired. Wrap each bar in wax paper or plastic wrap.

7. Store the bars. The bars can be stored in the fridge for several weeks or in the freezer for up to 3 months.

Additional Notes 

Energy balls: If you like, the dough can also be shaped into small balls. Try these combinations: Cherry-almond, apricot-almond, cranberry-pecan, apple-cinnamon, walnut. Try these add-ins: Shredded coconut, chocolate chips, chia seeds, cacao nibs, cocoa powder, ground cinnamon, ground nutmeg, lemon zest, and lime zest.


https://gscrochetdesigns.blogspot.com. one can see my crochet creations  

https://kneereplacement-stickclub.blogspot.com. for info on knee replacement

https://cancersupportindia.blogspot.com  for info on cancer and health related topics

https://GSiyers home remedies.blogspot.com   is the latest addition to my blogs


Vegan Chocolate Cake That Can Help You Lose Weight

 Did you know that it's possible to make 'healthy cakes'? These cakes are made without flour, dairy products, or artificial sweeteners. With this chocolate avocado cake, for example, the butter is replaced by avocados. Replacing the butter with avocados doesn't make the cake any less delicious, but it does make it healthier and can actually help you lose weight.

Avocados are rich and soft, which makes them an excellent substitute for butter. Furthermore, they are a great source of healthy fats, minerals, and vitamins. The healthy fats make avocados a great choice for a ketogenic diet. To add to this, they are an excellent source of folate (used to repair cells, and lutein (maintains eye health). 

Avocados have been used to lower cholesterol, treat osteoarthritis, and it's even been proven that they contain cancer-fighting properties. Therefore, adding this fruit to a cake is one of the tastiest ways to benefit from these health benefits. 

The taste of the avocado mixes in well with the other ingredients that it's not even possible to tell the difference. This cake is also sweetened with honey or maple syrup, instead of sugar and white flour. Try it out now!
How to - Recipe - Avocado chocolate cake
Ingredients: 

1 ripe organic avocado, mashed until smooth 

2 tsp baking powder 

 ¼ tsp sea salt 

¼ cup coconut or avocado oil 

3 cups coconut flour 

2 cups filtered water 

5 tbsp dark chocolate cocoa powder 

3 tbsp of maple syrup (or to your desired taste) 

2 tsp vanilla extract 

2 tbsp apple cider vinegar (or squeezed lemon juice) 

 For the frosting  

2 ripe organic avocados, mashed until smooth 

5 tablespoons dark chocolate cocoa powder 

2 tablespoons of maple syrup 

Whisk all the ingredients till smooth

Directions 

1. Preheat the oven to 350°F, grease, and (coconut) flour two 9" round cake pans.

2. Whisk the flour, cocoa powder, salt, and baking powder in a large bowl. In a separate bowl, whisk avocado oil, vinegar, avocado, water, and vanilla extract. As soon as they are mixed well, add the maple syrup. 

3. Pour this mixture into the flour mixture and stir well. 

4. Divide the mixture evenly between cake pans, and bake. 

5. After half an hour, check to see if they are done. 

6. Leave the cakes to cool in the pans, and take them out after 15 minutes to completely cool. 

7. Add a frosting layer on the first cake layer, and then top the second one. 

8. Pour the rest of the frosting on top of the entire cake.


https://gscrochetdesigns.blogspot.com. one can see my crochet creations  

https://kneereplacement-stickclub.blogspot.com. for info on knee replacement

https://cancersupportindia.blogspot.com  for info on cancer and health related topics

https://GSiyers home remedies.blogspot.com   is the latest addition to my blogs


Ragi Cake/ Finger millet Cake- Gluten free

 Ingredients

ragi flour 1 cup
sugar/ jaggery 1/2 cup
coconut oil 1/4 cup
milk 1/4 cup
egg 1
baking pdr 1/4 tsp
baking soda 1/4 tsp
cardamom pdr 1/4 tsp
salt a pinch
chopped nuts 1/4 cup

Preparations.
Preheat the oven to 180 C
Mix all the dry ingredients.
add oil, milk, egg to the dry ingredients to get a smooth batter
add the chopped nuts, pour the batter to the greased pan and bake for 25-30 minutes
let the cake cool, cut and serve the gluten free cake.
 

https://gscrochetdesigns.blogspot.com. one can see my crochet creations  

https://kneereplacement-stickclub.blogspot.com. for info on knee replacement

https://cancersupportindia.blogspot.com  for info on cancer and health related topics

https://GSiyers home remedies.blogspot.com   is the latest addition to my blogs


Wednesday, February 25, 2026

Instant Suji Veg Idli

 No need to soak rice and dal, grind and ferment. Just roast suji, add the veggies of your choice, mix with curd and water, steam !

Ingredients

suji 1 cup

curd 1 cup

water 1/2 up +

veggies- peas, carrot, beans  chopped finely

jeera 1/2 tsp 

mustard  seeds 1/4 tsp

salt 1 tsp

baking soda 1/2 tsp

green chili 1-2 finely chopped

oil 1 tsp

curry leaves finely chopped 1-2 tsp 


Preparations

dry roast suji ( not needed if you've roasted suji) for 2-3 minutes

in a small pan, heat oil, add mustard seeds, once it crackles, add jeera, green chilies, curry leaves, little hing

 add the seasonings to suji, add curd and water to get a smooth batter, add salt, vegetables, mix well

heat water in a pressure cooker/ kadai, just before spreading the batter on the idli plates, add baking soda and mix well.

grease idli plates, pour the batter, steam for 10-12 minutes, your veg idli will be ready to serve

as it is cooking, you can grind coconut chutney along with fresh grated coconut, green chilies, roasted dal, salt to a nice smooth paste adding little water, season with mustard seeds, urad dal, red chili and curry leaves, serve with hot idlis and enjoy your breakfast, 


https://gscrochetdesigns.blogspot.com. one can see my crochet creations  

https://kneereplacement-stickclub.blogspot.com. for info on knee replacement

https://cancersupportindia.blogspot.com  for info on cancer and health related topics

https://GSiyers home remedies.blogspot.com   is the latest addition to my blogs


Tuesday, February 24, 2026

Palak Pulao

Ingredients:

1 cup basmati rice

2 medium onions, chopped

2 Tbsp ghee plus extra

1 tsp brown sugar

1 Tbsp ginger-garlic paste, fresh

2 small tomatoes, chopped

Salt to taste

1/2 tsp turmeric  powder

1/2 tsp red chili powder

1/2 tsp coriander powder

1/2 tsp jeera pdr

bay leaves 2

For the spices

1 cinnamon stick

2 green cardamoms

2 black cardamoms

3-4 cloves

1 star anise

A pinch of mace

For the spinach puree

2 cups chopped spinach

1/4 cup grated coconut (optional)

1/2 cup coriander leaves

1-2 green chilies

For the garnish

1 cup crispy fried onions

1 cup roasted cashew nuts


Method:

1. Soak the rice in water for 15 minutes. Keep aide.

2. In a pan, dry roast the whole spices for a few minutes until aromatic. Then let it cool and grind them to make a coarse powder. Keep aside.

3. For the spinach puree, add all the ingredients in a mixer and grind to make a smooth paste.

4. In a pressure cooker, heat ghee and add brown sugar. Let it caramelize and then add the chopped onions. Sauté for 2-3 minutes.

5. Add ginger-garlic paste and tomatoes, turn up the heat and saute for 4-5 minutes until the tomatoes become pulpy and the oil separates.

6. Add salt, turmeric and red chili powder, and mix well. Then add the spinach paste and let it cook for 4-5 minutes.

7. Add cumin and coriander powders and mix well. Continue cooking for 4-5 minutes.

8. Now add the drained rice and mix well. Add the spice powder and saute for 2-3 minutes.

9. Fill the cooker with 2 cups warm water and add the bay leaves and pressure cook for three whistles.

10. Add a spoon of ghee and mix the rice well.

11. Serve hot topped with fried onions and roasted cashews.


https://gscrochetdesigns.blogspot.com. one can see my crochet creations  

https://kneereplacement-stickclub.blogspot.com. for info on knee replacement

https://cancersupportindia.blogspot.com  for info on cancer and health related topics

https://GSiyers home remedies.blogspot.com   is the latest addition to my blogs


Lahsun Palak Paneer

Ingredients:

 250 gm paneer

garlic chopped 3 tbsp

palak chopped 1 cup

onion-tomato masala 1 cup

palak and ground to paste 1 cup 

turmeric pdr 1 tsp

coriander pdr 1 tsp

ghee 1 tsp 

oil 3 tbsp

salt to taste 


Method:

  1. Heat oil in a pan.
  2. Add garlic mince and then chopped palak and saute it for 2 minutes.
  3. Add onion-tomato masala and sauté.
  4. Add palak paste, turmeric powder, coriander powder and salt to taste.
  5. Add a little bit of ghee.
  6. Serve with grilled paneer.
  7.  

https://gscrochetdesigns.blogspot.com. one can see my crochet creations  

https://kneereplacement-stickclub.blogspot.com. for info on knee replacement

https://cancersupportindia.blogspot.com  for info on cancer and health related topics

https://GSiyers home remedies.blogspot.com   is the latest addition to my blogs


One-Pot Palak Sambar

 Preparations

In a pressure cooker or pot, add washed toor dal, turmeric powder and 2-3 cups of water. Cook until the dal is soft and mushy.

Heat oil in a pan or the same pot. Add mustard seeds, cumin seeds, and curry leaves. Let them splutter, then add chopped onions and saute until translucent.

Add ginger-garlic paste and green chilies. Saute for a minute. Then add chopped tomatoes and cook until they turn soft.

Mix in the chopped spinach and sambar powder. Cook for 2-3 minutes until the spinach wilts and blends with the spices.

Add the cooked dal to the pan along with tamarind paste. Stir well and add water if needed to adjust consistency. Add chopped coriander leaves.

Let the sambar simmer for 5-7 minutes on low heat, allowing the flavours to combine. Adjust salt to taste.

Garnish with fresh coriander leaves if desired and serve hot with steamed rice or idli/dosa.


Tips To Make Perfect Palak Sambar At Home:

Use fresh spinach and cook lightly: Fresh, tender spinach gives a vibrant green colour and natural sweetness. Add it towards the end of cooking to retain its nutrients and colour.

Balance tamarind and spices: Tamarind gives tanginess, while sambar powder adds depth. Start with a small amount of tamarind and sambar powder, then adjust gradually to suit your taste.

Cook dal well and mash properly: Soft, well-cooked dal ensures a creamy consistency. Mash it lightly before combining with the vegetables for a flavourful sambar.


https://gscrochetdesigns.blogspot.com. one can see my crochet creations  

https://kneereplacement-stickclub.blogspot.com. for info on knee replacement

https://cancersupportindia.blogspot.com  for info on cancer and health related topics

https://GSiyers home remedies.blogspot.com   is the latest addition to my blogs


Rajasthani-Style Palak Besan Ki Sabji

 Rajasthani-Style Palak Besan Ki Sabji: A Simple And Comforting Recipe 

 Rajasthani cuisine is known for its bold flavours, rustic methods, and clever use of everyday ingredients. Among its many traditional dishes, Rajasthani-style Palak Besan Ki Sabji holds a special place in home cooking. This comforting dish blends fresh spinach with roasted gram flour (besan) to create a thick, hearty curry that tastes wonderful with roti or bajra roti.

Unlike creamy spinach curries from other regions, this version is earthy, mildly spiced, and deeply satisfying. It reflects the resourceful cooking style of Rajasthan, where simple ingredients are transformed into wholesome, flavour-packed meals. If you're looking for an easy, healthy, and authentic Indian dish, this recipe is a great choice.


Ingredients

  • 2 cups fresh spinach (palak), finely chopped
  • 4 tbsp besan (gram flour)
  • 2 tbsp oil
  • 1 tsp cumin seeds
  • A pinch of asafoetida (hing)
  • 1 medium onion, finely chopped
  • 2 green chilies, chopped
  • 1 tsp ginger-garlic paste
  • 1/2 tsp turmeric powder
  • 1 tsp red chili powder
  • 1 tsp coriander powder
  • Salt to taste
  • 11/2cups water (as required)

Preparations

Heat a pan on low heat and dry roast the besan until it turns light golden and aromatic. Keep stirring to prevent it from burning. Set aside.

Heat oil in a pan. Add cumin seeds and asafoetida. When they crackle, add onions and sauté until they turn light golden.

Add ginger-garlic paste, green chillies, turmeric, red chilli powder, and coriander powder. Mix well. Add the chopped spinach and cook until it softens and releases moisture.

Slowly add the roasted besan to the spinach mixture while stirring continuously. Pour water gradually to avoid lumps and mix until smooth.

Let the sabji simmer on low heat for 5-7 minutes until it thickens. Adjust salt and consistency as needed. Switch off the heat.

Rajasthani-Style Palak Besan Ki Sabji is simple, nourishing, and full of rustic flavour-a lovely addition to everyday meals and perfect for anyone who enjoys traditional home-style cooking.


https://gscrochetdesigns.blogspot.com. one can see my crochet creations  

https://kneereplacement-stickclub.blogspot.com. for info on knee replacement

https://cancersupportindia.blogspot.com  for info on cancer and health related topics

https://GSiyers home remedies.blogspot.com   is the latest addition to my blogs


A wonderful Non-Toxic All-Natural Oven Cleaner

This non-toxic all-natural oven cleaner can be made with items that you probably already have in your kitchen. It only takes 3 ingredients for the spray with an assist from baking soda. 

A Fantastic Natural Oven Cleaner 

 Ingredients

• Orange peel
• Lemon peel
• Distilled vinegar
• Rosemary (optional)
• Baking Soda
• Spray bottle 
 

Directions

1. Peel an orange and a lemon.

2. In a mason jar, add the orange peel, lemon peel, and distilled vinegar. You can also add some rosemary if you like (this will help remove the vinegar smell).

3. Let the ingredients infuse in the jar for around 5 days. Then, using a funnel, pour the liquid into a spray bottle.

4. When you need to clean your oven, apply baking soda to the spots you wish to clean. Spray the natural oven cleaner on to the baking soda – it should start to fizz.

5. Wait 20 minutes before wiping down the oven with a wet sponge.


https://gscrochetdesigns.blogspot.com. one can see my crochet creations  

https://kneereplacement-stickclub.blogspot.com. for info on knee replacement

https://cancersupportindia.blogspot.com  for info on cancer and health related topics

https://GSiyers home remedies.blogspot.com   is the latest addition to my blogs


Monday, February 23, 2026

Healthy Street Foods According to a Cardiologist

1) Roasted Chana – A Protein-Packed Street Snack
Roasted chana is a powerhouse of plant-based protein and fibre. It supports weight management, improves gut health and keeps you feeling full for longer. Rich in iron, magnesium and potassium, roasted chana is an affordable and highly nutritious street snack option.

From a heart health perspective, it is far better than deep-fried alternatives.

2) Light Bhel Puri – A Low-Fat Indian Favourite
Light bhel puri made with puffed rice, chopped vegetables and tangy chutneys can be a refreshing and low-fat option. When prepared with minimal sev and chutney, it becomes a fibre-rich snack that is gentle on digestion.

Opt for extra vegetables and less sweet chutney to make it even healthier.

3) Corn Bhutta – A Fibre-Rich Roasted Delight
Roasted corn on the cob, commonly known as bhutta, is a classic Indian street favourite. Cooked over an open flame and seasoned with lemon and salt, it is minimally processed and rich in antioxidants.

Bhutta supports digestion and heart health, making it a wholesome alternative to fried snacks.

4) Sweet Potato Chaat – A Nutritious Energy Booster
Sweet potatoes, often served as tangy chaat with lemon and spices, are rich in beta-carotene, fibre, and vitamins A and C. They provide steady energy and are beneficial for skin and hair health.

Compared to fried street food, sweet potato chaat is a healthier and equally satisfying option.

5) Boiled Eggs – A High-Protein Street Choice
Boiled eggs are widely available at street stalls and are an excellent source of protein. They support muscle health, help control appetite and are easy to eat on the go.

Sprinkled with pepper and a pinch of salt, boiled eggs make a balanced and convenient snack. 


https://gscrochetdesigns.blogspot.com. one can see my crochet creations  

https://kneereplacement-stickclub.blogspot.com. for info on knee replacement

https://cancersupportindia.blogspot.com  for info on cancer and health related topics

https://GSiyers home remedies.blogspot.com   is the latest addition to my blogs

1. Roasted Chana – A Protein-Packed Street Snack
Roasted chana is a powerhouse of plant-based protein and fibre. It supports weight management, improves gut health and keeps you feeling full for longer. Rich in iron, magnesium and potassium, roasted chana is an affordable and highly nutritious street snack option.

Sunday, February 22, 2026

Creamed Beet Greens

We all know the delicious beet salad that's packed with health benefits, but it's time to get familiar with a simple recipe for beet greens, which are often left aside. By using beet greens, you'll enjoy a dish rich in folic acid, dietary fiber, and vitamins A, B, and C, supporting your digestive and immune systems.
 healthy root vegetables
 

creamed beet greens

Ingredients  
Beet greens – 1 bunch (from one beet only) 
Butter – 1 tbsp (14 g) 
Olive oil – 1 tsp
Medium onion – 1 (thinly sliced) 
Salt – To taste 
Black pepper – To taste 
Milk – 1 cup 
Potato – 1 (small) 
Nutmeg – A generous pinch (grated)

Preparations
 
Separate the beet greens from the stems. 
Place the leaves in a colander and wash thoroughly to remove dirt. 
Pat dry with a towel, chop finely (about 2 cups), and set aside. 
Heat a deep saucepan over medium-high heat. Melt the butter and add the olive oil. 
Once heated, add the onion and sauté until lightly golden, about 1–2 minutes. 
Add the chopped beet greens, season with salt and black pepper to taste. 
Pour the milk into the saucepan.
 Using a grater, grate the potato directly into the saucepan. 
Sprinkle in the nutmeg and mix well.
Cook the mixture until it is close to boiling, then lower the heat to the lowest setting. 
Continue cooking just below a simmer for about 15 minutes, stirring occasionally. 
Remove the saucepan from the heat and let it cool for 1–2 minutes. Serve the dish warm.


https://gscrochetdesigns.blogspot.com. one can see my crochet creations  

https://kneereplacement-stickclub.blogspot.com. for info on knee replacement

https://cancersupportindia.blogspot.com  for info on cancer and health related topics

https://GSiyers home remedies.blogspot.com   is the latest addition to my blogs


Spanish and Italian-Style Frittata

 The frittata not only offers a great taste but also provides your body with vitamins A, B, and K, folic acid, calcium, and lutein to support your eye health.
 fritata


Ingredients  
 
Olive oil – 2 tbsp 
 
Potatoes – 2 (small, peeled, and finely chopped) 
 
Garlic – 1 clove (minced) 
 
Salt – To taste 
 
Turnip greens – 2 bunches 
 
Eggs – 8 (beaten) 
 
Black pepper pdr – To taste 
 
Parmesan cheese – ¼ cup (grated


Preparations
 
Preheat the oven to 190°C (375°F). 
 
Place a large oven-safe skillet over medium-high heat. Heat the olive oil and add the potatoes. 
 
Sauté the potatoes until they are golden at the edges and tender in the center. 
 
Add the garlic, season with salt, and continue to sauté for about 2 minutes. 
 
Add the turnip greens and cook until softened, approximately 3 minutes.

Season the beaten eggs with salt and black pepper to taste, then pour them into the skillet over the vegetables. 
 
Sprinkle the Parmesan cheese evenly over the mixture. 
 
Carefully transfer the skillet to the preheated oven. 
 
Bake the frittata for approximately 10 minutes. 
 
Remove the skillet from the oven with great care and allow the frittata to cool for about 10 minutes. 
 
Slice and serve.


https://gscrochetdesigns.blogspot.com. one can see my crochet creations  

https://kneereplacement-stickclub.blogspot.com. for info on knee replacement

https://cancersupportindia.blogspot.com  for info on cancer and health related topics

https://GSiyers home remedies.blogspot.com   is the latest addition to my blogs