Sunday, December 31, 2023

12 Common Cooking Mistakes That Can Ruin a Meal

Cooking can be therapeutic for many of us; dealing with raw materials with different textures, tastes and colors is a kind of art and the act of cooking itself can be especially relaxing. This wonderful cooking experience can easily be destroyed by common mistakes that many of us occasionally make, such as over-seasoning, inadequate seasoning, or even over-cooking an egg, which can damage the taste of food.

To avoid such problems, familiarize yourself with the 12 common mistakes made by cooks in the kitchen and the easy solutions that can save a meal and make cooking an enjoyable experience once more. 
 
1. Frying meat in a non-stick pan
cooking mistakes
 
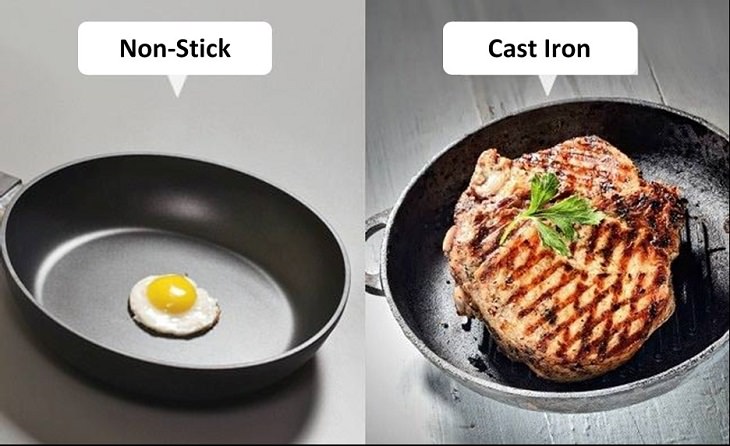
The mistake: If you want to fry meat so that it’s nicely seared, don’t do it in a nonstick pan. Pans of this type do not reach the high temperatures required to sear meat and therefore don’t create a crisp layer. 
 
The fix: Nonstick pans are more suitable for frying eggs or pancakes, and if you want to make juicy meat with a crisp seat, fry it in a cast iron frying pan, which heats to high temperatures allowing the meat to cook properly. 


2. Not heating the pan enough

cooking mistakes
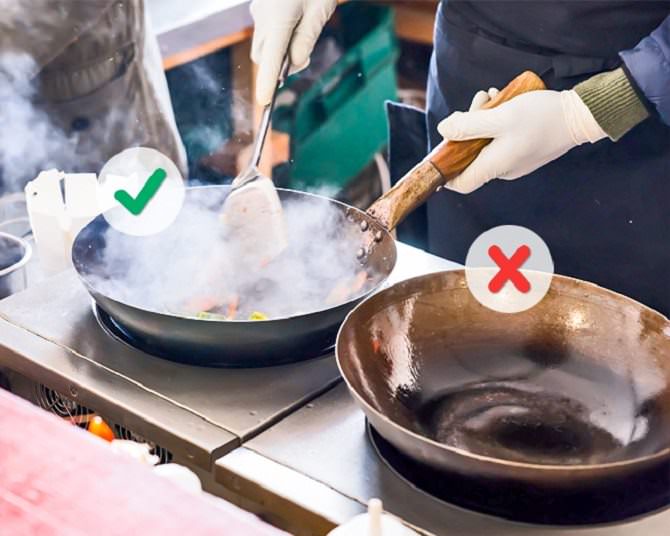
The mistake: Another mistake that many make when preparing food in a pan is not heating the pan enough, which causes the food to be cooked unevenly, to lose liquids and dry out, which is why chefs say, "If you think the pan is hot enough, wait another two minutes." 
 
 The fix: How do you know that the pan is hot enough? Spray a few drops of water on it and if they sizzle or "pop" on the pan it’s a sign that your pan is hot enough. After this step, you can add oil, but you should wait for the water to evaporate first. 
 
 
3. Thawing meat in the cooking process
cooking mistakes

The mistake: People, when rushed for time, often use frozen meat in their cooking thinking it’ll defrost quicker while being cooked. Unfortunately, meat cooked this way may seem ready on the outside but will be almost raw on the inside. The same applies to oven roasting. 
 
The fix: To avoid such a situation, place thawed meat outside the refrigerator or freezer for two hours and allow it to reach room temperature before cooking. Properly thawed frozen meat cooks uniformly and tastes better after cooking, as opposed to semi-frozen meat.


4. Frying in olive oil
cooking mistakes
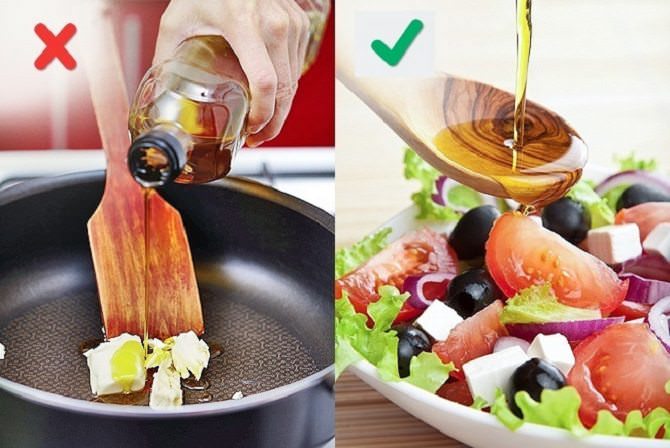
The mistake: When frying, oil reaches high temperatures, and when it comes to olive oil high temperatures cause it to lose its nutritional value and it starts to burn. As a result, the taste of your food may be destroyed maybe even making the meal inedible. 
 
The fix: To avoid this, use olive oil for seasoning and not for frying. Canola oil, for example, is resistant to high temperatures, which is why it’s recommended for frying. 
 
 
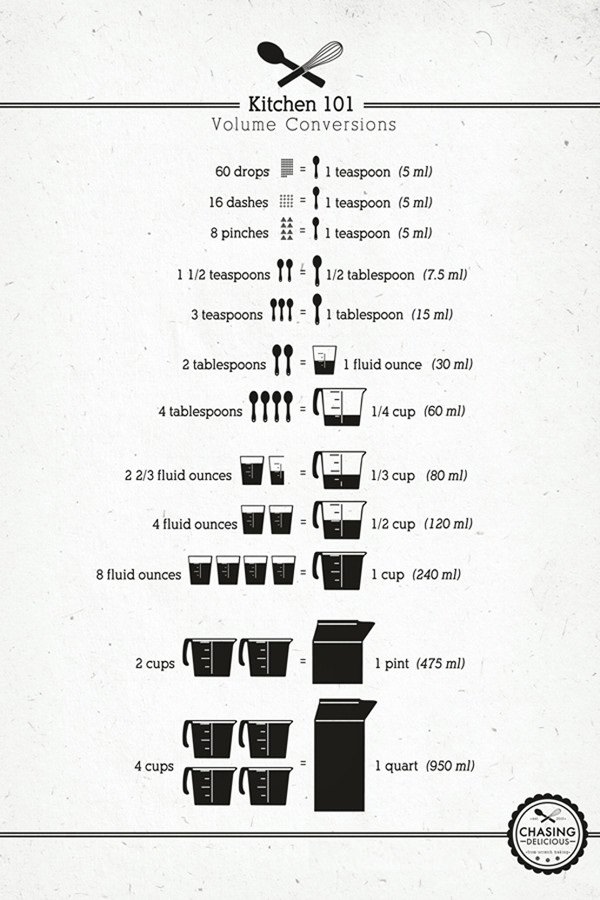
5. Measuring using a glass cup
cooking mistakes
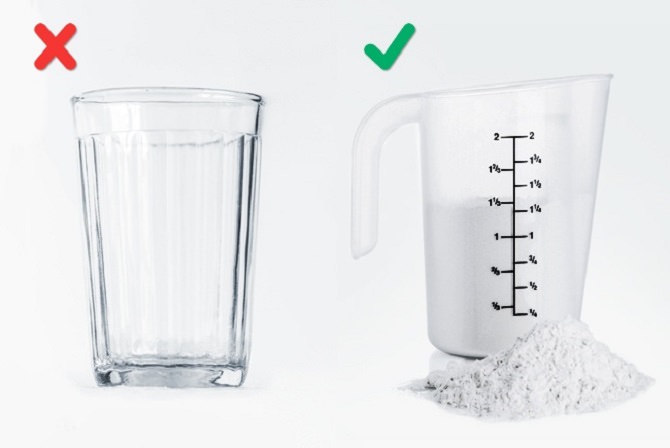
The mistake: The vast majority of people enjoy eating pastries, and those of us who enjoy the baking process know that this is a delicate science, and therefore precise quantities must be used by measuring the ingredients. When measuring in a glass cup people often forget that it holds different volumes of dry and liquid products, and therefore will never give an exact measurement. 
 
 The fix: To avoid mixing incorrect amounts of ingredients that may destroy the pastry, use a professional measuring cup that has one row for volume and another for weight. 
 
 
6. Store all foods in the refrigerator
 cooking mistakes
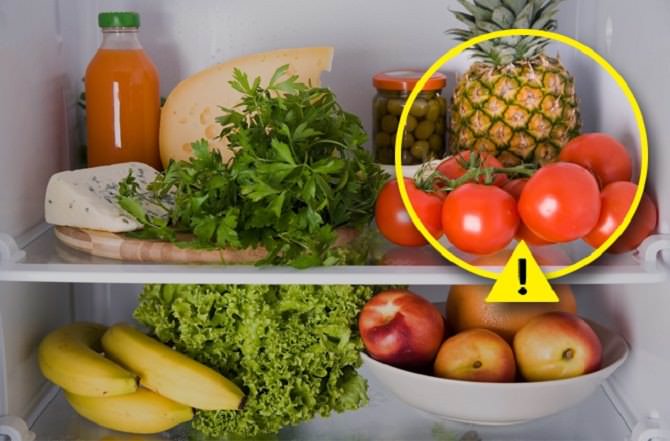
The mistake: We all want to keep food we buy at the grocery fresh, but it's not a good idea to put every single item in the fridge. Vegetables such as tomatoes, onions, garlic, potatoes and tropical fruits like kiwi and mango tend to spoil and lose their flavor when cooled, but they retain their freshness when stored in a warm place. 
 
The fix: To maintain the freshness of fruits and vegetables, check which ones should be kept in a warm place and place them in open baskets to keep them fresh for longer.
 
 
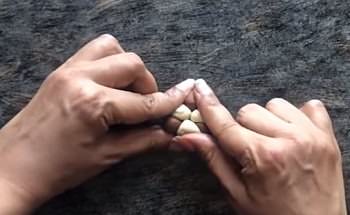
7. Over-frying garlic
 cooking mistakes

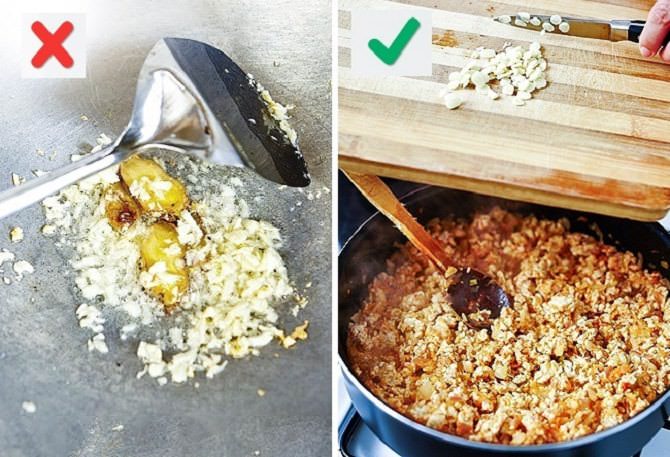
The mistake: Over-frying garlic causes it to burn and lose its taste and texture. This happens because the water content in garlic is low, so when you fry it too long, the water inside it evaporates quickly and it burns. 
 
The fix: In order to enjoy the unique taste of garlic, add it to food towards the end of the cooking process or fry it for 2-3 minutes, remove it from the pot or pan and set it aside until you want to add it to the food you are preparing. 
 
 
8. Over-cooking eggs
cooking mistakes
The mistake: Many people think that if the egg yolk looks gray after cooking it is a sign that the egg is spoiled. However, this color is not related to the quality of the egg, but to the time of cooking. An egg that cooks too long turns gray and rubbery. 
 
The fix: To maintain the color of egg yolks, remove the pot from the heat as soon as the water begins to boil, cover the pot and let the eggs remain in the water for another 10 minutes before you peel them. 
 
 
9. Not salting pasta
cooking mistakes
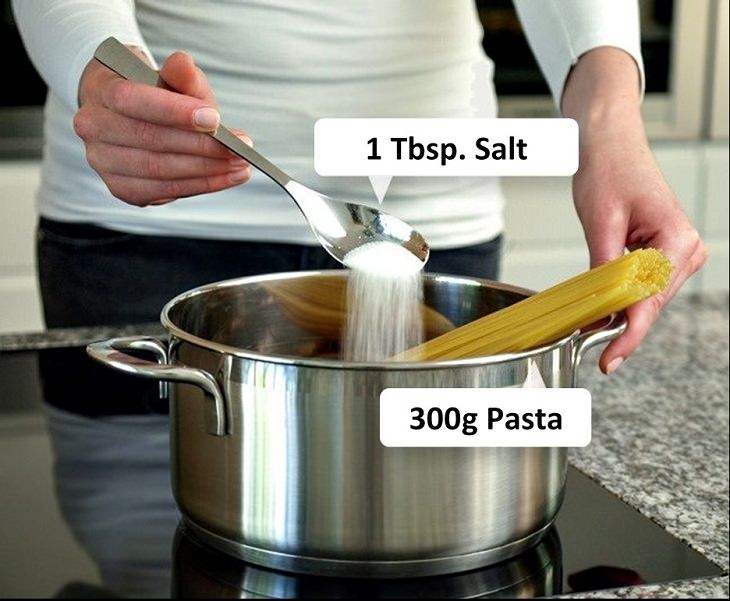
The mistake: Many people are afraid to over-salt their pasta, so they don’t add any salt, which makes it tasteless. Topping non-salted pasta with a delicious sauce won’t help in this case because unsalted pasta doesn’t absorb flavors like salted pasta does. 
 
The fix: In order to salt your pasta properly, use the following rule: Add one tablespoon of salt to every 300 grams of pasta. This way you can be sure that your pasta dinners will be full of flavor. 
 
 
10. Using dried herbs instead of fresh
cooking mistakes
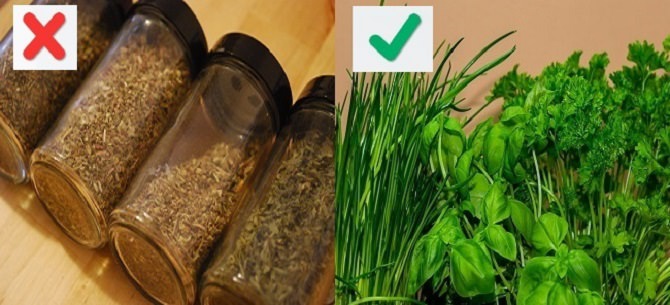
The mistake: When there are no fresh herbs in the house, we usually use dry, packaged substitutes, but this may ruin the taste of food. Drying herbs like parsley and basil causes them to lose their taste unlike drying oregano and tarragon which develops and enhances their flavors. Therefore, adding dried herbs instead of fresh causes the taste of food to either be too concentrated or not strong enough. 
 
The fix: If you get stuck without fresh herbs in the middle of cooking, consider the taste concentration of the spices mentioned above and add them to the dish accordingly. Also try to store fresh herbs in paper towels that absorb moisture, so that you always have fresh herbs on hand. 
 
 
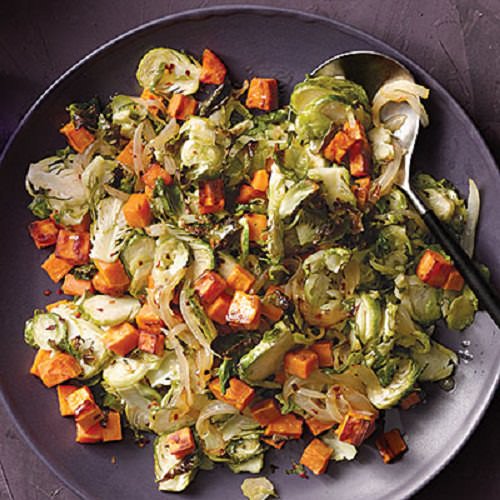
11. Frying moist spinach
cooking mistakes
The mistake: Frying wet vegetables for a hot and healthy side is a mistake. Frying vegetables such as spinach or arugula that still have water on them causes them to lose their crisp texture leading to them being soft, soggy and unpleasant to eat. 
 
The fix: To enjoy the wonderful taste of fried or stir-fried spinach, you should purchase a salad dryer, or absorbs the water from the vegetables with paper towels before cooking them. 
 
 
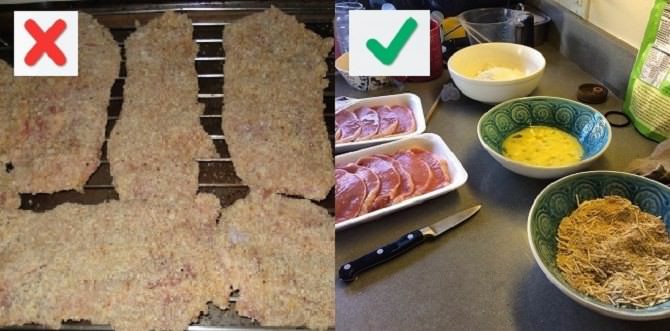
12. Crumbly coating of breadcrumbs
cooking mistakes
The mistake: Fried chicken with a crisp golden coating is a favorite dish especially for children and adults alike, but when preparing fried chicken, the coating of breadcrumbs does not always stick to the meat, and we get a half-coated piece. 
 
The fix: Try to make a crispy coating use the following method: First dunk the meat in flour, then in the egg and only after in the breadcrumbs. Fry the chicken in a well-heated pan with canola oil and get ready for the best breaded-chicken you’ve ever had.


https://gscrochetdesigns.blogspot.com. one can see my crochet creations  

https://cancersupportindia.blogspot.com. feel free to view for easy, simple and health tips  

https://kneereplacement-stickclub.blogspot.com. for info on knee replacement

https://GSiyers home remedies.blogspot.com     is the latest addition to my blogs.

Thursday, December 28, 2023

Choco-Nut Fudge

Ingredients


Cooking Steps

To prepare the ganache

In a vessel, bring fresh cream to a boil using the double boiler method.
After 2 minutes, with a whisk, mix the melted chocolate into the boiled cream to form a smooth paste. Allow it to cool for a few minutes.

To make the fudge

Crumble cake slices and set it aside.
Add the cake crumbs into the ganache and fold it in.
Add chopped nuts to this mixture and fold.
In a tray, line butter paper. Scoop out the mixture into balls and place it on the butter paper.
Now, place it in the fridge overnight.
Serve it chilled as dessert, the next day.

https://gscrochetdesigns.blogspot.com. one can see my crochet creations  

https://cancersupportindia.blogspot.com. feel free to view for easy, simple and health tips  

https://kneereplacement-stickclub.blogspot.com. for info on knee replacement

https://GSiyers home remedies.blogspot.com     is the latest addition to my blogs.

Baked Fried Rice Pie Casserole

Ingredients

  •  
  • \

Cooking Steps


Boil rice with peas and carrot. In another vessel, wash and boil the potatoes along with a pinch of salt. When the rice is done transfer it in a big bowl.
To the boiled rice, add salt, pepper, vinegar and sprinkle little herbs. Mix well and adjust all flavours according to your pallet.
Once the potatoes are boiled, take it out, peel off the skin and mash the potatoes well.


Now, add the boiled potatoes in a bowl. To it add milk, butter, salt, pepper, 1/4 tbsp vinegar and herbs. Using an electric hand whisker, whisk the ingredients well for few seconds at low speed.

To make the white sauce

Keep a small saucepan over medium heat and melt butter in it. Add flour and stir until the butter and flour combine well. Pour in the milk, stirring constantly as it thickens. Add more milk depending on the desired consistency.
Take one big glass baking bowl, at the base pour some white sauce. Top it with creamy potatoes, next put a thick layer of the prepared veg rice. Again repeat the same layer once more, top it with a thick layer of creamy potatoes.


Now, add grated cheese, chopped mushrooms, chopped olives, dry herbs and sprinkle some chilly flakes and sliced jalapeno as garnish.
Bake it in a preheated oven for around 15 minutes at 180° C or until you get a golden layer on top of your dish.

this isn't my recipe


https://gscrochetdesigns.blogspot.com. one can see my crochet creations  

https://cancersupportindia.blogspot.com. feel free to view for easy, simple and health tips  

https://kneereplacement-stickclub.blogspot.com. for info on knee replacement

https://GSiyers home remedies.blogspot.com     is the latest addition to my blogs.

Monday, December 25, 2023

Two-Colored Cookies


Ingredients: 
Butter - 1 stick (room temperature) 
 
Powdered sugar - 1/2 cup 
 
Corn flour - 1/2 cup 
 
Oil - 1/2 cup 
 
Vanilla sugar - 2 1/2 tsp. 
 
Baking powder - 1 tsp. 
 
Flour - 2 cups 
 
Cocoa powder - 1 tbsp. 
 
Chocolate chips - 1/2 cup (optional)


Method of Preparation:  
 
Preheat your oven to 320°F (160°C) and line a pan in baking paper. Add all the dough ingredients to the mixer bowl, except for the cocoa powder, and stir until smooth dough is reached. 
 
Divide the dough into two equal parts. Now return one part of the dough to the mixer bowl and add in the cocoa powder. Turn on the mixer and knead until the dough turns a uniform brown. 
 
Wrap both dough balls in saran wrap and cool in the freezer for about 10 minutes, then roll each ball into a long snake about an inch thick. Cut each snake into 1-inch pieces and roll them into balls, making sure that the number of white balls is equal to the brown balls. 
 
After rolling both dough into smaller balls, place a white ball on your work surface followed by a brown ball. Then place a white ball and then a brown ball and repeat again with a third ball of the two colors to form a hoop or a flower.
preperation

Now press the dough with both thumbs and two fingers and tighten the balls together.
preperation

Place the dough on the palm of your hand, press a few chocolate chips in the middle, and roll the dough in one direction in a circular motion until you create a ball with two slightly mixed colors that looks like a rose or a spiral. 
 
Place the cookie on the pan and continue to do the same with the rest of the dough. Place the pan in the oven for 15-20 minutes or until the white dough turns golden, remove from the oven and cool before serving.

Chef's Tip: Instead of coloring one part of the dough with cocoa powder, you can use instant coffee powder instead or natural food coloring to create other color combinations. 
 
this isn't me recipe, seeing something unique n simple wanted to share with all.

https://gscrochetdesigns.blogspot.com. one can see my crochet creations  

https://cancersupportindia.blogspot.com. feel free to view for easy, simple and health tips  

https://kneereplacement-stickclub.blogspot.com. for info on knee replacement

https://GSiyers home remedies.blogspot.com     is the latest addition to my blogs.

Saturday, December 23, 2023

Root Vegetable Salad

This dish is something light that will keep you warm but not cause you to lapse into a comatose nap. This roasted sweet potato salad is just what you need to be full without being sleepy.

Root Vegetable Salad   

Ingredients: 
 
Brussels sprouts - 9 cups (trimmed and thinly sliced) 
 
Sweet potato - 2 medium (peeled and cut into 1/2-inch cubes) 
 
Onion - 1 medium (sliced) 
 
Apple cider vinegar - 2 tbsp. 
 
Dijon mustard - 2 tsp. 
 
Honey - 1 tsp. (alternative: maple) 
 
Olive oil - 1/4 cup (plus more for baking sheets) 
 
Red pepper flakes - 1 tsp. 
 
Salt and Pepper - as needed 
 
Method of Preparation: 
 Preheat the oven to 450°F. Line two large racks with baking paper or foil, brushing lightly with oil. Toss the Brussels sprouts, sweet potato and onion with 2 tbsp. oil, red pepper flakes and salt. Arrange on a baking sheet and roast in the upper and lower thirds of the oven, stirring occasionally. Vegetables should be golden brown and tender (20 to 25 minutes). 
 
Then, in a large bowl, whisk the vinegar, mustard, honey and remaining 2 tbsp. oil. Add the vegetables, toss to coat and serve. 
 

Tip: Top with a tablespoon of roasted, salted sunflower seeds. 


https://gscrochetdesigns.blogspot.com. one can see my crochet creations  

https://cancersupportindia.blogspot.com. feel free to view for easy, simple and health tips  

https://kneereplacement-stickclub.blogspot.com. for info on knee replacement

https://GSiyers home remedies.blogspot.com     is the latest addition to my blogs.


Roasted Fennel and Beet Salad

Get this great roasted vegetable salad to warm your day while giving you the freshness of a great salad. One of the stars in this salad is radicchio. 
 
While it looks very similar to the red cabbage, radicchio has a much bitter taste.
Radicchio: Nutrition, Benefits, and Uses

Radicchio

It is grown as a leaf vegetable and usually has colorful, white-veined red leaves that form a head. Radicchio has a bitter, spicy flavor, especially when eaten raw. It's often paired with sweet or acidic ingredients to make a salad with balanced flavors. When cooked, radicchio mellows and gains some sweetness while still retaining a little bitterness.
 
What is a substitute for radicchio?
And these alternatives should work well in recipes calling for radicchio:
  • Belgian Endive.
  • Curly Endive.
  • Italian Chicory.
  • Romaine Lettuce.
  • Red Leaf Lettuce.
  • Arugula.
Ingredients: 
 
Fennel - 2 whole bulbs (tops removed) 
 
Salt and Pepper - to taste 
 
Orange - 2 medium 
 
Greek Yogurt - 1/2 cup (plain, full fat) 
 
Tahini - 2 tbsp. (divided) 
 
Lemon juice - 1 tbsp. (fresh) 
 
Cumin - 1/4 tsp. 
 
Garlic - 1 small clove (minced) 
 
Radicchio - 1 cup (sliced) 
 
Beets - 4 small (cooked and cut into wedges) 
 
Walnuts - 1/4 cup (toasted) 
 
Olive oil - 1 tbsp. 
 
 
Method of Preparation: 
Preheat the oven to 450°F, place a rack in the middle, lining it with foil or baking paper. Meanwhile, slice the fennel bulbs in half, lengthwise, through the root end. Then, using half the bulb, thinly slice 1 half crosswise and transfer to a large bowl. With the remaining halves, quarter the fennel lengthwise, making 12 wedges. 
 
Toss the wedges in oil and 1/4 teaspoon salt and pepper. Place the wedges in a single layer and roast, turning once until golden brown on each side. The cauliflower should be tender in about 25 to 30 minutes. Meanwhile, remove the tops and bottoms from the oranges. Remove the peel and pith with a small paring knife, cutting from top to bottom all around. Remove each orange segment, including skins and seeds and add to a bowl. 
 
Then, whisk yogurt, tahini, 1 tablespoon lemon juice, cumin, garlic, salt and pepper in a small bowl. Add the radicchio, roasted fennel and remaining lemon juice to a bowl with fennel slices and orange segments. Toss gently. 
 
Spoon half of the yogurt mixture onto 4 plates, dividing the salad evenly, topping with beets and walnuts. Serve the remaining yogurt mixture on the side. 
 
Tip: You can swap the oranges with small pink grapefruit or blood orange. If you can't find radicchio, try using endive, arugula, or chicory instead. 
 
https://gscrochetdesigns.blogspot.com. one can see my crochet creations  

https://cancersupportindia.blogspot.com. feel free to view for easy, simple and health tips  

https://kneereplacement-stickclub.blogspot.com. for info on knee replacement

https://GSiyers home remedies.blogspot.com     is the latest addition to my blogs.
 

Roasted Cauliflower-Quinoa Salad

This great winter salad can be completely vegetarian or can have some shredded rotisserie chicken in it. The second option leads to a perfect blend of savory and sweet, heat and cool. Perfect for any winter's day. The vegetarian option is ever lighter but just as delicious.
Roasted Cauliflower-Quinoa Salad
Ingredients: 
 
Cauliflower - 1 head (cut into 1-inch florets) 
 
Seedless red grapes - 2 1/2 cups 
 
Quinoa - 1/2 cup 
 
Greek Yogurt - 1/2 cup (plain (full fat)) 
 
Curry powder - 1/2 tsp. 
 
Cumin - 1/4 tsp. 
 
Lime juice - 2 tsp. (fresh) 
 
Cilantro - 1/4 cup (chopped) 
 
Cashews - 1/4 cup (unsalted, roasted)
 
Rotisserie Chicken - 2 cups (shredded, optional) 
 
Olive oil - as needed 
 
Salt and Pepper - as needed 
 
Method of Preparation:  
 
Preheat the oven to 450°F and line a baking tray with foil or baking paper. 
 
Combine the cauliflower and 2 cups grapes with 1 tablespoon oil. Roast the cauliflower, stirring occasionally. The grapes should be slightly wilted and the cauliflower golden brown and tender - 25 minutes in total. 
 
In a small pan, stir 1/2 teaspoon salt with 1 cup water and bring to boil over medium-high heat. Add the quinoa and simmer. Cover and cook until all the liquid has been absorbed and the quinoa is tender - 15 minutes. When done, remove from the heat and let it sit (covered) for a couple of minutes. 
 
Then transfer the quinoa to a medium bowl. 
 
Halve the remaining grapes and pulse in a food processor. Add yogurt, curry, cumin, lime juice and remaining oil, 1/4 teaspoon salt and 1/2 teaspoon pepper. The mixture should be slightly chunky. 
 
 Then, combine the quinoa with 3 tablespoon dressing and cilantro. 
 
Divide equally among 4 plates and top with cauliflower, cashews and chicken (if using). 
 
Drizzle the remaining dressing and serve. 
 
Tip: If you've got some left-over cauliflower stem from this recipe, don't throw it away. Peel, chop it up and add to a stir-fry. Or it can be added with any vege you're making with dal also.


https://gscrochetdesigns.blogspot.com. one can see my crochet creations  

https://cancersupportindia.blogspot.com. feel free to view for easy, simple and health tips  

https://kneereplacement-stickclub.blogspot.com. for info on knee replacement

https://GSiyers home remedies.blogspot.com     is the latest addition to my blogs.

Friday, December 22, 2023

You can grow your own chikoo/ sapota, avocado also.

 Just plant the chikoo seeds  and see it grow. I've planted avocado for the first time, the nut inside I had soaked hoping roots will grow, as it didn't, told the gardener plants it, he said, as he was going to plant it, it broke into 2 and he has planted them, waiting for them to grow. Also gave jackfruit seeds to grow.


https://gscrochetdesigns.blogspot.com. one can see my crochet creations  

https://cancersupportindia.blogspot.com. feel free to view for easy, simple and health tips  

https://kneereplacement-stickclub.blogspot.com. for info on knee replacement

https://GSiyers home remedies.blogspot.com     is the latest addition to my blogs.

To grow turmeric and how to make turmeric powder

 It is a plant normally harvested during the Pongal time in the South India, while Makar Sankarantri. In the south, a special brass vessel is well cleaned, then  churna ( the white one used in pan) all around the vessel where it has like a rim, then kumkum is applied, then the whole turmeric plant with fresh turmeric piece in it is tied and Pongal is cooked.

I learned from a man here, after the pongal is cooked and naivedya/ offering is done to the Gods, it is removed and he said now small pieces of turmeric with roots you plant, by next year, I can have my own plant. Since 4 years was growing, earlier only few plants, last year, I had about 25 plants left after that many stealing many. I asked the gardener to dig and take out all the turmeric pieces. It was well cleaned in water till all the mud goes off. Then you cut into small pieces, boil want, put in boiling water for 3 minutes, remove, strain well. Dry them well on a cloth till well dried. Then you can powder and get your own organic turmeric powder. I got roughly 300 gm + powder which I divided into 2 bottles for daughter and daughter-in-law, but the latter forgot to take it, gave it to daughter. Sad, this year, less plants, as part of the area is cemented !


https://gscrochetdesigns.blogspot.com. one can see my crochet creations  

https://cancersupportindia.blogspot.com. feel free to view for easy, simple and health tips  

https://kneereplacement-stickclub.blogspot.com. for info on knee replacement

https://GSiyers home remedies.blogspot.com     is the latest addition to my blogs.


Easy to grow pineapple

 I love pineapple, if you give me only pineapple to eat for the day, I'm very happy. I love the pineapple juice, but firmly believe that by drinking juice, we're wasting the good fiber, by eating the fruit whole, it will make you feel with the fiber.

After cutting the top part of the pineapple with the leaves, soak in water, changing it daily for 3-4 days, you can see small roots must have started, at times, even if it hasn't come, you can plant it after 3 days. Water it regularly, not over watering. It takes long for the fruit to come. I was so happy to see my 1st fruit, though it was small, it was half ripe, thought that I'll pluck it the next day. Unfortunately due to my husband's illness, I forgot, after 2 days went to get,😓😧 someone had stolen my pineapple. Many people were eyeing it. I asked the gardener, he said that he doesn't eat any fruit, then who? A sly guy who used to roam around searching for fruits and plants to steal. He used to steal my turmeric plants too.

Now, I've planted them in the front so, I can keep an eye on them, hopefully!


https://gscrochetdesigns.blogspot.com. one can see my crochet creations  

https://cancersupportindia.blogspot.com. feel free to view for easy, simple and health tips  

https://kneereplacement-stickclub.blogspot.com. for info on knee replacement

https://GSiyers home remedies.blogspot.com     is the latest addition to my blogs.

A Conversion Guide For Simple Cooking

Have you ever tried cooking something out of a recipe book and the instructions just didn't make sense? Well have no fear, for your troubles are over. With these simple and straight forward fact sheets cooking becomes much easier. These handy lists are great for printing and hanging in your kitchen to help you find the right amount, and the right way, to cook almost anything.

First, if you need some help with your mixer, use this handy chart:
A Must Have Kitchen Cheat Sheet For Any Recipe.
Then, a very helpful chart for volume conversions

cooking help


https://gscrochetdesigns.blogspot.com. one can see my crochet creations  

https://cancersupportindia.blogspot.com. feel free to view for easy, simple and health tips  

https://kneereplacement-stickclub.blogspot.com. for info on knee replacement

https://GSiyers home remedies.blogspot.com     is the latest addition to my blogs.


Anti-Reflux Smoothie

 To know more about heartburn, acid reflux, other natural remedies, what to eat, what to avoid, kindly see my home remedies blog

 14 Natural Solutions for Stomach Ulcers and Heartburn

Anti-Reflux Smoothie

1 cup diced fresh pineapple 
 
• 1 cup diced fresh papaya 
 
• 1/2 cup Greek yogurt 
 
• 1/2 cup ice 
 
• 1/2 cup pineapple juice or water 
 
• Blend it all together and drink.

https://gscrochetdesigns.blogspot.com. one can see my crochet creations  

https://cancersupportindia.blogspot.com. feel free to view for easy, simple and health tips  

https://kneereplacement-stickclub.blogspot.com. for info on knee replacement

https://GSiyers home remedies.blogspot.com     is the latest addition to my blogs.