Friday, November 23, 2018

Natural DIY Cleaning Products

1. All purpose cleaner- 
Ingredients
baking soda 2 tsp
dish soap 1 tsp
white vinegar  4 tbsp
warm water 1 3/4 cup
stir all well to mix, store in a spray bottle to use.

2. Glass cleaner
Ingredients
rubbing alcohol  1/4 cup
white vinegar   1/4 cup
corn starch  1 tbsp
warm water  2 cups
stir to mix, pour in a spray bottle to use.

3. Tub cleaner
Ingredients
grapefruit  1/2 cup
kosher salt   1/4 cup
place salt on grapefruit half and scrub the tub !

4. Dusting spray
Ingredients
Olive oil  2 tsp
lemon juice  1 tsp
white vinegar  1/4 cup
warm water   1 cup
stir well to mix, store in a spray bottle to use.

5. Toilet bowl cleaner
Ingredients
baking soda  1/4 cup
borax  1/4 cup
white vinegar  1 cup
place the ingredients directly in the toilet. Mix gently with toilet brush, let it sit for 30 minutes, then scrub well.

For my other blogs, I'm giving the links below, feel free to view and comment too.

https://cancersupportindia.blogspot.com. for all cancer and health related topics
https://gseasyrecipes.blogspot.com. feel free to view for easy, simple and healthy recipes
https://kneereplacement-stickclub.blogspot.com. for info on knee replacemen

How To Get The Best Results From Your Cookware

Now-a-days cookwares cost a lot of money. So, we've to be careful how best we can take good care of them. I'm sure that most will agree that we can't afford to keep buying new sets of pots and pans each year. So, here are some ways as to how best we can take good care of them and use the right type for our cooking !

1. Do Not Over-heat- aluminum, copper, steel ( not stainless) and iron react with food. This results in chemicals being released during cooking- not ideal over time. Non-reactive materials include stainless steel,  enamel and ceramics.

2. Control Temperature- Cooking is all about conducting heat and some materials are much better ( copper, aluminum) are much better than others ( stainless steel, cast iron). Good heat conductors cook more evenly and react faster to temperature changes.

3. Balance reactivity with conductivity- Combining materials can bring together the best properties of different materials. For e.g., stainless steel pots ( non-reactive) with copper bottom ( for improved conduction).

4. Beware non-stick can be toxic- Non-stick cookware can contain substances that when heated release toxic particles and gases.  These have been linked to many health problems.

5. DIY non-stick cookware- Cast iron and some stainless steel pans can be made non-stick through a simple process of seasoning. This involves coating the pan with oil and heating it to form a non-stick surface that will last for years !

6. Keep it clean naturally- Get stains off, even on baked ones, using natural cleaners like baking soda, vinegar, lemons, salt and boiling water. A combination of these will work every time.

7. Quality and quantity- Buy a smaller number of good quality pans, rather than a cheap set of 20, which won't get used or last.

8. Smart storage- save space, keep pots and pans in top condition longer.Search online for DIY  organizing ideas or invest in some simple racks and shelves.

9. Care and maintenance- Different cookware require different care and maintenance. Understand how to clean and maintain it for optimal results.

10. Use it or lose it-  The more you cook, the better you'll get to know how your cookware performs and if it's right for you. If it isn't, then donate / swap or give it away and replace with something better.
raw-cast-iron-vs-enamel-cast-iron-infographic

Simply mix up a paste of baking soda and water and apply with a Magic Eraser. If you’d like to make your own and save dollars.

Wash your Dutch Oven or Enamel Cook-pot as normal with a sponge and dish soap. You only want the burnt on bits of food and stubborn stains to clean.

Make sure you soak the Eraser in water first before you start scrubbing. Your solution should be equal proportions of water and baking soda. Apply with a ball of scrunched up paper towel. You won’t believe how well this works and there’s no hard scrubbing. 

For my other blogs, I'm giving the links below, feel free to view and comment too.

https://cancersupportindia.blogspot.com. for all cancer and health related topics
https://gseasyrecipes.blogspot.com. feel free to view for easy, simple and healthy recipes
https://kneereplacement-stickclub.blogspot.com. for info on knee replacemen


Benefits Of Using Cast Iron To Cook

1. You use less cooking oil.- When you use a cast iron skillet, you do not need to as much oil, due to its non-stick surface. You don't have to worry about food clinging on to the surface.

2. Cast irons are chemical free- compared to many alternative non-stick pans, cast iron  do not contain PCF's ( perfluorocarbons), a chemical that is known to be linked to developmental problems and liver damage.

3.Easier to clean-  you do not use a soap or a dishwasher to clean a cast iron because you want to keep as much of the coating and seasoning as possible. You simply use hot water and a gentle brush to clean.

4. You can bake your food in cast iron- Unlike metal pots, you can bake your goodies to perfection in a cast iron skillet as it distributes heat evenly to give you perfect crusting and no sticking.

5.Retains and keeps heat- Due to its thickness and weight, a cast iron takes longer to heat up. But once heated, its thickness retains heat longer, allowing you to simmer and cook food to your perfection.

6.It is durable- A cast iron can last for years as it is built to last, as an added bonus, it saves you time and money for having to buy numerous skillets and pans.

For my other blogs, I'm giving the links below, feel free to view and comment too.

https://cancersupportindia.blogspot.com. for all cancer and health related topics
https://gseasyrecipes.blogspot.com. feel free to view for easy, simple and healthy recipes
https://kneereplacement-stickclub.blogspot.com. for info on knee replacemen

Thursday, November 22, 2018

Surprising Uses for Cream of Tartar

Cream of tartar, which is actually a byproduct of the winemaking process, is an acidic powder that is typically used in baking to stabilize eggs and creams, as well as adding volume and thickness to the final product. But I recently discovered that baking is just the tip of the iceberg with this inconspicuous powder!
The acidic nature of cream of tartar also makes it an excellent non-toxic cleaning agent for all sorts of jobs around the house, and can even be used to ward off bugs and treat laundry stains! After finding all of these great ways to use cream of tartar, I promise I’ll never take that little can for granted again!

Deter Ants

If ants are gathering on your driveway or sidewalks, sprinkle some cream of tartar to deter them away from the area.

Tackle Tough Jobs

Add hydrogen peroxide to a small bowl of cream of tartar, just enough to make a paste. Rub the paste on tough stains like rings in the bathtub, tough spots in the kitchen, and spills in the fridge. Allow the paste to dry out before wiping, then rinse the surface with water.
Uses for Cream of Tartar

Stain Remover

Make a paste of cream of tartar mixed with lemon juice to lift stains on clothing and carpets. Let the paste sit for an hour or two, then either machine wash as usual, or blot with a damp cloth. This mixture works well on ink stains!
Uses for Cream of Tartar

Kitchen Cleaner

Make a paste of cream of tartar mixed with white vinegar to make a great all-purpose kitchen cleaner. Use it on burner pans, grout lines, ovens, sinks, and to clean up mold and mildew. Store in a squeeze bottle for easy application.
Uses for Cream of Tartar

Collar Stains

Apply cream of tartar directly to stains around shirt collars. Dampen the collar area with water, sprinkle with cream of tartar, then rub the powder into the stain. Launder as usual.
Uses for Cream of Tartar

Scratched Dishes

Make a paste of cream of tartar and water to scrub away scratches or stains on your dishes and mugs. Simply apply the paste, scrub with your fingers or a sponge, and rinse with water. (Barkeeper’s Friend would be more effective, but if you have cream of tartar on hand, it’s good in a pinch!)
Uses for Cream of Tartar

Coffee Pot

Clean stains and residue out of your coffee pot by sprinkling cream of tartar inside. Add boiling water to fill the pot, let the pot cool to room temperature, and rinse well.
Uses for Cream of Tartar

Make Baking Powder

Make your own baking powder by mixing one part baking soda with 2 parts cream of tartar. (The resulting baking powder is gluten free, unlike several brands you find in stores!)
Uses for Cream of Tartar

Homemade Playdough

Make homemade playdough by mixing 1 cup of flour, 1 cup water, 1 cup salt, 1 tablespoon vegetable oil, 1 tablespoon cream of tartar, and 3-5 drops of food dye (optional). Add more flour if the mixture is wet or sticky, or add more water if the mixture is too dry.
Uses for Cream of Tartar

Shine Stainless Steel

Clean and shine your stainless steel appliances using a mixture of 1 cup of white vinegar and 1/4 cup of cream of tartar. Dip a sponge into the mixture, scrub your stainless steel, then wipe clean with a clean, damp cloth. (Buff with a microfiber cloth for extra shine!)
Uses for Cream of Tartar

Clean Silver

Clean tarnished silver using cream of tartar and a damp magic eraser (one of my very favorite cleaning tools). This can be used on silver trays, dishes, and utensils.

Rust Remover

Create a handy rust remover by mixing 1 teaspoon of cream of tartar, 1/4 cup baking soda, and add just enough hydrogen peroxide to form a paste. Apply the paste to a rust spot, let it sit for 30 minutes, then wipe the surface clean.
Uses for Cream of Tartar

Clean Up Copper

Clean up copper pots and pans using a mixture of 2 tablespoons of cream of tartar and 1 tablespoon of lemon juice. Rub the mixture onto the copper surface and wipe clean with a damp cloth.

Keep Veggies Colorful

Adding a 1/2 teaspoon of cream of tartar to a pot of boiling vegetables can help retain their vibrant color.
meringue

Meringue Miracle

Add an 1/8 teaspoon of cream of tartar for each 2 egg whites in your meringue. The acid from the cream of tartar will stabilize the egg whites and add volume to your finished product.

Clear Clogged Drains

To clear built up hair and gunk from your drains, mix together 1/4 cup of baking soda, 1/4 cup of salt, and 1 tablespoon of cream of tartar. Pour the mixture into the drain and add 1 cup of water. Allow it to sit for 30 minutes or so, then run hot water through the drain.
fireplace

Sweep Away Soot

A sooty fireplace can be cleaned up using a mixture of cream of tartar and water. Dip a cloth or sponge into the mixture, wipe away the soot, then follow with a clean, damp cloth.

Pre-treat Whites

Keep your whites extra bright by pretreating them with a cream of tartar soak. Add a teaspoon of cream of tartar to a quart of water, and soak your whites before laundering.

toilet

Toilet Touchup

Keep your toilet looking clean between regular cleanings by sprinkling cream of tartar into the bowl and giving it a quick scrub with your toilet brush.

For my other blogs, I'm giving the links below, feel free to view and comment too.

https://cancersupportindia.blogspot.com. for all cancer and health related topics
https://gseasyrecipes.blogspot.com. feel free to view for easy, simple and healthy recipes
https://kneereplacement-stickclub.blogspot.com. for info on knee replacemen

Monday, November 5, 2018

How to remove pesticides from your fruits and vegetables

It is quite possible that the vegetables you and I buy from the local market, are laced with pesticides. Consumers are increasingly becoming concerned that these harmful chemicals are present in a worryingly high dose. Before cutting or cooking any vegetable, we are taught to thoroughly wash them with tap water, so that these chemicals get washed away, making the vegetable safe for consumption.

However, a study conducted  found that tap water was ineffective in ridding the vegetable of excess pesticide residue.

Another person reports that he has reportedly found a more effective method which can be used to clean vegetables at home.

In the study, a researcher found that tap water was only 17-39% effective in ridding vegetables of pesticide residue. In comparison, mixing 160 ml of acetic acid (commonly found in vinegar or bought over the counter) with 4gms of baking soda and lemon juice from 4 lemons in 4 litres of water, followed by washing the vegetables with tap water could reduce the amount of pesticide residue in vegetables by 55-76%.

 “The effectiveness of Veggy wash was checked on five pesticides—Dimethoate, lambda-Cyhalothrin, Flubendiamide, and Profenophos which are widely used by farmers on the tomato, a vegetable that finds high usage in Indian cooking as well as in salads for raw consumption. While the tomato was the main focus of the published study, these five pesticides find wide usage in other vegetables as well,” it was  reported.

For my other blogs, I'm giving the links below, feel free to view and comment too.

https://cancersupportindia.blogspot.com. for all cancer and health related topics
https://gseasyrecipes.blogspot.com. feel free to view for easy, simple and healthy recipes
https://kneereplacement-stickclub.blogspot.com. for info on knee replacemen

Sunday, November 4, 2018

Ways to Use Liquid from Your Canned Goods

Most people who use canned goods believe there's nothing to do with the liquid left in them and, without thinking twice, pour it all down the drain. However, these liquids can be used up to the last drop as a basic ingredient in almost any food wimaginable, such as sour sauce, a stew, or a sweet dessert. That is why We’ve collected 10 ideas for you to learn how to make the most of the liquid in your canned goods.

1. Canned white beans - meringue kisses 

The ultimate meringue is usually made from two ingredients: eggs and sugar. If you want to try a new recipe or you suddenly find yourself without eggs, you can use the liquid from canned beans. The liquid left in every can of white beans (or chickpeas) is famous as a cheap and accessible ingredient that could replace eggs in any baking recipe, from pies and breads to cookies and cakes. For meringue, many recommend using white bean juice because the resulting flavor is milder and also blends better with sugar substitutes (like stevia), unlike canned chickpea liquid.
Ingredients:
  • Liquid from one can (570 g) of white beans
  • About ½ cup sugar (depending on the desired texture)
  • 1 teaspoon vanilla extract (optional)
  • Food processor or hand mixer
Instructions:
1. Beat the liquid for about 3 minutes with a whisk or mixer at high speed until the mixture becomes white and shiny.
2. Add the sugar into the mixture while stirring slowly until it becomes airy (once you’ve reached the desired texture, stop adding sugar).
3. Add a teaspoon of vanilla extract.
4. To prepare meringue kisses, heat your oven to 350 ° F (180 ° C) and line a baking pan with parchment paper.
5. Using a small spoon or piping bag, place your kisses 4 cm apart and bake for half an hour.
6. Check to see if the meringue has lightly browned. If necessary, leave it in the oven and continue checking at intervals of 10 minutes until the desired color is reached.
7. Turn off the oven and leave the pan to cool in the oven overnight.
canned goods

2. Canned tomatoes – sauce base

Whether you use canned or crushed tomatoes, you may find yourself with leftover juice that usually gets drained into the sink or spills across the countertop. Before you rush to throw away the liquid, remember that this wonderful juice can miraculously improve the flavor of countless dishes. For example, you can pour it over rice and couscous, add it to pasta sauce, use it as a base for gazpacho, or as a sauce for healthy, nutritious vegetable salad. All you need to upgrade your dish right now is to replace the amount of water written in the recipe with the same amount of liquid from the canned tomatoes.

3. Tuna - an addition to your pet's meal 

Tuna is usually canned in two types of liquid: water and oil. With the help of oil, you can improve the taste of a number of dishes such as pasta, tuna cannelloni or an Asian flavored wrap. If your tuna is canned in water you can use that water to upgrade your pets’ food. Note that canned tuna oil is usually soybean oil and may harm your pet, so only use canned tuna water. Pour it on their food and you’ll see them savoring every bite.

4. Canned Corn - Corn Soup

Not only can the liquid from canned chickpeas or beans produce wonderful foods. the corn liquid should be kept for cold winter days, especially if you like warm, easy-to-make soups.
Ingredients:
  • Canned corn (550 grams - with the liquid)
  • 1 tablespoon cornstarch or flour
  • 2 cups boiling water
  • 1 tablespoon dry soup mix 
  • Salt and pepper for seasoning
  • 1 egg, a teaspoon of soy sauce and a teaspoon of sugar (optional)
Instructions:
1. Drain the corn kernels and lightly blend in the food processor.
2. place the blended corn and corn liquid into a pot, add the spices with 2 cups of water and wait for the boil.
3. In the meantime, mix the cornstarch or flour with a half cup of water until smooth.
4. After boiling, add the mixture and continue cooking for about 10 minutes until it becomes thick.
To upgrade to Chinese corn soup, add a teaspoon of soy and a teaspoon of sugar. When the soup is ready, mix an egg in a bowl and drip it into the soup while it is hot until the egg turns white.

Canned chickpeas

Instead of spilling out the canned liquid into the sink or trash, using basic ingredients in every kitchen, you can make the sauces and desserts we all enjoy:

5. Homemade mayonnaise

Using the liquid from canned chickpeas you can improve your diet and make homemade mayonnaise. This recipe is quick and easy, and tastes just like regular mayonnaise!
Ingredients: (for 2 cups)
  • 1 tablespoon of vinegar
  • ½ teaspoon minced mustard
  • ½ teaspoon salt
  • 3 tablespoons canned chickpea liquid (room temperature)
  • 1 ½ cups oil with a neutral flavor (coconut oil or grapeseed oil)
Instructions:
1. Mix the vinegar, mustard, salt and 3 tablespoons of canned liquid with a hand blender for 2 seconds.
2. After you finish stirring, gradually pour a quarter cup of oil and continue blending.
3. Be sure to move the blender around the bowl with rotating movements until the mixture is airy.
4. Transfer to a jar and refrigerate.
Tip: Toward the end of mixing, add a little maple syrup instead of vinegar (or in addition to) to get some light sweetness.
canned goods

6. Chocolate Mousse

To make this dessert, all you need is a little salt, sugar, chocolate, and liquid from one can of hummus. This recipe is especially suitable for those who want a light, airy and tasty chocolate mousse without soy, nuts, gelatin or eggs.
Ingredients:
  • About 125 ml of canned humus liquid
  • 100 grams dark chocolate (over 60% cocoa)
  • 1-2 teaspoons of stevia or powdered sugar
  • Pinch of salt
  • Hand mixer
Instructions:
1. With the help of a Ban Marie (pot over a pot of hot water) melt the dark chocolate and then let it cool off slightly on the side.
2. Beat the canning liquid with a hand mixer until it’s airy.
3. Add the rest of the ingredients except the chocolate and beat again for about 15 seconds until a uniform texture is obtained.
4. Using a spatula, slowly add the melted chocolate into the mixture.
5. Let the mixture stand for a few minutes, transfer the mousse to a container and store it in the refrigerator or use it as a frosting for a cake.
Tip: To avoid lumps when adding chocolate to the mixture, add a teaspoon of vanilla extract into the chocolate and only then add it to the liquid mixture.

Canned pineapple

We don’t always throw out the pineapple juice leftover from canned pineapple, instead we usually drink it, however, it can be used in other ways as well. The juice is not only a refreshing addition to drinks, syrup, marinades or water, it is also an excellent substitute for liquids that appear in recipes for muffins, ice cream, and fruit salad.

7. Pineapple syrup

This syrup is recommended for dazzling over every sweet dessert because it contains small pieces of pineapple and also because it is simple and wonderful!
Instructions:
1. Before preparing, it is recommended to place the liquid in the fridge for several hours. This will make it easier to mix it with cornstarch later on.
2. Add about 4 tablespoons of cornstarch (56 g) to each cup of pineapple juice.
3. Mix and boil in a pot over medium to high heat until it thickens.
4. The prepared syrup should be cooled for several hours and drizzled over ice cream, cakes, pudding or pancakes.canned goods

8. Teriyaki sauce

This light teriyaki sauce can be adapted to any stir-fried noodles or rice recipe.
Ingredients:
  • 2 cups of canned pineapple juice
  • ½ cup soy sauce
  • 2 teaspoons of grated ginger
  • 1 teaspoon coarse salt
  • 1 clove garlic
  • ¼ cup brown sugar
Instructions: 
1. Mix all the ingredients in a bowl until thick.
2. If the sauce is still runny, carefully add some more soy and sugar.
3. Finally, store the sauce in the refrigerator.

Canned olives 

Jars of pickles are filled with salty liquid, used, among other things, for preservation. While we may sometimes use pickle juice in salad dressings, olive juice usually gets tossed into the sick. However, this liquid can be very useful when we need a substitute for vinegar or a more dominant seasoning.

9. Substitute for vinegar

According to the label affixed to olive cans, the ingredients of the liquid are actually a combination of oil, vinegar, salt, and dried herbs, so it can be used for any dish that requires vinegar. Recipes that best benefit from this added liquid are Mediterranean dishes and salads.

10. Ice cubes for martinis

Even those who don’t usually enjoy gin cocktails and martinis know that the taste of the olive is as important as the drink itself. That's why you should try this at your next dinner or when you just want to relax after a hard day's work. Fill an ice tray with olive juice and freeze. The next time you make yourself a martini add this cool ice cube which will amp up your cocktails taste immediately!
  
For my other blogs, I'm giving the links below, feel free to view and comment too.

https://cancersupportindia.blogspot.com. for all cancer and health related topics
https://gseasyrecipes.blogspot.com. feel free to view for easy, simple and healthy recipes
https://kneereplacement-stickclub.blogspot.com. for info on knee replacemen


11 Tips, Tricks, and Advice for Using Avocado

It is dark green on the outside, light green on the inside, when ripe and good to eat it has a smooth, creamy texture, and there are many who consider it a royal delicacy - yes, you’re not mistaken, this is of course avocado. This favorite fruit (yes, fruit!) originated in South America, but today is grown and sold all over the world. Here are 11 tips, tricks, and advice on how to use avocados to help you understand how you can quickly ripen it, check it for ripeness, and how to combine the avocados in your meals easily, conveniently and aesthetically.

1. To help it ripen, pack the avocado in a paper bag with a banana or an apple

If you bought a fresh avocado that is not yet ripe enough to eat, there is a simple solution that can help you quicken its ripening. Just place the avocado into a paper bag along with a banana or an apple, and wait a few days; Both of these fruits release a gas which helps the avocado ripen faster, and the bag itself helps in gas absorption and speeds up the process.

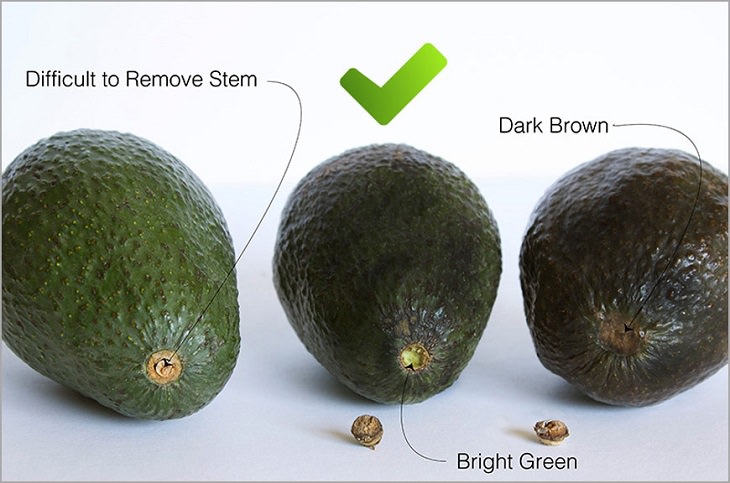
2. Remove the avocado stem to check its ripeness

The stem at the top of the avocado can be gently pulled out to examine the color of the avocado from the inside; If the color you see is yellow or green it indicates that your avocado is ripe and ready to eat, but if the inner color is brown, it means that the fruit is no longer edible and should be thrown out.
avocado

3. Wash your avocado before peeling it

There may be those who will find this bit strange or unnecessary - why wash a fruit before removing its peel which I’m not even going to eat? But know that this is a very important step, that if you skip you risk putting various harmful substances in your body through the avocado. The avocado peel is indeed hard and impenetrable, however, the bumps on it can provide fertile ground for the development of parasites and bacteria. If you don’t wash it before peeling, you may transfer these parasites to the fruit itself through the knife. Therefore, make sure that before you remove the avocado peel, you rinse it thoroughly with a bit of cold or lukewarm water.

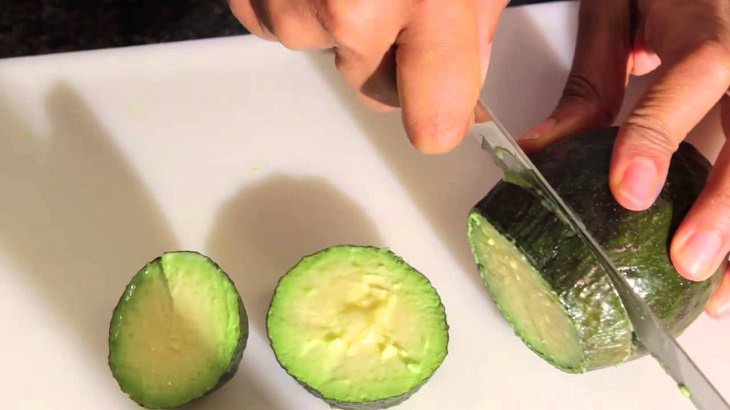
4. Cut your avocado widthwise rather than lengthwise

Many people cut their avocados lengthwise, and if you’re one of these people - you may want to rethink your method, at least if you want to make it easier for yourself to remove the pit. The best way to cut an avocado is to cut around the pit. If you do this, you will find it much easier to take it out, without the need for a knife or spoon, because a small pull will be enough to release it. By the way, if you thought of getting rid of the pit and throwing it in the trash, don’t rush to do so - read the following article first and discover some of its amazing health benefits.
avocado

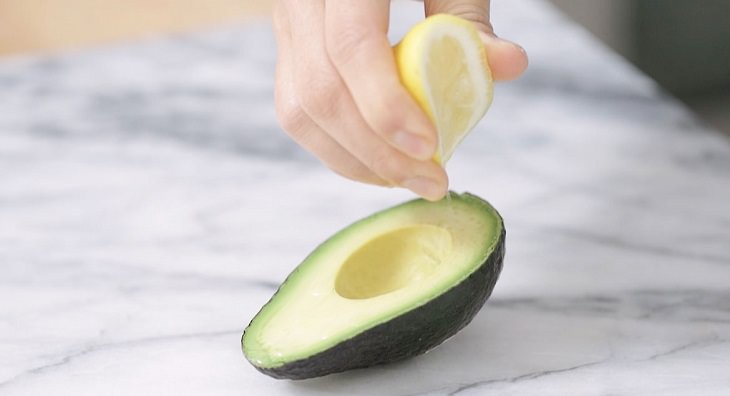
5. Use lemon juice to keep leftover avocado from going bad

If you’re only planning on using half of an avocado make sure to use this trick the keep the other half fresh. Cut a lemon in half, squeeze the juice on the remaining avocado, and then store it refrigerated. The citric acid in the lemon is a powerful antioxidant that will slow down the browning process.
avocado

6. Use avocado as a substitute for butter

There is no doubt that avocado is a healthy vegetable - in part because it contains high amounts of monounsaturated fat, which helps lower cholesterol, as well as reducing the risk of heart disease and stroke. It is also an excellent component for cooking and baking in your kitchen, which can replace much less healthy products, such as butter. One cup of avocado puree is equal to a cup of butter. 

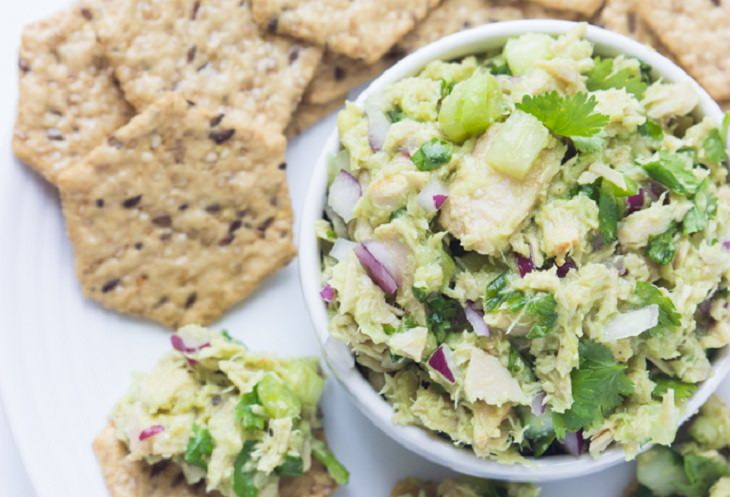
7. Replace the mayonnaise in egg and tuna salads with avocado

Besides cooking and baking, another place where you can use avocado as an excellent substitute is in cold dishes, especially salads. Some people believe that tuna and egg salad are healthy because of their protein content, but a large amount of mayonnaise added to these “salads” isn’t really good for us. Therefore, it is best to replace it with fresh avocado puree.
avocado

8. Lower you fruit shake’s sugar content by adding avocado

What’s better than starting the morning with a refreshing healthy shake made from the freshest fruits in your fridge? While many people agree this is the best way to start their day, they don’t always notice that the fruit they’re using, such as bananas, for example, is full of sugar, which, as everyone already knows, is unhealthy in high quantities. To prevent this, use avocados instead of those sugar-rich fruits – making sure you get the same nutrients and favorite smooth texture, without the harmful sugar.

9. Use avocado slices to make healthy ‘fries’

There aren’t many people who would say no to a plate of fries, but if you want to stick to a slightly healthier and less fatty diet, use avocado slices to create a delicious snack that will enrich your body with better nutritional values and fight off that French fry craving. Just coat the avocado slices in breadcrumbs and bake them in the oven or even fry with a little vegetable oil - either way, they still make for the healthier choice.
avocado

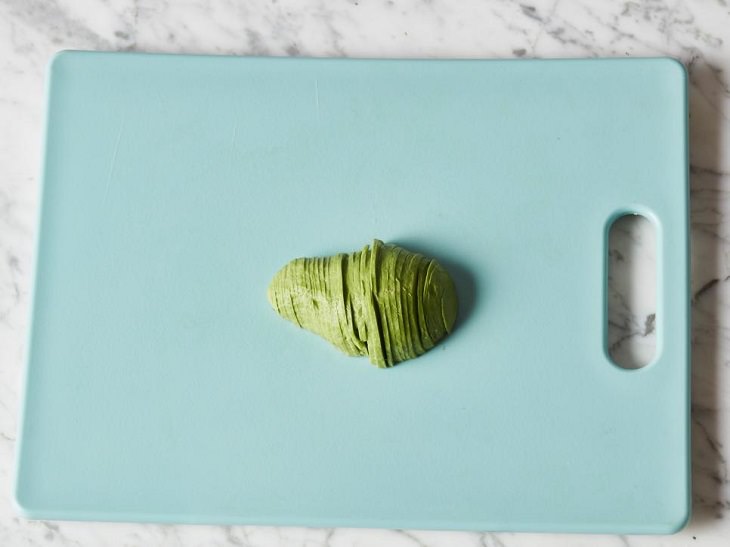
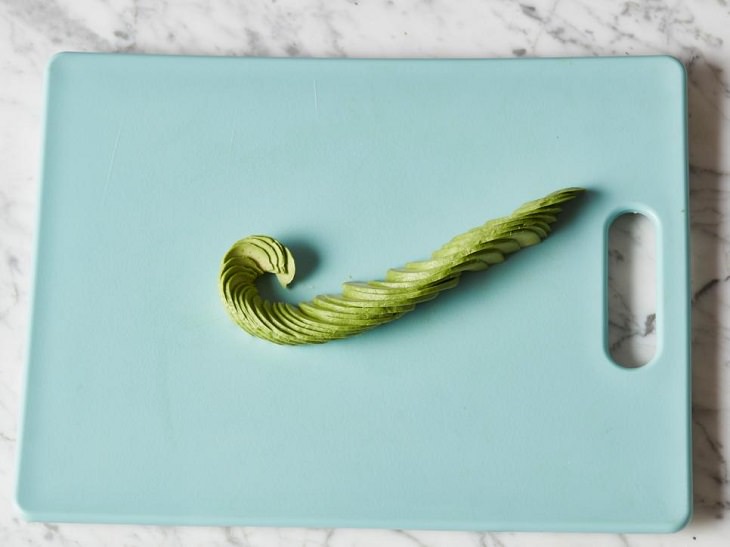
10. Turn your avocado into a beautifully appetizing piece of art

You can upgrade the look of almost any dish by creating a special avocado garnish. To do this: peel your avocado, cut it into two halves, and remove the pit. Now take one half, place it on a cutting board with the pit side facing down, and thinly slice it. 
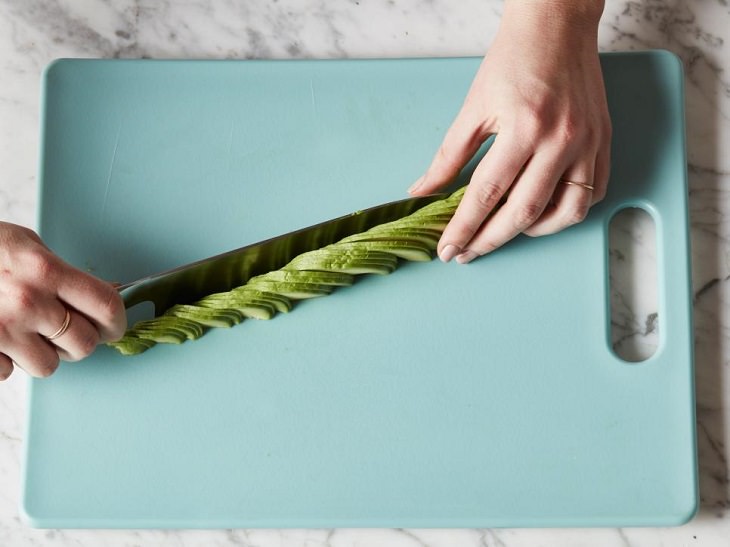
avocado
Now take the flat side of the knife, place it next to the sliced avocado slices, and press it slightly against them, until they begin to overlap each other and form a fan; Keep pressing with the knife until the slices are arranged in a long line.
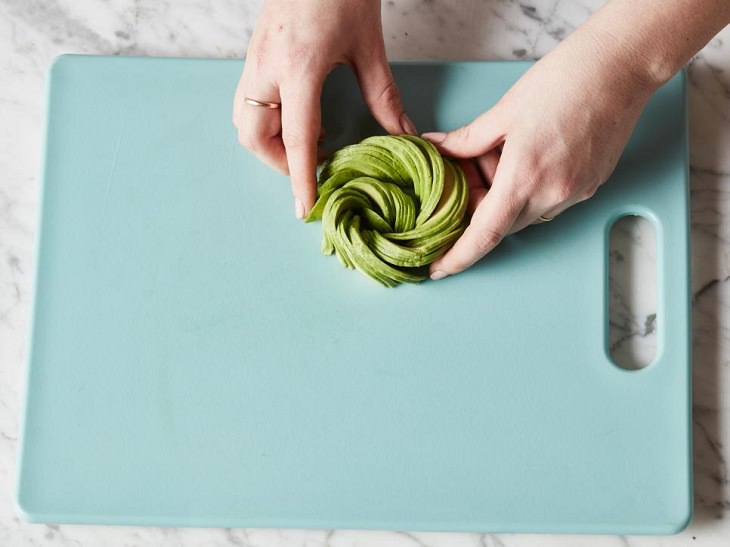
avocado
Now start assembling the garnish - Roll the avocado slices from the narrow end inward, and continue rolling until a perfect circle is formed (as shown in the following pictures).

avocadoNow you can place your avocado artwork on a piece of bread, a pie or vegetable salad and bring beauty to the most mundane of meals!
avocado

11. Easily cut avocado with a peeler

If you’re looking for really thin slices of avocado to use as a dressing or garnish for another dish, just run a peeler over it. doing so will give you thin slices with no almost no effort.

For my other blogs, I'm giving the links below, feel free to view and comment too.
https://cancersupportindia.blogspot.com. for all cancer and health related topics
https://gseasyrecipes.blogspot.com. feel free to view for easy, simple and healthy recipes
https://kneereplacement-stickclub.blogspot.com. for info on knee replacemen